11 Chapter 10: Structural Search and Rescue
Introduction
Welcome! Tansi!
Essentials of Firefighting
Chapter Objectives
- Explain best practices to ensure firefighter survival during interior operations. [4.2.4, 4.3.5, 4.3.9]
- Describe air-monitoring operations. [4.3.21]
- Describe structural search and rescue operations. [4.3.5, 4.3.9]
- Describe victim removal methods. [4.2.4, 4.3.5, 4.3.9]
- Describe MAYDAY protocols. [4.2.4, 4.3.5]
- Describe emergency evacuation methods. [4.2.4, 4.3.1, 4.3.5, 4.3.9]
- Describe rapid intervention crew equipment and duties. [4.3.9]
- Skill Sheet 10-1: Enact the proper procedures for an SCBA air emergency. [4.2.4, 4.3.1]
- Skill Sheet 10-2: Operate an air-monitoring device. [4.3.21]
- Skill Sheet 10-3: Conduct a primary or secondary search. [4.3.9]
- Skill Sheet 10-4: Perform the incline drag. [4.3.9]
- Skill Sheet 10-5: Perform the extremities lift/carry using the two-rescuer method. [4.3.9]
- Skill Sheet 10-6: Perform the webbing drag. [4.3.9]
- Skill Sheet 10-7: Transmit a MAYDAY report. [4.2.4]
- Skill Sheet 10-8: Follow a hoseline or search line out as a withdrawal procedure. [4.2.4, 4.3.5]
- Skill Sheet 10-9: Perform reduced profile maneuvers without removal of SCBA using the side technique. [4.3.1, 4.3.5, 4.3.9]
- Skill Sheet 10-10: Breach an interior wall. [4.3.5]
- Skill Sheet 10-11: Perform reduced profile maneuvers without removal of SCBA using the SCBA-first technique. [4.3.1, 4.3.5, 4.3.9]
- Skill Sheet 10-12: Disentangle from debris or wires. [4.3.5]
Locating and removing victims, generally known as search and rescue, requires firefighters to take calculated risks in hazardous situations. Before participating in this critical aspect of a firefighter’s mission, you must know:
- How to perform a primary and secondary search
- How to use standardized markings to indicate searched areas
- How to work as part of a team
- How to determine the best method for removing victims
- Emergency survival techniques
- General MAYDAY protocol
- How to remove incapacitated firefighters
Now, what?
Let’s get learning!
Lesson 1
Learning Objectives
- Describe the basic principles of forcible entry.
Firefighter Survival During Interior Operations
Firefighting and rescue operations are inherently dangerous. To ensure your survival and that of your fellow fire-fighters, you must learn to:
- Recognize and avoid potential hazards.
- Escape unavoidable hazards.
- Rescue lost or trapped firefighters.
Situational Awareness: Search and Rescue Operations
As mentioned in Chapter 1, Introduction to the Fire Service and Firefighter Safety, communicating your observations when assigned a task is essential for your safety. The following conditions specific to search and rescue operations should be observed and communicated to crew members and/or your supervisor:
- Location and extent of the fire
- Changes in heat level
- Changes to fire behaviour, spread, and growth, including signs of rapid fire development
- Visibility level and changes to visibility (more difficult to see/less difficult to see)
- Changes to the neutral plane in the structure (smoke lowering/smoke rising)
- Smoke colour or change of smoke colour
- Volume and behaviour of smoke
- Known locations of victims or occupants
- Number of known victims or occupants
- You and your team’s starting and available air supply
- Locations of safe havens and alternate exit routes
- Indications of ceiling/floor collapse such as ceiling burn-throughs or sagging floors

Personal Preparation for Survival
If you cannot avoid a hazardous situation, you must know how to survive it.
To do so you must:
- Practice sound firefighting techniques.
- Practice situational awareness.
- Anticipate the types of survival situations you may face.
- Practice MAYDAY and self-rescue techniques.
- Check your own and your team members’ air supply.
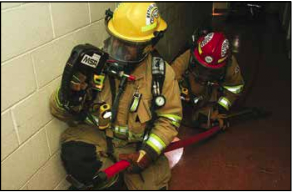
The basic skills of firefighting are also essential survival techniques. For example, forcible entry techniques such as forcing windows and cutting debris can also be applied in an escape. The hoseline used in a fire attack can protect you from a rapidly progressing fire or help you find your way out of a smoke-filled room (Figure 10.1). Under normal conditions, air management increases your work time; but if you are lost or trapped, it increases the amount of time you can survive before escaping or being rescued. The extreme stress of an emergency makes conscious thought difficult, so practice these skills until they become automatic.

Situational awareness will warn you of rapid fire development or structural collapse. If you recognize the warning signs, you should be able to withdraw to safety. If you know your physical limitations, you can monitor your stress level, air consumption, and workload and withdraw before becoming incapacitated.
To be physically and mentally prepared you must:
- Practice basic skills.
- Train for the hazards you will encounter.
- Practice air management techniques.
- Practice emergency exit techniques.
- Make sure that your PPE matches the hazard and is working properly (Figure 10.2).
- Know your duties.
- Know your physical limitations: Watch for signs of fatigue, increased breathing, and increased heart rate.
- Know the limitations of your PPE and air supply system.
- Look out for the members of your crew.
- Listen to your team members.
- Follow orders thoughtfully: If it does not sound right, ask for clarification.
![]()
 Practice situational awareness:
- Look for signs of key fire behaviour indicators, particularly those associated with rapid fire development such as rollover (Figure 10.3).
- Listen, feel, and watch for changes in the environment.
You must also be aware of the psychological effects of obscured vision conditions and recognize when they occur:
- Disorientation
- Fear
- Claustrophobia
- Panic

To overcome the psychological effects of obscured vision conditions you should:
- Remain calm.
- Control your breathing.
- Maintain your situational awareness.
- Stay in contact with your partner(s) (Figure 10.4).
- Focus on your assigned task.
- Rely on your other senses (hearing and touch).
Personnel who experience emotional difficulties when operating in obscured vision conditions should seek professional assistance with these difficulties. The department’s member assistance program can aid those seeking professional help.

Recognition and Avoidance of Hazards
MAYDAY situations you may face include but are not limited to the following:
- Air emergencies: Your facepiece is dislodged; you run out of air; or your SCBA malfunctions. It also occurs if your low-pressure alarm activates, and you are unable to immediately exit the hazard area.
- Lost/disoriented: You are in extreme darkness, or you lose contact with your partner, your hoseline or search line, or an orientation point such as an entry door.
- Entanglement: You are caught on exposed wires, a fallen ceiling grid, or other debris (Figure 10.5)
- Rapid fire development: Rapid rise in heat release rate that exceeds your PPE’s level of protection.
- Collapse/trapped : You are unable to exit due to structural collapse.
Determining Tenability
An untenable environment is not necessarily dangerous to life and health if the proper level of PPE is provided. For example, most interior fire environments are untenable for unprotected victims but can be tenable for firefighters equipped with full structural PPE and SCBA. For firefighters, the environment may remain tenable as long as there is no evidence of structural collapse and heat levels and duration of the interior operations stay within acceptable limits for the PPE and SCBA provided.
Firefighters must use situational awareness and communication to remain alert to changes to tenability.
The environment of a structure fire or damaged structure can change swiftly due to:
- Sudden or unexpected fire spread, and temperature increase within the structure
- Loss of structural stability and possible collapse
- Buildup of smoke and products of combustion
If conditions within the structure become untenable, the personnel operating in and around the structure must be alerted. This alert may come from personnel within the structure, the IC, or the Incident Safety Officer. Personnel should evacuate the structure or take shelter in a safe haven. The IC must be notified once all personnel have evacuated or have taken shelter in a safe haven.

Identifying Safe Havens
During search and rescue operations, firefighters should identify possible safe havens within the structure. Safe havens may be rooms or closet areas where the door can be closed to prevent the spread of heat, smoke, and toxic gases into that space (Figure 10.6). Occupants may be in these safe havens seeking protection from a fire. Even a hollow core interior door may provide several minutes of protection even if it is adjacent to the fire compartment. If conditions deteriorate, firefighters can use door control methods and safe havens as survival procedures. If you seek shelter in a safe haven, you must notify the Incident Commander of your situation.
Air Management
You must regulate air consumption so that you can exit the IDLH safely. In the past, firefighters stayed in the IDLH until their low-pressure alarm activated. This practice placed them at risk because that amount of air is insufficient to exit from deep inside a large or complex structure. Even in a small structure, it may not be enough if you encounter an emergency or must wait for assistance.

There are three key principles of air management:
- Always know how much air you have left.
- Know your point of no return.
- Inform the IC if you must exit the structure.
To know how much air you have left, you must check your gauge regularly, particularly at these times (Figure 10.7):
- Before entering an IDLH atmosphere
- When moving from one area to another
- After periods of heavy work
- At specific intervals, based on SOPs
- When resting
- Before beginning a new assignment
- When the assigned area is reached
Your point of no return is based on:
- How much air is required to exit the IDLH
- The lowest cylinder gauge reading of any member of the team
- Your department’s SOPs
- Environmental conditions
- Your team’s physical and mental condition


Your point of no return must be based on how much air you consume. Simulate emergency conditions during training, and measure how long it takes to consume a full cylinder of air to test consumption rate.
Never leave your team, and never leave a team member alone in the hazard zone. If there are only two team members in a hazard zone, they must leave together (Figure 10.8). Maintain communications with the IC or supervisor for both to receive instructions and to immediately transmit any complications that you or your team are experiencing.
 Effective air management includes knowing how to react in an air emergency. To do so, you must remain calm and follow procedures to determine the cause of the emergency and implement a solution.
Solutions to an air emergency may include any of the following:
- Stay low to the ground and ensure cylinder valve is fully open, as well as opening a bypass valve only as needed and directed by local SOPs.
- Fix or bypass malfunctions if possible.
- If low on air and you have a team member nearby or rescue has arrived, use air-sharing techniques that your equipment supports and local SOPs allow.
- If trapped or disoriented, stay calm, activate PASS device, and control breathing until rescue team arrives.
- If your SCBA mask regulator becomes inoperable and air remains in your cylinder, you can open the bypass/ purge valve to provide positive pressure and breath directly from the cylinder.
- If air runs out before rescue arrives, and there are no other options, create a gap between chin and mask seal to take a breath as needed. Ensure that regulator stays in place and protective hood stays sealed around lower lip of mask.
![]()
Practice these procedures until they become second nature. They will help you to conserve air, increase the time you have to escape, and improve the chances that others will be able to locate and assist you.
Skill Sheet 10-1 describes the proper procedures for an SCBA air emergency.

Shelter in Place
Sometimes the only option is to remain in place. Stay calm, breathe slowly to conserve air, and stay low where the temperature is cooler. After completing your MAYDAY report, take these actions to help rescuers locate you:
- Remain calm and control your breathing.
- Get to an uninvolved, nearby room if possible and close the door.
- Shine a light through available windows to draw attention to your location.
- Continue to communicate on your radio, including information that might be useful to the IC or RIC crews trying to locate you (landmarks, floor or position in the structure).
- Activate your PASS device (Figure 10.9).
- Make noise that will draw attention to your location.
- Shine your flashlight or hand light directly overhead.
- If you are unsure of your location, listen for sounds that provide clues to your location, such as traffic, crews working with tools, or the sound of a pumper.
- Isolate yourself from the fire compartment.
Lesson 2
Learning Objectives
- Describe air-monitoring operations.
Air Monitoring
Firefighters usually perform air monitoring to determine whether the atmosphere at an incident is safe. They usually monitor air quality when responding to emergency medical calls in which victims have collapsed for an unknown reason or search and rescue calls with no fire present. Air monitoring in these situations can identify whether gas leaks of odourless, colourless gases like natural gas or propane caused the emergency. Monitoring may also identify other gaseous, hazardous materials.
When an incident involves hazardous materials, firefighters may be ordered to monitor other gases based on the materials at the scene. They may also perform monitoring during operations to track atmospheric changes. Similarly, firefighters supporting trench or confined space technical rescues may monitor atmospheric levels in the trench or in the confined space.
![]()
All firefighters should be able to monitor air quality. Air monitoring improves firefighter and responder safety for everyone at an incident. The following sections describe air monitoring techniques that can be used at structure fires or in support of hazardous materials and technical rescue operations.
Reasons for Air Monitoring
Air monitoring is conducted to:
- Identify hazards (the potentially hazardous materials the detector is designed to monitor are present and concentrations, CO levels, and oxygen levels) .
- Determine appropriate PPE, tools, and equipment (Figure 10.10).
- Determine perimeters and the scope of the incident (how far hazardous materials have travelled, contaminated areas, and/or potentially safe and contamination-free areas).
- Determine if respiratory protection is needed at a trench, confined space, or other technical rescue.


Air Monitoring Equipment
Air monitoring equipment is only as useful as the operator’s ability to operate it and interpret the data provided.
Responders using air monitoring devices must:
- Fully understand the capability of each device.
- Use the devices correctly (Figure 10.11).
- Understand what is being measured and how the instrument relays the information to the user.
- Interpret the data each device provides accurately.
- Maintain, field test, and calibrate the devices per manufacturers’ instructions.
- Use the devices in accordance with procedures based on:
- Availability, capabilities, and limitations of personnel
- Appropriate personal protective equipment (PPE)
- Appropriate respiratory protection
- Other resources available at the incident
- Information from the Incident Action Plan (IAP)
- Use more than one sampling method and more than one technology to verify monitoring and sampling results, whenever possible.


A firefighter who does not understand how to use air monitoring devices can easily jeopardize his or her safety and the safety of others. For example, the instrument reaction time may take several seconds (Figure 10.12). If firefighters move too quickly, they may find themselves in a situation where the toxic gas concentration is much higher than the meter indicates because they have moved beyond the area where they took initial samples.

 Describing the operation of every manufacturer’s air monitoring equipment lies beyond the scope of this manual. The AHJ or training organization should offer training in the use of its air monitoring equipment. Whenever equipment is purchased in the organization, in-service training should be provided to all personnel. Follow the manufacturer’s instructions for calibrating, operating, and reading air monitoring equipment.
Atmospheric Hazards
Unless there are hazardous materials present, firefighters usually prioritize monitoring for a safe atmosphere to conduct a rescue or identify gases that may have contributed to a medical emergency. Air monitoring identifies atmospheric hazards that dictate necessary PPE and respiratory protection for activity at the scene or tactics for a rescue. Atmospheric hazards generally fall into one of the following categories:
- Oxygen enrichment or deficiency: Measured as a percentage of oxygen in the air using an oxygen meter
- Flammability: Measured as a percentage of flammable gas in the air based upon the gas’s lower explosive limit using a combustible gas indicator (CGI)
- Toxicity: Measured in parts per million of toxic gas in the air using single gas or multigas detectors
Oxygen Enrichment and Deficiency
The atmosphere being monitored may be either oxygen-deficient or oxygen-enriched. Both scenarios pose risks to responders. In oxygen-deficient environments, such as confined spaces, specialized respiratory protection like SCBA is necessary for safe entry.
Conversely, oxygen-enriched atmospheres heighten the flammability potential of fuels, necessitating precautions. Ventilation is key to reducing oxygen levels below 23.5% before entry, with readiness for fire suppression measures.
Normal air comprises 20.9% oxygen. Levels below 19.5% are deemed deficient, mandating SCBA use. Oxygen concentrations exceeding 23.5% pose an increased fire and explosion threat.
Between 20.9% and 19.5%, although breathable, slight deviations suggest air contamination, warranting caution. Even minimal contamination levels can be hazardous, necessitating SCBA use as a precautionary measure.
Oxygen sensors require regular replacement due to degradation accelerated by chemical exposure, like oxidizers and carbon dioxide. Environmental factors such as humidity, temperature, and altitude can also impact sensor reliability.
Flammability
An atmosphere containing a flammable gas, vapour, or mist in excess of 10 percent of its lower explosive limit (LEL) is considered hazardous. Additionally, when grain dust or fine dust from woodworking is suspended in the air, a very flammable or even explosive atmosphere can be created. The LEL of airborne combustible grain dust can be approximated when the dust obscures vision at a distance of 5 feet (1.6 m) or less.
If monitoring equipment indicates the presence of flammable gases or vapors, responders must assume the atmosphere to be flammable or explosive. All nearby sources of ignition should be eliminated, and consideration must be given to delaying entry into the area until ventilation reduces the level of flammable gas or vapor to below 10 percent of its LEL. A sufficient quantity of a fire extinguishing agent specific to the hazard must be ready in case of ignition, as well as personnel standing by to begin suppression efforts.
Combustible gas indicators (CGIs) measure the amount of flammable vapours and gases in the atmosphere in one of these three ways:
- Percentage of the lower explosive limit (LEL)
- Parts per million (ppm)
- Percentage of gas per volume of air
![]()
 Most CGIs measure the LEL, and for this reason, responders may refer to them as LEL meters. Typically, LEL meters will sound an alarm at 10 percent of the LEL of the calibration gas. Even low percentages of LEL indicate that something is in the air, potentially at toxic levels.
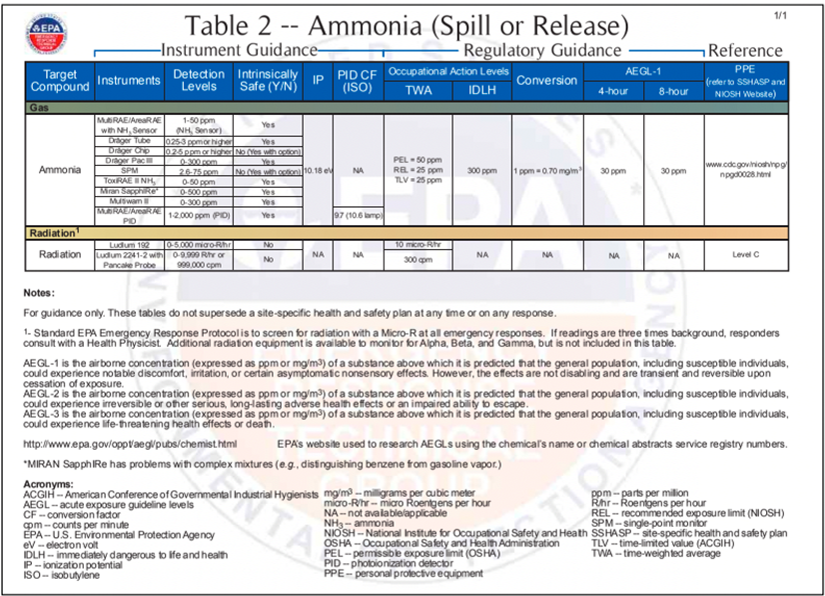
CGIs have specific calibration issues. Each CGI is calibrated to a specific flammable gas (commonly methane, pentane, propane, or hexane). When responders use a CGI calibrated to one gas (such as methane) to measure other flammable gases/vapours (such as propane), the actual LEL of the gas being measured may differ from the reading the CGI displays (Table 10.2).

Table 10.3 provides examples of correction factors (also called multipliers or response curves) for gases. Responders using LEL meters must make allowances for these potential discrepancies to correctly interpret LEL readings. Manufacturers provide response curves and conversion factors that are specific to individual meters.
Toxicity
Toxic chemicals can be encountered during hazmat incidents and fires. For example, fires produce toxic gases such as carbon monoxide. In a structure fire, assume toxic gases, vapours, fumes, and particulates are present in the structure even after the fire has been extinguished. Monitor for air hazards hours and days after a fire event to ensure that the fire ground is safe for operations, such as fire investigations, and for occupants to return to their residences.
Check sources such as Safety Data Sheets (SDSs), Emergency Response Guidebook (ERG), or the National
Institute for Occupational Safety and Health (NIOSH) Pocket Guide to Hazardous Chemicals to determine safe exposure limits for particular toxic materials. If an unknown atmosphere is encountered, a hazardous materials team should identify the contaminant.
Many different technologies detect toxic materials. Some are chemical specific (such as a carbon monoxide detector) while others identify the presence of large groups of chemicals such as organic gases and vapours. Some are very simple, while others are quite complex.

Some chemical monitors use sensors designed to detect a single chemical, such as:
- Carbon monoxide
- Ammonia
- Hydrazine
- Hydrogen cyanide
- Hydrogen sulfide
- Chlorine
- Ethylene oxide
- Phosgene
Firefighters are most likely to use devices that combine individual sensors with a CGI and an oxygen sensor to form multigas monitors (Figure 10.13). A typical 4-gas monitor will detect LEL, oxygen, carbon monoxide, and hydrogen sulfide. Skill Sheet 10-2 provides steps for using a multigas meter.
** NOTE: Monitoring equipment is typically calibrated for and designed to detect a specific gas. Often, the only clue to the presence of a gas other than what the monitor is designed for is a decrease in the percentage of oxygen in the atmosphere. **
Atmospheric Monitoring
Equipment used to sample and analyze a potentially hazardous environment must be:
- Accurately calibrated
- Direct-reading
- Capable of measuring the oxygen concentration
Firefighters use multigas monitors to perform atmospheric monitoring. Mulitgas monitors detect specific toxic gases, as well as flammable gases, and accurately measure both concentrations. At certain facilities, single gas monitors may be used to detect the presence of a specific, known hazard.
Calibration
Because single and multigas monitors are calibrated to detect only a single toxic gas or a limited range of gases, reading the oxygen levels may indicate the presence of gases that monitoring equipment cannot identify. As indicated earlier, if oxygen levels are below normal, something else has displaced the oxygen from the atmosphere. If this situation is encountered, summon additional resources to the scene. Hazardous materials teams or industrial subject matter experts may be able to assist and identify or monitor for a specific atmospheric hazard.
![]()
![]() Regardless of the type or brand of gas monitor that a team uses, firefighters must ensure that the monitor is accurately calibrated prior to initiating atmospheric sampling. The calibration process typically involves using a known quantity of a manufacturer approved calibration gas to test that a monitor’s sensors are reading accurately. Full calibrations should be performed on a schedule that the manufacturer recommends. Rescuers should follow manufacturer’s directions regarding the calibration of their gas monitors.
Regardless of the type or brand of gas monitor that a team uses, firefighters must ensure that the monitor is accurately calibrated prior to initiating atmospheric sampling. The calibration process typically involves using a known quantity of a manufacturer approved calibration gas to test that a monitor’s sensors are reading accurately. Full calibrations should be performed on a schedule that the manufacturer recommends. Rescuers should follow manufacturer’s directions regarding the calibration of their gas monitors.
A bump test is a calibration performed on air monitors being taken to an incident. Bump tests are performed before mounting an apparatus. A bump test verifies the performance of the gas detector and ensures that the sensors respond to the correct target gas or gases in the correct amounts. This calibration gas can be used to quickly confirm a monitor’s accuracy prior to deployment into a hazardous area. If a monitor fails a bump test, it may need a full calibration and should not be taken to the incident. Manufacturer’s instructions should explain how to perform a bump test.
Once at the incident, the firefighter responsible for air monitoring should perform a fresh-air calibration, also known as a zero cal. The detector should be activated in a clean-air environment to ensure a baseline before entering the monitored atmosphere.

Air Monitoring Safety
To stay safe while monitoring, follow these recommended steps:
- Maintain communication with safety officer or IC.
- Follow written procedures.
- Understand the limitations of the instruments and detection devices. Follow manufacturers’ instructions for calibration and usage.
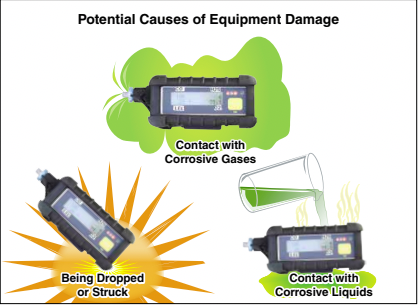
- Remove any damaged device from service immediately. It may no longer be intrinsically safe and may provide false readings (Figure 10.14).
- Be consistent — always wear your appropriate PPE and respiratory protection
-
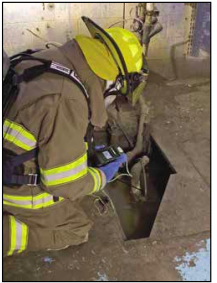
Figure 10.15 Gases may concentrate in low-lying areas and confined spaces. Courtesy of MSA. Work with a buddy — always have a backup team waiting in appropriate PPE and respiratory protection.
- Approach the hazard area from upwind.
- Follow local protocols and SOPs in the event an alarm sounds or a hazardous material is detected.
- Pay particular attention to low-lying areas, confined spaces, and containers where vapours and gases will likely concentrate (Figure 10.15)
- Move slowly, making allowances for instruments with various reaction times.
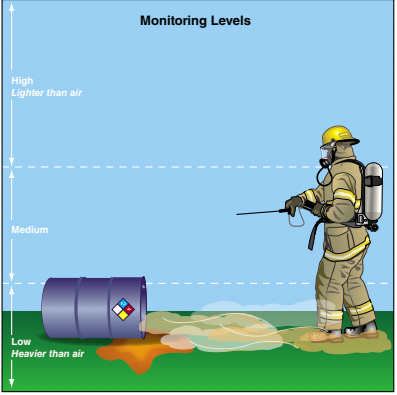
- Monitor for vapours and gases at ground level, waist level, and above the head (Figure 10.16)
![]()
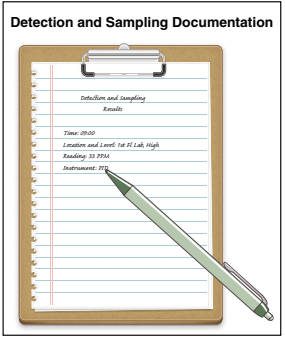
Personnel should accurately document monitoring, detection, and sampling results (Figure 10.17):
- Time of the reading
- Location and level of the reading
- Reading obtained
- Instrument used
- Information downloaded from device if so equipped
Record this information in a notebook immediately. Follow AHJ protocols for reporting readings to the Incident Commander.
Action Levels
The AHJ should establish action levels that describe how firefighters should respond to high-level or low-level alarms while performing air monitoring. Action levels can be defined as a response to chemicals or products that will trigger some action (Figure 10.18). Manufacturer’s recommendations may also influence local SOPs concerning action levels.
When an action level (or action point) is reached, it may trigger:
- Removal of unprotected or unnecessary personnel
- Additional monitoring
- Alteration or adjustment of PPE
- Total area evacuation
Lesson 3
Outcomes:
- Describe structural search and rescue operations
Structural Searches
The NFPA reports that in 2015, structural fires killed 3,280 civilians and injured 15,700 more (Haynes 2016). These figures would be worse if not for the thousands of potential victims that firefighters located and removed from burning structures. To rescue victims, firefighters must be able to conduct an effective structural search.
This requires extensive training and knowledge of:
- Search preparation including building floor plans and search tools and equipment
- Search safety guidelines
- Fire isolation procedures
- Search markings used in your jurisdiction
- Primary and secondary search techniques
- Search methods including oriented, wide-area, and VEIS
Search Preparation
Before entering any area that is immediately dangerous to life and health (IDLH), prepare yourself and other members of your crew or team.
You must ensure that:
- You know who you report to.
- Your portable radio is turned on, working properly, and set to the correct fireground channel.
- Your SCBA is turned on, working properly, and contains a full cylinder of air.
- Your PASS device is turned on and working properly.
- You know your assigned duties and the tactical objectives of your crew or team.
- You are aware of the alternate means of egress from the structure.
In addition to your personal preparation, you should gather whatever knowledge you can about the building’s floor plan. Also, you should have all the necessary tools and equipment, including forcible entry tools, hand light, thermal imagers, and search line.
Building Floor Plan
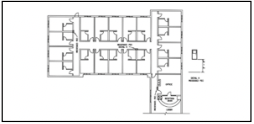
To conduct an effective structural search, firefighters must know the layout or floor plan (Figure 10.19). This knowledge may come from inspections, preincident surveys, architectural plans, or personal observation.
Many fire departments perform periodic preincident surveys of target hazards in their response areas. Preincident surveys allow departments to meet the facility’s owner/occupants and become familiar with the contents, floor plans, building construction, and manufacturing processes.
When new buildings are built or existing structures are modified, architectural building plans are submitted to the local authority having jurisdiction (AHJ) for approval. In some jurisdictions, the fire department receives a copy of the plans and is involved in the review and approval process. The floor plan may also be made available.
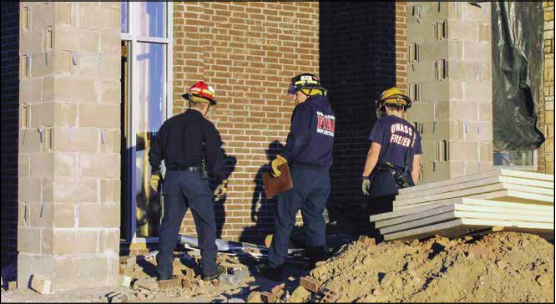
Fire companies should tour buildings under construction or renovation to learn about construction materials and floor plan arrangements (Figure 10.20). New construction surveys are important for residential construction, where the department will not have access for inspections or preincident planning once construction is complete. Another opportunity to observe residential dwellings occurs when the department installs smoke detectors as part of its fire prevention activities.

Finally, your experience can help you estimate the floor plan of a structure. Observe the layout of all structures in your response area, including commercial buildings that you visit regularly. Note the similarities between residential structures such as hotels, motels, apartment buildings, and single-family dwellings (Figure 10.21). After any emergency incident, observe the floor plan and the location of doors, windows, vent pipes, and chimneys. These items, visible from the outside, can give you a general idea of the interior floor plan. Remember, though, interior alterations can drastically change the layout, so be prepared for the unexpected. Attend local zoning meetings; go to a real estate agent’s open houses and get to know local building officials to gain knowledge. The more you learn, the better prepared you will be when an emergency occurs.
Tools and Equipment
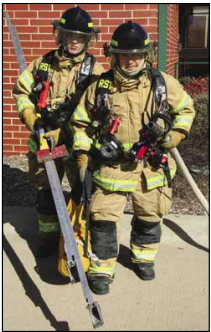
Rescue personnel should carry a variety of tools and equipment when conducting search and rescue operations.
Examples of these tools and equipment may include but are not limited to (Figure 10.22):
- Flashlight(s)
- Thermal imager
- Portable radio
- Forcible entry tools such as an axe, a Halligan tool, or other pry tool
- Charged hoseline(s)
- Rope for search lines
- Ladders (where necessary)
Thermal Imagers
Thermal imagers (TIs) allow firefighters to see sources of heat through darkness and thick smoke. They are also used to locate victims and hidden fires. TIs identify temperature differentials on surfaces. Contrary to the way they are often described, TIs cannot “see through” objects. They can tell you if a surface or area is hotter than the surrounding area. For example, if a TI shows that a wall is hot, then heat has spread from some area to that wall. There could be a fire behind the wall generating this heat or a fire within the wall generating it.
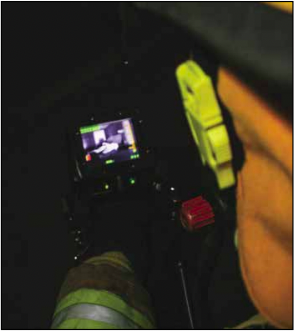
Using TIs during search and rescue or firefighting operations has several advantages:
- Enhances situational awareness.
- Improves visibility in an obscured environment.
- Provides additional information during search.
- May be useful in locating victims, the seat of the fire, or hidden fires (Figure 10.23)
TIs have some limitations:
- They cannot detect a person under or behind furniture or on the opposite side of a wall.
- They cannot “see” through water, glass or other reflective surfaces.
- If a structure is carpeted, TIs may not be able to detect fire on the floors below.
You should be properly trained on the use and interpretation of data for whatever TI your department uses. When in doubt, refer to the manufacturer’s documentation for proper use.
Two NFPA standards include information about the use and requirements for TIs:
- NFPA 1408, Standard for Training Fire Service Personnel in the Operation, Care, Use, and Maintenance of Thermal Imagers
- NFPA 1801, Standard on Thermal Imagers for the Fire Service

Inspect TIs after every use, following the manufacturer’s instructions. Replace batteries as needed, clean them regularly, and make sure they are properly stored. Report damage and/or malfunction immediately.
Like many pieces of equipment, TIs are designed to do one thing. They are valuable tools but should not be relied upon to provide all of the information about a fire or about the locations of victims. TIs are not a replacement for your senses or observations, and like other tools, TIs may fail under fire conditions. However, TIs are still very useful and provide good information about interior conditions at a scene.
Search Safety Guidelines
Search safety guidelines in a structural fire include the following:
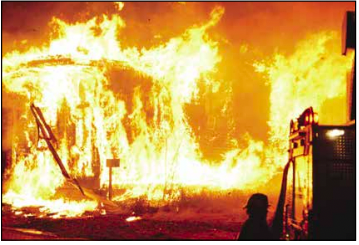
- Do not enter a structure where survivors are not likely to be found (Figure 10.24). If you observe conditions that indicate a lack of survivors, report them to your supervisor.
- Close doors during the search to create protected areas and/or avoid creating additional flow paths in the structure.
- Maintain control of exterior doors to the structure to control available ventilation to the fire while firefighters are conducting searches.
- If there is a possibility of rapid fire development, do not attempt entry until coordinated fire control and ventilation have been implemented.
- Do not freelance. Work according to the Incident Action Plan (IAP).
- Maintain radio contact with the Incident Commander (IC).
- Monitor radio traffic for important information or changes in orders.
- Continuously monitor fire conditions that may affect your safety and that of other firefighters.
- Use your department’s personnel accountability system.
- Be aware of your entry point and the secondary means of egress from the structure.
- Wear full personal protective equipment, including SCBA and personal alert safety system (PASS) device.
- Work in teams of two or more, and always remain in physical, visual, or vocal contact.
- If you encounter fire in a room, close the door and report the condition.
- Search systematically to increase efficiency and reduce the possibility of becoming disoriented.
- Where visibility is limited, stay low and move cautiously.
- Continuously monitor the structure’s integrity and communicate any changes.
- Mark entry doors into rooms and remember the direction you turned when entering. To exit the building, turn in the opposite direction when leaving the room.
- When visibility is obscured, maintain contact with a wall, hoseline, or search line.
- Have a staffed, charged hoseline available when working on the fire floor or the floors immediately above or below. The hoseline can be used for fire suppression, crew protection, and indicating the path out of the structure.
- Coordinate with the IC and ventilation teams before creating any exterior openings to the structure (doors, windows, breaches).
- Inform your supervisor immediately of any room or rooms that could not be searched.
- Report promptly to your supervisor once the search is complete.
Fire Isolation
Locating and isolating the fire must be a priority before any search. Isolating the fire may be accomplished in several ways, depending upon circumstances at the scene. Entering to perform a search provides a ventilation opening to the structure. As a result, even though a search intends to locate victims, ensuring that the fire does not spread beyond the compartment of origin should be a high priority to protect victims and firefighters.
Marking Systems
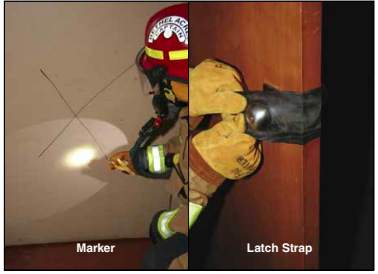
A consistent room marking system is necessary to ensure a thorough, effective search. Searched rooms can be marked using any of the following (Figure 10.25):
- Chalk or crayon markers
- Specially designed door markers
- Latch straps over doorknobs
Marks should be placed low so that they can be seen under the smoke. They can be placed on the lower third of the door, the lower third of the adjacent wall, or in the landing of adjacent stairs. Marking with latch straps has the added advantage of preventing the door from closing, which might trap the search team. Never block the door open with furniture, as this can contribute to fire spread. Also, never place the mark inside the room. Subsequent searchers would then have to enter the room to find your marker. Hazards can also be marked, as they are discovered during search. Follow local protocols for the marking system used in your department.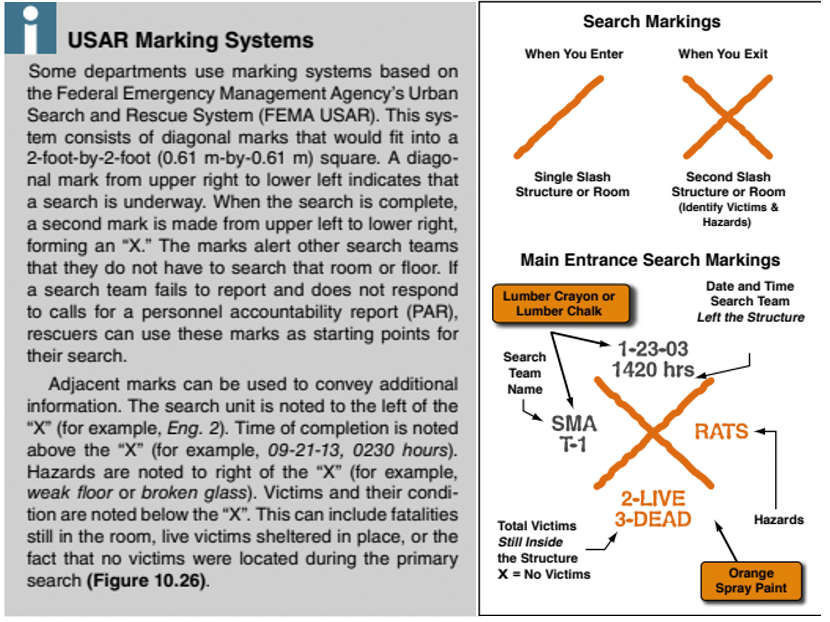
Primary Search
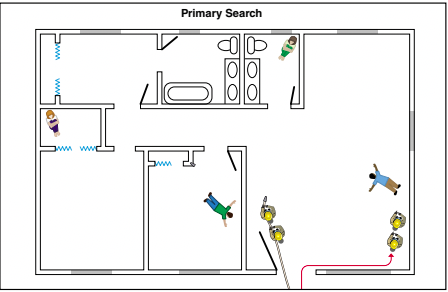
A primary search is intended to rapidly determine the location of victims. The search should be fast but thorough and may be performed either before or during fire suppression operations. During the primary search, quickly check the known or likely locations of victims and all affected areas of the structure (Figure 10.27). While doing so, check that fire conditions are as they appeared from outside, and report any changes you encounter. Your supervisor or the IC will identify the areas for you to conduct a search based on conditions and information gathered at the scene.
During the primary search, always use the buddy system and work in teams of two or more (Figure 10.28). Rescuers working together can conduct a safer, faster search. When searching in an IDLH atmosphere, maintain physical, visual, or voice contact with other team members.
The procedures for conducting a primary (and secondary) search are described in Skill Sheet 10-3.
Secondary Search
A secondary search is a slow, thorough search conducted after the fire is under control. The search’s purpose is to ensure that no occupants were overlooked during the primary search.
Personnel who did not participate in the primary search are often ordered to conduct secondary searches. Using different personnel to conduct the secondary search has the advantage of allowing the search team to use “fresh eyes” and get an unbiased view of the scene. Secondary searches use the same steps and are just as systematic as primary searches to ensure that no rooms or spaces are missed. Structural instability and areas where the fire is starting to rekindle must be reported immediately.
Even though the interior of the building may appear to be free of smoke, do not remove your SCBA while conducting the secondary search. Fire gases such as carbon monoxide and hydrogen cyanide may still be present after the fire is extinguished. Air monitoring is the only effective way to determine the presence of toxic gases. Once air monitoring has determined that the atmosphere is safe, your supervisor or safety officer will tell you that you may remove your SCBA.
Search Methods
Each department has its own search procedures, and you will be trained to apply these in a variety of situations. However, most draw on the same general methods, which can be applied to almost any type of search. Specialized search methods include oriented search, wide area search, and search using thermal imagers.
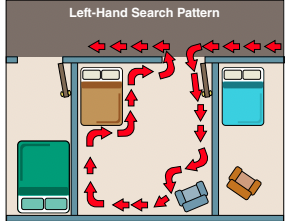
General methods for primary and secondary Left-Hand Search Pattern searches follow a pattern. When you enter a room, turn right or left and follow the walls around until you return to your starting point. As you leave the room, turn in the same direction you did to enter and continue to the next room to be searched. For example, if you turned left when you entered the room, turn left when you leave the room (Figure 10.29). To remove a victim to safety or to exit the building, turn opposite the direction you turned to enter. Always exit through the same doorway you entered to ensure a complete search unless an order to evacuate has been issued. In case of evacuation, your nearest safe means of egress is the best option for exiting the structure.
On the fire floor, start your search as close to the fire as possible and then work back toward the entrance door. This allows your team to reach those in the greatest danger
first. People farther from the fire are in less immediate danger, so they can safely wait as your team moves back toward safety. To reach a point nearest the fire, proceed as directly as possible from the entry point. Advancing a hoseline or deploying a search line will provide a way for you to remain oriented so that you can exit quickly if fire conditions change.
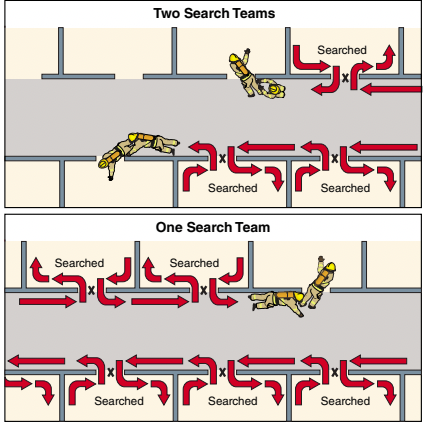
When rooms extend from a centre hallway, both sides should be searched. The supervisor will dictate the search pattern based on the available personnel and scene conditions. For example, if two teams are available, each could search opposite sides of the hallway. If there is only one search team, they could search down one side of the hallway and back up the other side (Figure 10.30). Always control the egress passageways so search teams can escape if conditions change rapidly.
To accomplish this:
- Stage a firefighter at the door to the room to be searched. This firefighter should control the door to control the flow path into the room.
- Close doors to rooms adjacent to the passageway after they are searched.
- Position hose teams at intervals along the path to cool accumulated gases.
- Use thermal imagers to aid in searching the rooms off the hallway for victim heat signatures or fires.
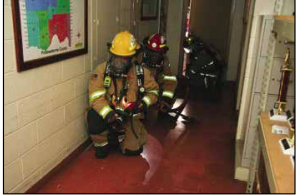
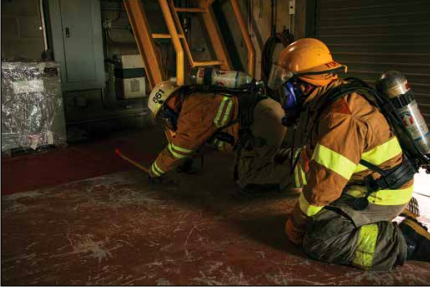
Figure 10. 31 Firefighters moving in a kneeling position.
One good search practice is to get low to the floor to perform a quick survey. Thermal layering and the buoyancy of smoke produce a clear area of vision just above the floor level. Victims, obstacles, or the general layout of a room may be identified more quickly from this perspective.
Illustrating different methods for conducting a search based upon the number of search teams available.
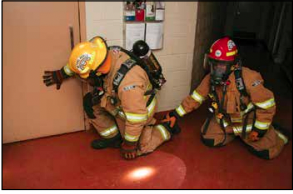
Depending on conditions, you may be able to walk upright or you may have to move forward at floor level to stay below the smoke. Walking is preferable if there is minimal smoke and heat. But in heavy smoke or extreme heat, moving below the smoke level can increase visibility and reduce the risk of tripping or falling. Although crawling or sliding forward in a kneeling position are much slower, an advantage is that it is much cooler near the floor. As an alternative to crawling, moving forward in a kneeling position, one knee down and one knee up, offers better visibility (Figure 10.31).
![]()
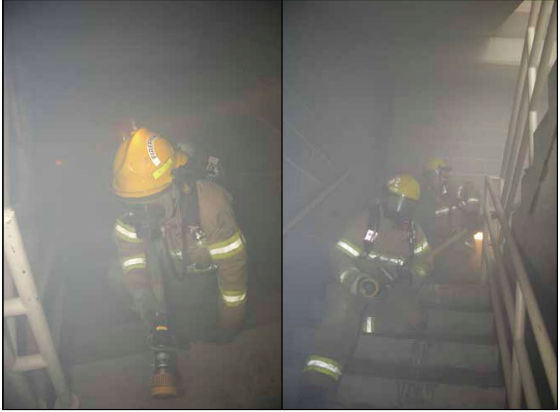
If you have to use stairs while crawling, proceed head first while ascending and feet first while descending (Figure 10.32). Keep your feet and hands as far apart as possible to distribute your weight close to the side of the stairs. That way you can brace yourself if the stairs collapse.
Victims may be found in paths of egress and any areas where they seek shelter from the fire, such as:
- Closets
- Bathtubs
- Behind furniture
- Basements
- Cabinets
- Bathrooms
- Shower stalls
- Under beds
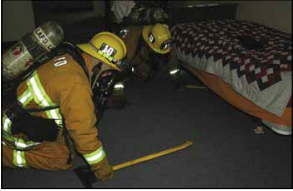
Figure 10. 34 Thermal imagers can assist firefighters in locating victims. - Under stairs
- Attic rooms
Search the perimeter of each room. Because smoke may overcome occupants while they are trying to escape, always check behind doors and on the floor below the windows. As you move around the perimeter, extend your arms or legs to reach completely under beds and other furniture (Figure 10.33). After searching the perimeter, place the tool against the wall and extend your arm or leg toward the center of the room to search the middle of the room.
During the primary search, visibility may be extremely limited. You may have to touch items to identify them, and this may be your only clue as to the type of room you are in. Make sure to search all sides of any object. Never move an object, however, as this may disorient you. If smoke obscures your vision, report this to the IC.
If you have a thermal imager, operate the TI according to manufacturer’s instructions and your department’s SOPs. Slowly scan the TI around the room close to floor level, then rise to scan at a higher level (Figure 10.34). If you encounter furniture, manually search to check beneath and behind it. Open closet and cabinet doors and scan inside with the TI. Remember that the camera screen may “white out” when it detects high levels of heat. Allow it time to readjust before proceeding into a room that has shown a high heat level.
Search teams should maintain radio contact with their supervisor or IC and report their progress in accordance with departmental SOPs. Progress reports and new information are especially important during the primary search. For example, if trapped victims are found, the fire has spread farther than it appeared from the outside, or the search has to be terminated, notify the IC immediately. Reporting on areas that have not been completely searched enables additional search teams to be assigned to these areas.
This prevents fire from spreading into these rooms. Opening doors and windows can disrupt ventilation efforts, spread fire, and draw it toward the opening. Clear any unused hoselines or other equipment for egress pathways. This reduces tripping hazards and generally makes egress less difficult. Be aware of the location of exit pathways in case you have to remove a victim quickly.
Oriented-Search Method
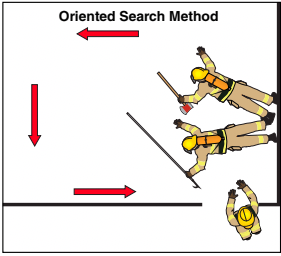
The oriented-search method works as an efficient way for a team to search a room. The team leader remains anchored at the door, wall, or hoseline, while other team members spread out through the room to complete the search (Figure 10.36). All members stay in constant communication with the leader and each other, and update the leader on their progress. They must coordinate their efforts in order to prevent confusion and avoid clustering in one section of the room. The leader may also use a TI to orient the crews and relay more information. After the search is complete, the searchers return to the anchored team leader and proceed to the next room.
Wide Area Search Method
A wide-area search method is sometimes used to conduct a primary search of a large or complex area that is filled with smoke. This system employs a dedicated search line, typically 200 feet (60 m) of 3⁄8-inch (10 mm) rope. A minimum of three team members are required, although larger teams can be more effective.
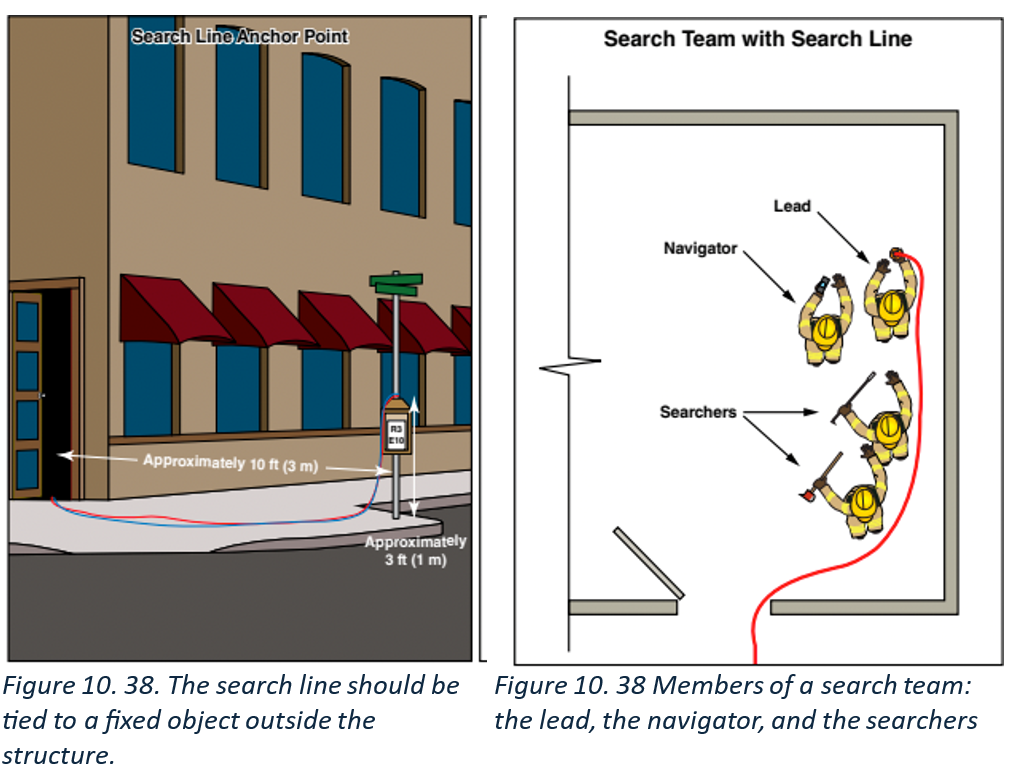
About 10 feet (3 m) outside the entry point to the search area, the end of the search line is tied to a fixed object about 3 feet (1 m) above the floor (Figure 10.37). A tag indicating the unit or company designation is left at that point. An attendant is sometimes stationed at the entry point to maintain communication with the team and monitor their air management.
One team member usually called the lead, picks up the rope bag containing the search line and enters the search area. Another member,
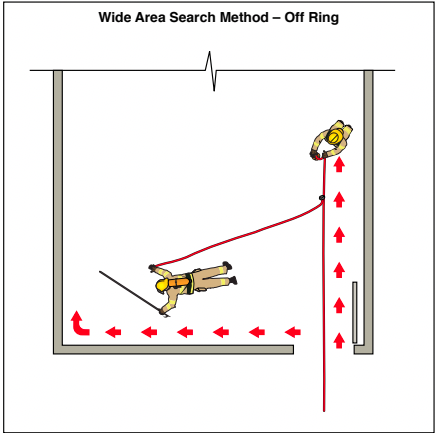
the navigator, closely accompanies the lead (shoulder-to-shoulder). The navigator directs the lead using a hand light and, if available, a thermal imager (TI). One or more searchers equipped with radios follow them. Each searcher carries a tether wrapped around one wrist and a forcible entry tool in the other hand (Figure 10.38). As the team progresses into the building, the search line flakes out behind them, and all members maintain contact with the search line.
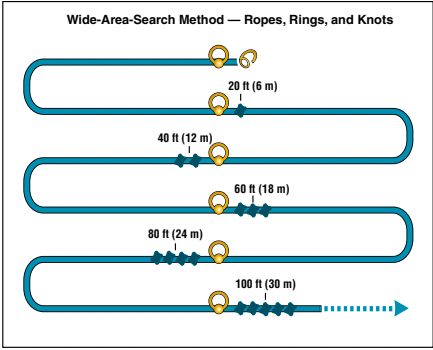
At regular intervals along the search line, markers should be created in the line to indicate distance from the entrance. A knot tied in the line works as a common marker; the knots may be tied in the line before its use to create a rope dedicated to these types of searches. In addition, a steel ring can be attached to the line wherever a knot is tied. The knots indicate the distance from the beginning of the search line and they are always just beyond the ring, so they provide a directional indication – knots toward the fire; rings toward the exit (Figure 10.39).
Tether lines can be attached to the search rope at regular intervals, usually corresponding with the knots tied for distance. The tethers enable team members to search areas perpendicular to the search line. Searchers flake out the tether while moving away from the search line (Figure 10.40). The searchers can use the tethers to guide themselves back to the search line. When the searchers return to the search line, they disconnect the tether and carry it with them out of the structure.
Any time team members move off from the search line, they must stay in voice contact with the navigator. Because searchers are working in a much larger area, air monitoring is even more critical than in other types of searches. The navigator also regularly updates the IC, reporting on fire conditions, what the team has found, and how many knots into the building they have progressed.
VEIS Method
VEIS, which stands for vent, enter, isolate, and search, is a search technique intended to provide rapid search of individual rooms that can be accessed from the exterior, usually through a window. VEIS is usually chosen as a rescue tactic when there is a credible report of possible victims in survivable areas of a structure.
VEIS should only be initiated following a 360-degree size-up of a structure. Rooms that are involved with the fire or show indications of backdraft or flashover should not be searched using the VEIS technique. Only areas that appear to be survivable and unlikely to have fire extension when ventilated should be searched using the technique. Remember, ventilating the structure introduces new oxygen. Fires need oxygen and will move toward new sources in ventilation-limited environments.

Two firefighters (three, if using a ladder) can perform VEIS. First, the searcher ventilates and makes entry. The second firefighter may then enter if desired. The firefighter remains at the point of entry to guide the searcher back to the exit. The two firefighters should maintain verbal contact during the room search and use other means to draw attention to the exit point for the searcher. The four steps involved in VEIS are as follows (Figure 10.41).
Vent
- From the ground or from a ladder, vent the window that will provide entry and egress for victims.
- If the window is on the ground floor, open or remove the window from the side rather than standing directly in front of the window.
- After venting the window, observe the smoke behaviour in the room and/or use a thermal imager to gauge the survivability of the room’s environment.
- Remember, temperatures at or above 162 degrees F (72 degrees C) are high enough to burn human skin and are unlikely to be survivable for unprotected victims.
Enter
- The search firefighter enters the room while the attending firefighter stays at the point of entry.
- The attending firefighter should maintain verbal communication with the searcher and be prepared to guide the searcher back to the entry point.
- If a TI is available, the attending firefighter may use it to provide additional information about the room to the searcher.
Isolate
- The searching firefighter’s first priority is to locate the door(s) to the room and close it.
- Assuming that caution was used in selecting the entry point, the searcher should have time to find the door and close it before the fire moves toward the ventilated room.
- With the door closed, the room is isolated from the fire. The flow path to the fire is also closed, so the room becomes more survivable.
Search
- With the room isolated, the searcher should search the room for any victims.
- If victims are found, the attending firefighter may enter and assist the searcher with rescuing the victim and should communicate the victim’s location to the IC.
- Additional personnel outside the structure will be needed to assist with removing the victim through the window (and possibly down a ladder).
- If no victims are found, the searcher should leave through the entry point, leaving the door closed.
- VEIS is not intended to be the first step in a larger structural search. It is only intended for rapid rescue of a victim(s) and the isolation of individual rooms. Once the room is isolated and the search completed, the firefighters should leave.
Lesson 4
Outcomes:
- Describe victim removal methods

Victim Removal
Victims located during the search must be separated from the hazard. Depending on conditions, this can be done through self-evacuation, shelter-in-place, or rescue.
Victim Self-Evacuation
Most occupants can evacuate a structure on their own or with minimal assistance. For example, you may have to direct them to an alternate exit or close stairwell doors to maintain the integrity of their exit path (Figure 10.42). You may also have to establish a safe haven away from the structure where occupants can be accounted for, treated, and interviewed. Your actual duties in any self-evacuation setting will depend on staffing levels and local SOPs.
Shelter-in-Place
Sheltering-in-place involves moving victims to a protected location within the structure (Figure 10.43).
It is used when:
- The hazard is minor.

Figure 10. 43 In some situations, victims may shelter in place. - It is safer to keep victims inside the structure.
- Victims are incapacitated and cannot be moved.
- There is limited staffing to assist with evacuation.
- The structure can provide a protective barrier between the victim and the hazard.
Sheltering-in-place is common in hospitals, nursing homes, correctional facilities, high-rises, and high-hazard industrial sites. The protected location may be predetermined during a preincident survey or chosen based on the size-up of the incident.
Only your supervisor or the IC can make the decision to shelter-in-place. If you observe any condition within the structure that might influence the safety of this method, report it immediately.
Victim Removal Techniques

Victim removal is required when conditions prevent self-evacuation and sheltering-in-place, or when victims are directly threatened. You may have to extinguish a fire that has cut them off from an exit, provide them with an alternate exit pathway or remove debris from a victim who has been pinned. You may also have to carry injured or unconscious victims to safety.
Injured victims should not be moved until they have been assessed and treated, unless they (or you) are in immediate danger. The primary danger in moving victims quickly is the possibility of aggravating a spinal injury. But in an extreme emergency, preserving the victim’s life becomes the first priority. Even in an emergency, never pull a victim sideways — instead, pull along the long axis of the victim’s body. If the victim is on the floor, pull on the victim’s clothing in the neck or shoulder area (Figure 10.44).
Improper lifting technique is a common cause of injury. Keep your back straight and lift with your legs, not your back. One rescuer can safely carry a small child, but two to four may be needed to safely carry an adult. Follow these safety guidelines:
- Lift as a team.
- Focus on keeping your balance.
- Support the head and neck.
- Avoid unnecessary jostling.
Never drag or carry a victim through the hazard zone unless there is no other choice.

The following are types of carries and drags that fire service personnel frequently use (Figure 10.45):
- Incline Drag: The incline drag enables a rescuer to move the victim up or down a stairway or incline. It is especially useful for moving unconscious victims. This method is described in Skill Sheet 10-4.
- Extremities Lift/Carry: The extremities lift/carry enables two rescuers to move any victim. This method is described in Skill Sheet 10-5.
- Webbing Drag: In this drag, a rescuer pulls on a section of webbing that has been wrapped around the victim’s body. The webbing drag is useful when heat and smoke force you to stay low, or the victim is a downed firefighter wearing an SCBA. This method is described in Skill Sheet 10-6.
- Cradle-in-Arms Lift/Carry: The cradle-in-arms technique is used to carry children or small, conscious adults. It is not practical for unconscious adults because of the victim’s weight and relaxed body, and the difficulty in supporting the head and neck.
- Seat Lift/Carry: The seat lift/carry enables two rescuers to carry a conscious or unconscious victim.
- Litter Carry: Occasionally, rescuers may use a litter to remove a victim. The long backboard litter is common, but other types include the standard ambulance cot, army litter, basket litter, and scoop stretcher. Similar techniques are used for moving people onto litters regardless of the type of litter.
** NOTE: Occasionally, rescuers will need to assist a victim down a ladder. The techniques for this operation were described in Chapter 8, Ground Ladders. **
Lesson 5
Outcomes:
- Describe MAYDAY protocols
Emergency Calls for Assistance – MAYDAY Protocols
Immediate communication of danger increases your chances of survival. The word “MAYDAY” is used whenever a firefighter is in immediate danger. First, describe the problem and give your location to your partner, team leader, or supervisor. Remain in place until another firefighter reaches you.


If you think your life is in immediate danger, transmit your department’s MAYDAY signal, communicate your situation to the IC immediately, then activate your PASS device (Figure 10.46). The sooner rescuers know you are in danger, the sooner they can come to your aid.
If possible, communicate your air supply status and any actions you are taking. Describe your location as clearly as possible so that rescuers know where to search for you. Stay in contact with Command and keep them informed if your situation changes. Skill Sheet 10-7 describes the steps when transmitting a MAYDAY report.
** NOTE: Transmit your MAYDAY before activating your PASS device. An activated PASS device emits a signal that can prevent you from being heard over the radio. If your PASS device has activated automatically before you are able to transmit, deactivate your PASS device before transmitting your MAYDAY signal on the radio, then reactivate it after your transmission is finished. Practice this procedure in training. **
When MAYDAY is broadcast, the following actions must immediately be taken:
- All radio traffic ceases and only traffic relating to the MAYDAY is allowed.
- Nonessential activities cease and units are directed to assist with searching for the firefighter who has broad-cast the MAYDAY.
- The rapid intervention crew (RIC) is dispatched to locate the downed firefighter (Figure 10.47).


Always listen closely when a MAYDAY transmission gets made. If you are near the downed firefighter, you may be able to assist with the rescue. Listen closely for your orders after the transmission and do not freelance. All teams must remain disciplined and focus on their tactical assignments. If conditions within the hazard zone change rapidly, the IC may give orders for all personnel to exit. You must be familiar with the ways that your department sounds an evacuation signal, such as audible warning devices on the apparatus and radio messages ordering interior crews to immediately exit. Exit orders are typically handled like other emergency traffic and are broadcast several times to ensure that everyone hears them. Warning devices work well in small structures but may not be heard in a large structure, where a radio message may be the only means of notifying personnel. When any evacuation signal is given, all units on scene must give a personnel accountability report (PAR). Exiting crews should proceed to designated safe areas outside the collapse zone.
Lesson 6
Outcomes:
- Describe emergency evacuation methods.
- Describe rapid intervention crew equipment and duties.
Evacuation
The best survival tactic is to constantly monitor your surroundings, using your situational awareness to help keep you safe. But if a MAYDAY event does occur, you must choose one of three courses of action: remaining in place, seeking safe haven, or escaping. Whichever you choose, it is vital that you remain calm, signal your MAYDAY as soon as possible, and relay your planned course of action. Panic is a leading contributor to firefighter death.
Immediate Actions to Improve Survivability
Improving survivability entails taking actions that buy you more time to escape or otherwise improve your situation. Many times these actions can be performed before you communicate your MAYDAY.

Actions that improve survivability include:
- Staying low to the floor: Temperatures are cooler and air may be less contaminated.
- Using your hose stream for protection: In a thermal emergency, use your hose stream to cool the overhead gases as you rapidly retreat (Figure 10.48).
- Closing doors between you and the fire: This places a barrier between you and the fire, allowing you time to find an egress point or breach a wall to escape.
- Using tools to shore building material: During a building collapse, you may be able to use your hand tools to shore up building materials. This gives you time to find an egress point or escape the collapse area.
- Filtering toxic air: This should be done with your face low to the floor and without removing your regulator. Break the seal of your mask and use your protective hood to filter each breath. Be aware that this will not remove toxins such as carbon monoxide (CO) and hydrogen cyanide (HCN). Breaking your mask seal will expose you to heated air. It is a last resort if your SCBA cylinder is completely exhausted.
Escaping to a Safe Haven
Escaping to a safe haven is the best option in any of the following circumstances:
- There is an imminent threat of structural collapse.
- There is not a safe place to shelter.
- You have completely exhausted your air supply.
- Rapid fire development is about to occur.
- You have been ordered to abandon the structure.

A safe haven is any area that is no longer considered a hostile environment. Escape from a hostile environment requires teamwork. Practice emergency procedures as a team so that all members know their individual roles and responsibilities. If your team is intact, follow your hoseline or search line to your original point of entry to escape as a unit. In the event or threat of rapid fire progression, do not leave the nozzle to follow your hoseline out. Withdraw the line and operate the nozzle as needed.
Skill Sheet 10-8 describes the procedures for withdrawing from a hostile environment with a hoseline or search line.
If you are separated from your team, follow the hoseline, search line, or wall in the direction from which you came (Figure 10.49). If you are following a hoseline, feel the first set of couplings you come to. The female cou-pling is on the nozzle side of the set, and the male coupling is on the water source side. The male coupling has lugs on its shank; the female coupling does not. Following the hoseline will lead you to an exit or to the nozzle team. Communicate your progress to your supervisor or to the IC.
** NOTE: This technique for following a hoseline out of a structure does not apply to two-way or quick-connect couplings. **
If you decide to escape, follow these safety guidelines:
- Remain calm.
- If you have a hoseline, maintain control of the nozzle and use it for protection.
- Orient yourself to points of reference such as hoselines, search lines, walls, and points of exterior light.
- Stay low.
- Keep in contact with the wall.
- Stay in radio communication.
- Remember which level of the structure you are on.
- Control your breathing.
- Check your air supply frequently and report to Command.
When smoke is dense and low, you may use a duck walk or a low-profile maneuver during your escape. If you can see the floor, you can use a crouched walk or duck walk. This method is slightly faster than crawling, but it is more dangerous unless you can clearly see the floor. The low-profile maneuver involves crawling, which is an effective way of moving in areas of low visibility (Figure 10.50). One advantage of crawling is that the area close to the floor is cooler and may have better visibility. It also allows you to feel in front of you with your hand or a tool, warning you of objects or dangerous openings in

 To search for an exit, locate a wall and crawl along it. With one hand, sweep the floor ahead of you to avoid openings into which you might fall. With your other hand, sweep the wall to find a window. Reach as high as you can without standing. When you locate a window that can be opened, determine whether the window will allow you to exit. Notify Command of your location and ask if opening the window will make interior conditions worse. If there is a door between yourself and the fire, close it before opening the window. If you are on the ground floor, open the window or break it with your forcible entry tool. Make certain the frame is completely clear of glass shards. Climb through the window and lower yourself to the ground feet first.

If you are on an upper floor, find out if there is an aerial or ground ladder at or near the window. If there is, climb out and onto the ladder. If there is not, report your location and your need for a means of egress. If you have an escape rope system, secure it to a sturdy interior point, climb through the window, and descend. You should only do this if you have been properly trained in this form of escape.
Breaching an interior wall may give you access to a safe haven or a room from which you can safely exit the building. However, this is not a preferable method since it requires strength, depletes air supply, and creates an additional flow path. Interior walls are generally made of drywall, wood, or plaster and lath making them easier to breach than exterior walls. Exterior walls are made of masonry, concrete, metal, or wood, and are very difficult to penetrate with hand tools.
To breach a wall, remain low and use your forcible entry tool to make an opening. Remove enough wall material to make a space large enough to crawl through, then make an opening in the wall on the other side. Use your forcible entry tool to sound the floor on the other side of the wall and to locate any obstructions (Figure 10.51). Look into the next area before entry to ensure conditions appear better than where you are. You may have to adjust your SCBA to fit through the opening. Loosen your right shoulder strap and waist belt, then shift the SCBA until it is tucked under your left arm. This allows you to exit on your side through an opening with limited clearance.
Skill sheet 10-10 describes the method for breaching an interior wall.
You can also exit SCBA-first through walls with standard 16-inch (405 mm) stud spaces. You should only remove your SCBA as a last resort because it increases the risk of becoming separated from your air supply.
Skill sheet 10-11 describes reduced profile maneuvers for fitting through an interior wall breach without removing your SCBA.
If you become entangled, immediately broadcast a MAYDAY before attempting to extricate yourself. Using a type of swim stroke to work your way out of the entanglement, you may be able to free yourself. It is easier to move back the way you came than to move forward through the entanglement. It is a good practice to carry wire cutters in a pocket that you can access even if your movement is limited. You can use the wire cutters to cut nonelectrical wire to free yourself.
Skill Sheet 10-12 describes the procedure for disentangling from debris or wires.
Rapid Intervention
Occupational Safety and Health Administration (OSHA) regulations and NFPA 1500 require that a rapid intervention crew (RIC) be standing by whenever firefighters are in any hazard zone. RIC consists of at least two members who are prepared to rescue injured or trapped firefighters. They must be trained in firefighter rescue and equipped with the same PPE as the interior fire fighting crews at the incident. Sometimes more than one RIC is assigned to stand by, especially if interior crews entered the building at multiple points.
 Mandatory RIC equipment can be described using the acronym AWARE: Air, Water, A Radio, and Extrication.
Teams carry (Figure 10.52):

- A spare SCBA to provide breathing air for a downed firefighter
- A hoseline to create a defensive space
- A radio to communicate with Command
- Forcible entry tools for extrication
They may also be equipped with:
- Flashlights or handheld lights
- Thermal imager (TI)
- Power saw
- Search lines
- Litter
- Attic ladder
- Spare-breathing air cylinders
After any MAYDAY transmission, the IC will conduct a PAR, establish the location of the downed firefighter, and maintain communications with the downed firefighter and the RIC. The IC may also order a brief shutdown of all pumps, generators, fans, and other noise-producing devices so that the firefighter’s PASS device can be better heard. If these actions are unsuccessful, the RIC follows the firefighter’s hoseline or search line into the structure, then begins its search from the firefighter’s last known location.
The RIC should stop frequently and briefly remain silent, especially after moving from one room or area to another. This will help them hear the downed firefighter’s PASS device sounding. To be silent, crew members may hold their breath for a few seconds when the search team member gives the signal. This may allow rescuers to hear faint calls for help or the sounds of the downed firefighter’s SCBA exhalation valve operating.
Tracking Devices
Digital radio transceivers enable lost or disoriented firefighters to be easily located. These tracking devices were developed to locate avalanche victims but have been adapted for use in the fire service. The transceivers are about the size of a PASS device and mounted on the SCBA harness. They have a range of approximately 100 feet (30 m) and do not interfere with other, on-scene radio transmissions.
Like PASS devices, tracking devices are always turned on when entering an IDLH atmosphere. Unlike PASS
devices, walls, floors, or other solid objects do not block tracking devices’ low-frequency signal, which enables rescuers to easily locate a downed firefighter, even from outside the building. Lost or disoriented firefighters can switch the transceiver from standby mode to a search mode. In this mode, the device displays the distance and direction toward another transceiver or to an egress transmitter that has been positioned near an exit.
Removing Located Firefighters
- After locating the downed firefighter, the RIC checks his or her air supply. If necessary, the team may connect a full replacement cylinder. They also deactivate the PASS device and confirm or determine the firefighter’s identity.
- The RIC notifies Command of the firefighter’s location and status. If the firefighter is trapped or injured assistance will be requested.
- While waiting for help to arrive, the team will mitigate hazards that threaten the downed firefighter’s safety. If necessary, they may move the firefighter to a safe haven.
- In most cases, exiting the IDLH atmosphere takes priority over stabilizing the firefighter’s injuries.
- If the firefighter is unable to walk, the rescuers should move him or her to safety. Even if the firefighter is uninjured and able to walk, rescuers should escort him or her to a safe location (Figure 10.53).

General guidelines you should follow when removing a firefighter from a hazardous location include:
- Firefighter with functioning SCBA: If the firefighter has a functioning SCBA, the team must move the fire-fighter carefully so as not to dislodge the mask.
- Firefighter with non-functioning SCBA: If the firefighter does not have a functioning SCBA, the team must either connect the firefighter’s facepiece to a functioning SCBA or quickly remove the firefighter from the hazardous atmosphere.


