8 Chapter 7: Ropes and Knots
Welcome! Tansi!
Essentials of Firefighting
Chapter Objectives
- Differentiate between life safety rope and utility rope. [4.3.20]
- Describe the various materials and methods used to construct rope. [4.3.20]
- Describe the procedures for inspecting, cleaning, and maintaining ropes. [4.3.20, 4.5.1]
- Describe how webbing is used, inspected, maintained, and stored. [4.5.1]
- Identify types of knots. [4.3.20]
- Describe the procedure for hoisting various tools and equipment. [4.1.2, 4.3.20]
- Explain how ropes and knots are used during rescues and at other emergencies. [4.3.3, 4.3.9]
- Skill Sheet 7-1: Inspect, clean, and store rope. [4.5.1]
- Skill Sheet 7-2: Tie an overhand knot. [4.3.20]
- Skill Sheet 7-3: Tie a clove hitch. [4.3.20]
- Skill Sheet 7-4: Tie a clove hitch around an object. [4.3.20]
- Skill Sheet 7-5: Tie a figure-eight knot. [4.3.20]
- Skill Sheet 7-6: Tie a figure-eight on a bight. [4.3.20]
- Skill Sheet 7-7: Tie a figure-eight follow through. [4.3.20]
- Skill Sheet 7-8: Tie a water knot. [4.1.2, 4.3.20]
- Skill Sheet 7-9: Hoist an axe. [4.1.2, 4.3.20] 17.
- Skill Sheet 7-10: Hoist a pike pole. [4.1.2, 4.3.20]
- Skill Sheet 7-11: Hoist a roof ladder. [4.1.2, 4.3.20]
- Skill Sheet 7-12: Hoist a dry hoseline. [4.1.2, 4.3.20]
- Skill Sheet 7-13: Hoist a power saw. [4.1.2, 4.3.20]
Ropes and webbing are used to perform many fire service tasks. This chapter provides basic knowledge about the proper use, selection, care, and maintenance of ropes and webbing and shows you how to tie a variety of knots.
Now, what?
Let’s get learning!
Lesson 1
Outcomes:
- Differentiate between life safety rope and utility rope.
- Describe the various materials and methods used to construct rope.
- Describe the procedures for inspecting, cleaning, and maintaining ropes.
- Describe how webbing is used, inspected, maintained, and stored.
Rope and Webbing
Rope is one of the oldest and most common tools used by firefighters. You will be trained to use rope in a variety of applications, including:
- Rescues
- Hoisting tools
- Securing unstable objects
- Cordoning off areas
- Gaining access to areas above and below ground level
You must know the different types of ropes, what they are made from, and how they are constructed. You must also know how to inspect, clean, store, and maintain them, and keep accurate records of their use.
Life Safety Rope

Life safety rope is designed to be used only for rescue and other emergency operations. It is also used to raise, lower, or support firefighters during training. Life safety rope should not be used for other utility purposes.
NFPA 1983, Standard on Life Safety Rope and Equipment for Emergency Services
- This standard specifies that only rope of block creel construction using continuous filament virgin fibre for load-bearing elements is suitable for life safety applications (Figure 7.1). Rope made of any other material or construction must not be used to support firefighters or victims.
- It requires manufacturers to provide information regarding proper use, inspection and maintenance procedures and criteria for retiring life safety rope from service.
- Ropes should pass field inspections in accordance with manufacturer and AHJ requirements.
- To be reused in life safety situations ropes meet the following criteria:
- No exposure to heat or direct flame
- No exposure to any impact load
- No exposure to the liquids, solids, gases, mists, or vapours of any chemical or other material that can deteriorate rope
Impact Loading
Impact loading cannot be detected by the manufacturer’s recommended regularly scheduled inspections. Start and keep a rope log throughout the rope’s working life. Maintaining accurate rope logs ensures that life safety ropes remain a reliable source of protection for rescuers and victims.
New Life Safety Rope
When life safety rope is purchased, it must be permanently identified. Many departments have personnel mark the ends of new ropes with the unit number and the date that the rope was placed in service. Marking the ends of new ropes can be done with a printed label sealed to the rope ends with a liquid compound made for this purpose.
Removing Life Safety Rope from Service
Remove a life safety rope from service if it has been subjected to an impact load, fails inspection, has been used only as utility rope, or is marked for destruction. Refer to your jurisdictional policy regarding the reclassification of life safety rope as utility rope. You must alter the rope in some way so that it cannot be mistaken for a life safety rope and unintentionally used again for that purpose. You can discard the rope altogether, or you can remove the manufacturer’s label, cut the rope into shorter lengths, and clearly mark it as utility rope. Life safety rope that has been converted to utility rope is referred to as downgraded.

Utility Rope
Utility rope can be used to hoist equipment, secure un-stable objects, or cordon off an area (Figure 7.2). Although the rope industry has standards addressing the properties, care, and use of utility rope, NFPA does not have standards addressing utility rope. Downgraded life safety rope may be used as utility rope if it is still in good condition. Inspect utility rope regularly to see if it is damaged.

Rope Materials
Fire service rope can be constructed from synthetic or natural fibres. Synthetic fibres are used to construct both life safety and utility ropes while natural fibres are only permitted for utility ropes. The main difference between synthetic and natural fibre ropes is the material used for construction, which affects the use and longevity of each type of rope. Synthetic ropes are replacing natural ropes as utility ropes because natural fibre rope loses its strength when it gets wet and rots rapidly.
Synthetic Fiber Rope
- Synthetic fibres include:
- Polypropylene
- Nylon
- Kevlar TM
- Polyester
- Polysteel®
- Spectra®
- Synthetic fibre rope disadvantages:
- Melt when exposed to heat.
- Synthetic fibre rope advantages:
- Excellent resistance to water, mildew, mould, rotting, and shrinkage
- Longer life span than natural fibre rope
- Lightweight yet very strong
- Easy to maintain
Natural Fiber Rope
- Most natural fibre rope is made from plant fibres such as:
- Manila
- Sisal
- Hemp
- Cotton
- Natural fibre ropes should not be used for life safety applications.
- Natural fibre rope disadvantages:
- Prone to mildew and mould.
- Deteriorates when exposed to chemicals.
- Burns when in contact with embers or open flame.
- Natural fibre rope advantages:
- More resistant to sunlight than synthetic rope
- Chars rather than melts (fails) when exposed to heat

Rope Construction
The most common types of rope construction are (Figure 7.3):
- Kernmantle
- Laid
- Braided
- Braid-on-braid
Kernmantle Rope
Kernmantle Rope: A jacketed synthetic rope composed of a braided covering or sheath (mantle) over a core (kern) of the main load-bearing strands (Figure 7.4). Kernmantle construction is typically used for life safety rope while all other types of rope construction are used for utility ropes.

Composition
- The Core
- Its strands run parallel to the rope’s length and work with the covering to increase the rope’s stretch resistance and load characteristics.
- It is made of high-strength fibres, usually nylon, which accounts for 75 percent of the total strength of the rope.
- The Sheath
- The sheath provides the rest of the rope’s overall strength and protects the core from abrasion and contamination.
- Kernmantle rope comes in both dynamic (high-stretch) and static (low-stretch) types.
- Dynamic Rope – is used when long falls are a possibility.
- To reduce the shock of impact in falls, dynamic rope is designed to stretch without breaking.
- Because this elasticity is a disadvantage when trying to raise or lower heavy loads, dynamic rope is not used for hoisting applications other than as a belay line.
- Dynamic Rope – is used when long falls are a possibility.
- Static Rope – is used for most rope-rescue operations.
- It is designed for low stretch without breaking.
- According to NFPA 1983, low-stretch rope must not elongate more than 10 percent when tested under a load equal to 10 percent of its breaking strength.
- Static rope is used for rescue, rappelling, and hoisting. It is also used where falls are not likely to occur, or only very short falls are possible.
Laid (Twisted) Rope
Laid Ropes: Constructed by twisting fibres together to form strands, then twisting the strands (typically three) together to make the final rope (Figure 7.5). Most natural fibre ropes and some synthetic ropes are this type. Laid ropes are used exclusively as utility ropes.

- Disadvantages of laid ropes
- They are susceptible to abrasion and other physical damage.
- Damage immediately affects the rope’s strength because such a large proportion of the load-bearing strands are exposed.
- Advantages of laid ropes
- The strand exposure makes laid ropes easy to inspect.
Braided Rope

Braided Rope: Constructed by uniformly intertwining strands of rope together in a diagonally overlapping pattern (Figure 7.6). Braided rope is mostly used as utility rope. Most braided ropes are synthetic, although some use natural fibres.
- Advantages of Braided Rope:
- It is less likely to twist during use than laid rope,
- Disadvantages of Braided Rope:
- Its load-bearing fibres are still vulnerable to direct abrasion and damage.
Braid-On-Braid Rope

Braid-on-braid Rope: Consists of a braided core enclosed in a braided sheath. It is also known as Double-braided Rope. Braid-on-braid rope is most often used as a utility rope.
Braid-on-braid Rope vs kernmantle Rope
- Braid-on-braid sometimes gets confused with kernmantle rope because both are jacketed.
- Kernmantle rope has a core rope strand running the length of the rope while braid-on-braid rope has a braided core running the length of the rope (Figure 7.7).
Advantages of Braid-on-braid Rope
- Braid-on-braid rope is very strong.
- Half of its strength is in the sheath and the other half is in the core.
Disadvantages of Braid-on-braid Rope
- It does not resist abrasion as well as kernmantle rope.
- The sheath may slide along the inner core of the rope.
Rope Maintenance
All rope must be properly maintained (inspected, cleaned, and stored,) so that it is ready for use when needed. A log must be kept so that personnel can record the rope’s use and maintenance history. Skill Sheet 7-1 describes the procedures for inspecting, cleaning, and storing a rope.

Inspecting Rope
Personnel should inspect all ropes after each use and inspect unused rope at least once a year. Document inspections in the rope log. If damage is found, remove the rope from service and have it destroyed.
Damage includes:
- Embedded shards of glass (Figure 7.8)
- Metal shavings (Figure 7.9)
- Wood splinters
- Foreign objects that can damage the fibres

Kernmantle Rope
In addition, Firefighters should inspect rope for:
- Irregularities in shape or weave
- Foul smells
- Discolouration from chemical contamination (Figure 7.10)
- Roughness
- Abrasions
- Deterioration (fuzziness)
**NOTE: Some deterioration is normal. Rope that is excessively fuzzy in one spot or overall should be removed from service. **

Laid Rope
Synthetic laid rope should be untwisted so that all sides of each strand can be inspected. In synthetic
rope, mildew is not necessarily a problem because the fibre resists rotting and moulding. However, mildew must always be removed, after which the rope should be cleaned and reinspected.
When inspecting synthetic rope, look for the following:
- Soft, crusty, stiff, or brittle spots
- Cuts, nicks, or abrasions
- Excessive stretching
- Chemical damage
- Dirt or grease
- Other obvious flaws
Natural fibre laid rope deteriorates with age. When it reaches the end of its manufacturer’s recommended service life, it must be removed from service. The rope’s age can be determined from the rope log.
When inspecting natural rope, look for the following signs of damage:
- Ruptured fibres and powdering between strands indicate the rope has been overloaded.
- Dark red, brown, or black spots between the strands, along with a sour, musty, or acidic odour indicate rot and mildew.
- Powdering between strands indicates internal wear.
- Brittle or ruptured fibres, dark red or brown spots, salt incrustation, or swollen areas indicate chemical damage.
- Rust spots, which occur on ropes in pre-rigged pulley systems or ropes that are stored with other metal devices, indicate weakened fibres, and reduced holding power.
- Accumulations of heavy, greasy materials indicate adverse effects on rope strength and reduced holding power.
**NOTE: Rot will quickly spread from a rotten rope to a new rope if they are stored next to one another. When rot is discovered, the rotten rope and any surrounding ropes must be immediately removed from service, cleaned, and re-inspected. The storage area should be cleaned, dried, and ventilated before putting the rope back into it. **
Braided Rope
Visually inspect braided rope for exterior damage, such as nicks, cuts, heat sears (caused by friction or fire), and excessive or unusual fuzziness. Inspect for permanent mushy spots or other deformities by feeling and squeezing the surface of the rope.
Braid-on-braid Rope
Feel for lumps, which indicate core damage. If the rope’s diameter has shrunk, this may indicate a break in the core. If there is any damage or questionable wear on the sheath, examine it carefully. Check to see if the sheath slides on the core; if it does, cut the end of the rope, pull off the excess material, and then seal the end.
Visually inspect braid-on-braid rope for:
- Heat sears
- Nicks
- Cuts
Maintaining Rope
If not properly maintained, synthetic and natural fibre ropes can be easily damaged. In addition to the manufacturer’s instructions, the following guidelines can help to ensure that ropes remain in good condition:
- Avoid abrasion and unnecessary wear
Rope can be weakened from constant vibration against apparatus compartment surfaces, compression when stored in tight spaces, and surface damage due to chafing or dragging over splintered, rough, or gritty surfaces. - Avoid sharp angles, bends, and knots
Sharp angles, bends, and knots can reduce strength by as much as 50 percent. - Protect ends from damage
Whip or tape cut ends to prevent unravelling. - Avoid sustained loads
Natural fibre ropes have less ability to bear sustained loads than synthetic fibre ropes. If they are subjected to heavy loads for long periods, they can break well below the rated load limit. Never exceed the load limit of any rope or subject it to sustained loads for more than two days. - Avoid rust
Keep all synthetic or natural fibre ropes away from rust, which can weaken rope in as little as one to two weeks. If ropes become rust-stained, inspect the extent of the stain. If it is halfway through the rope, then the rope may have lost as much as half of its strength. The rope should be removed from service and destroyed. - Prevent contact with chemicals
Natural fibre rope is extremely vulnerable to chemicals and solvents. Synthetic rope is not entirely resistant to damage from oils, gasoline, paint, and chemicals. Do not let rope contact storage battery solution, washing compounds or solutions, or animal waste. Strong acids, alkalis, and solvents can also damage any rope. - Reverse ends of the rope periodically
Uncoil the rope and recoil it with the location of the ends changed. This will ensure even wear along all portions of the rope. - Do not walk on rope
Walking on rope grinds dirt and debris into the strands and bruises the strands by compressing them.
Cleaning Rope
After use, visually inspect the rope to determine if it has been contaminated or soiled. If the rope is contaminated or soiled, use a stiff bristled brush to remove loose surface debris and grime. If additional cleaning is needed, follow the manufacturer’s instructions, and consult the general cleaning guidelines in the following section.

Synthetic Fibre Ropes
To loosen embedded dirt particles, wash synthetic fibre ropes with a mild detergent or fabric softener added in lukewarm to warm water. Do not use bleaches or strong cleansers.
The following three methods are used for cleaning synthetic rope (Figure 7.11):
- Washing by hand: Place the rope into a utility sink filled with water and detergent. Scrub the rope with a bristle brush. You can also place the rope in a mesh bag, allow it to soak in the sink, and then agitate it by hand to remove grit. When the rope is clean, rinse it thoroughly in clean water to remove detergent.
- Rope-washing device: Commercial rope-washing devices consist of a bristle-lined plastic tube that has a garden hose connection on one side. The rope is manually fed through the device, and multidirectional streams of water clean all sides of the rope at the same time. These devices remove mud and other surface debris; however, these devices cannot be used with detergent and do not address deeper cleaning problems.
- Washing machine: Rope can also be cleaned in front or top-loading clothes washers without centre accessories. Place the rope in a mesh bag to protect the exterior from abrasion. Set the washer on the coolest wash/rinse temperature available and use only a small amount of mild detergent. A washing machine can also be used to rinse a rope that has been cleaned with a high-pressure washer.
After you have washed and rinsed the rope, you must dry the rope immediately. To dry the rope, you can spread the rope out on a hose drying rack, suspend it in a hose tower, or loosely coil it in a hose dryer. Never place it near a heat source or use a heated dryer because heat can reduce the rope’s tensile strength. Avoid drying or storing in direct sunlight, as ultraviolet light can also weaken the rope.
Natural Fibre Ropes
Wipe or gently brush the rope to remove as much of the dirt and grit as possible. Do not use water, as this will damage the rope. Water initially strengthens natural fibre rope, but over time it damages and weakens the fibre. If the rope gets wet during use, dry it thoroughly using the same method described for synthetic rope.

Maintaining a Rope Log
Keep a rope log for every life safety rope throughout the rope’s working life.
The log must include:
- Product label, identification label (Figure 7.12), and manufacturer’s instructions
- Information regarding purchase date, use, maintenance, and inspection
- Incidents that result in impact loading
In addition to visual inspections and known failures, maintenance log information helps determine when the rope should be removed from service. You may store the log at the station or in the rope storage bag. Rope logs are not required for utility ropes.
Rope Storage

Proper rope storage helps ensure that a rope maintains its condition and rated load strength and reaches its life expectancy. Whether stored in a fire department facility or on an apparatus, the rope should be in a clean, dry, unheated area with freely circulating air currents. All rope must be protected from the weather, stored out of direct sunlight, and kept away from chemicals, fumes, and vapours. Ropes should not be stored in the same compartments where gasoline-powered tools or fuel containers are stored. New rope is generally stored on reels until it is placed into service.
The best method for storing rope is to place it into a nylon or canvas storage bag. The bag makes the rope easy to transport and protects it from abrasion and contamination. Mark the bag to indicate the type, diameter, and length of rope and the unit to which it has been assigned. You can also attach the rope log to the bag. Ropes stored in bags can be deployed quickly by holding the end of the rope and dropping or throwing the bag. (Figure 7.13). The weight of the rope inside the bag carries the bag toward the target, and the rope unravels from the bag as it travels through the air. The bag may have a drawstring and shoulder straps to make carrying easier.
Webbing
Webbing is used in conjunction with rope for both life safety and utility applications. It comes in many forms and may be a:
- Piece of material
- Loop
- Ladder belt
- Rescue harness

Materials and Construction
Webbing is constructed from the same materials used to make synthetic rope. It can be flat or tubular, in either a spiral-weave or chain-weave design (Figure 7.14). One-inch (25 mm) webbing is the most commonly used in the fire service, although webbing used for other applications may be larger. Any webbing used for life safety applications must be NFPA 1983 compliant.
Flat Webbing
Flat webbing is constructed of a single layer of material that resembles an automobile seat belt. Though less expensive than tubular webbing, it is stiffer and more difficult to tie into knots. In rescue applications, it is mainly used for straps and harnesses.
Tubular Webbing
Tubular webbing is commonly used for rescue applications. It is easier to tie than flat webbing. The two types of tubular webbing are edge-stitched and spiral weave. Edge-stitched webbing is formed by folding a piece of flat webbing lengthwise and sewing the edges together. Spiral weave tubular webbing, also known as shuttle-loom construction, is preferred for rescue work.
Inspection, Maintenance, and Storage of Webbing
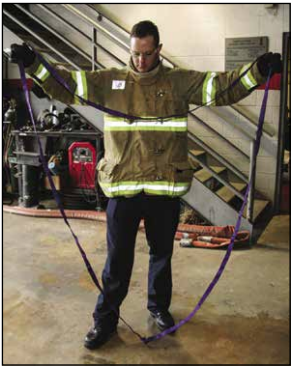
Care, cleaning, and maintenance of webbing follow the same guidelines used for synthetic rope (Figure 7.16). Always follow the manufacturer’s instructions, especially for life safety harnesses and ladder belts.
Many firefighters carry a 20 to 30-foot (6 to 9 m) length of utility webbing in their protective coat pocket. You can quickly tie utility webbing into a loop, attach it to a piece of rope hardware, or wrap it around an object (Figure 7.15). Roll or daisy-chain long lengths of webbing for storage.

Lesson 2
Outcomes:
- Identify types of knots.
Knots
Knots join ropes and webbing together, attach ropes and webbing to people and objects, and form ropes and webbing into loops. Improperly tied knots can be extremely hazardous to both rescuers and victims.
When tying knots, a rope is divided into the following three parts (Figure 7.17):

- The working end is used to tie the knot or hitch.
- The running part is the free end that is used for hoisting or pulling.
- The standing part is the section between the working end and the running part.
Process of Dressing: Tighten knots until snug. After tying, all slack should be removed.
Even dressed knots can loosen or fail because of repeated loading and unloading of the rope. One way to prevent these failures is to tie an overhand safety knot in the tail of the working end. Tying this knot is addressed in a later section.
Hitch Safety Knot: A temporary knot that can be undone by pulling against the strain that holds it.
Elements of a Knot
To be suitable for use in the fire service, a knot must be easy to tie and untie, be secure under load, and reduce the rope’s strength as little as possible. A rope’s strength is reduced to some degree whenever it is bent; the tighter the bend, the more strength is lost. Some knots create tighter bends than others, reducing the rope’s strength to a greater degree.
Bight, loop, and round turn are names for the bends that a rope undergoes when tying a knot or hitch. Knots and hitches are a combination of bights, loops, and round turns. Combine these forms so the tight part of the rope bears weight on the working end and holds it in place.
Each of these formations is shown in the following figures (Figure 7.18):
- Form a bight by simply bending the rope back on itself while keeping the sides parallel.
- Make a loop by crossing the side of a bight over the standing part.
- Make a round turn by further bending one side of a loop.

Types of Knots and Hitches
The most common types of knots and hitches used in the fire service include the following:
- Overhand safety
- Clove hitch
- Figure-eight
- Figure-eight on a bight
- Figure-eight follow through
- Water knot
Overhand Safety Knots
As an added measure of safety, an overhand safety knot (often just called a safety) can be used when tying any type of knot (Figure 7.19). Although any properly tied knot should hold, it is best to provide the highest level of safety possible. The use of the overhand safety knot eliminates the danger of the running end of the rope slipping back through the knot and causing the knot to fail. Skill Sheet 7-2 describes the procedure for tying the overhand knot.
Clove Hitch
A clove hitch is principally used to attach Its principal use is to attach a rope to an object such as a pole, post, or hoseline (Figure 7.20). It is not appropriate for life safety applications because repeated loading and unloading will cause it to fail. The clove hitch may be formed anywhere in the rope, from either end or the middle. If a clove hitch is used for utility applications and will be subjected to repeated loading and unloading, an overhand safety knot should be tied as well.
The two methods of tying this knot are described in Skill Sheets 7-3 and 7-4. When tying it over an object that does not have a free end, the method described in Skill Sheet 7-3 will not work. Use the method described in Skill Sheet 7-4 instead.
Figure-Eight
The foundation knot for an entire family of figure-eight knots is the figure-eight (Figure 7.21). It can also be used as a stopper knot so that the rope will not pass through a rescue pulley or the grommet of a rope bag. Refer to Skill Sheet 7-5 for tying procedures.
 |
 |
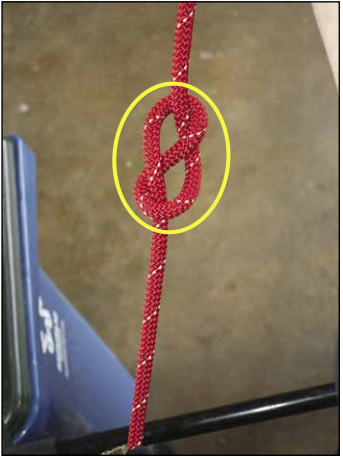 |
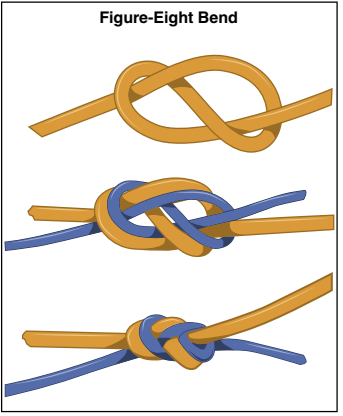
Figure-Eight Bend
The figure-eight bend is used primarily on life safety rope to tie ropes of equal diameters together. Figure 7.22 illustrates how to tie a figure-eight bend.
Figure-Eight on a Bight
The figure-eight on a bight is a good way to tie a closed loop. To tie a figure-eight on a bight, form a bight in the rope and then tie a simple figure-eight with the bight in the doubled part of the rope (Figure 7.23). Refer to Skill Sheet 7-6 for tying procedures.
Figure-Eight Follow Through
The figure-eight follow through is used for securing objects. Essentially it is a figure-eight on a bight that is around the object (Figure 7.24). Refer to Skill Sheet 7-7 for tying procedures.
Water Knot
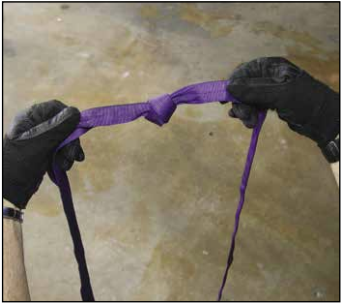
The water knot is the preferred knot for joining two pieces of webbing or the ends of the same piece when a loop is needed. Because the water knot tends to slip, dress the knot properly and have the webbing as flat as possible when forming the knot. Allow at least 3 inches (75 mm) for the tail (Figure 7.25). See Skill Sheet 7-8 for tying procedures.
 |
 |
 |
 |
 |
|
Lesson 3
Outcomes:
- Describe the procedure for hoisting various tools and equipment
Hoisting Tools and Equipment
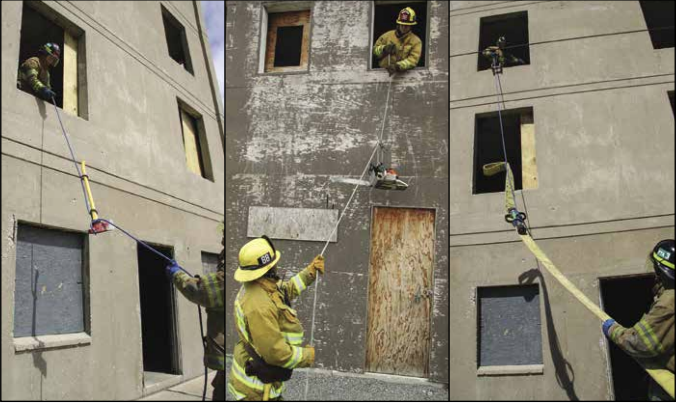
Rope and webbing are frequently used to raise or lower tools and equipment, with one notable exception. For safety reasons, the Occupational Safety and Health Administration (OSHA) prohibits hoisting pressurized cylinders, such as SCBA cylinders.
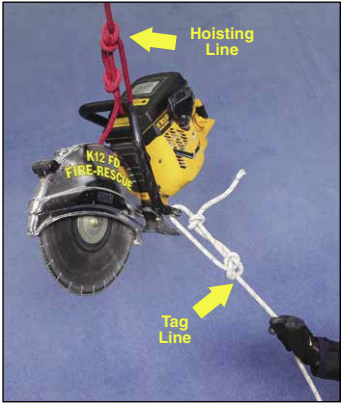
Using proper knots and securing procedures can prevent equipment from being dropped, thus preventing damage to the equipment and injury to the personnel below. A separate tag line may be tied to the equipment, or part of the hoisting line may also serve as a tag line. Tag lines are non-load-bearing and help prevent tools from spinning or snagging while being hoisted. Firefighters on the ground use the tag line to prevent the equipment from striking the structure or other objects (Figure 7.27). When one rope serves as both the tag line and the hoisting line, the knot or hitch-tying methods and methods of hoisting may vary. Common types of hardware used in hoisting are carabiners and pulleys.
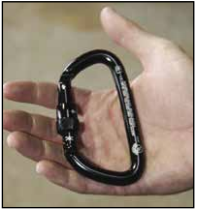
Carabiner: A snap link made from aluminum, titanium, or steel, with a spring or screwed gate that connects ropes to other mechanical gear (Figure 7.28).

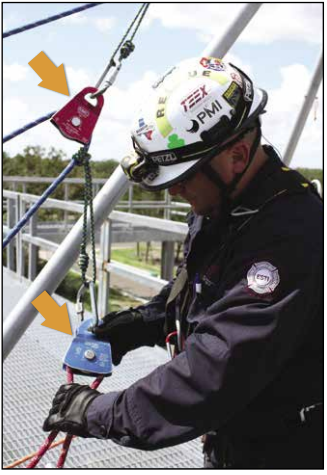
It consists of a grooved wheel through which a rope can run to change the direction or point of application of a force applied to the rope (Figure 7.30).
hoisting tools or equipment, your primary consideration is safety. Always use the following general safety guidelines:
- Be sure that you are balanced and standing firmly on the ground before starting a hoisting operation.
- Use the hand-over-hand method to maintain control of the rope.
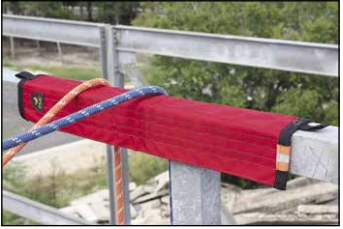
- Use an edge roller or padding to protect rope from physical damage when pulling it over sharp edges, such as cornices or parapet walls (Figure 7.31).
- Use a pulley system for heavy objects.
- Work in teams when working from heights.
- Make sure that all personnel are clear of the hoisting area.
- Avoid hoisting operations near electrical hazards. If this is not possible, use extreme caution.
- Secure the nozzles of any charged hoselines to prevent accidental discharge.
- Use a tag line to help control the hoisted object.
- Avoid hoisting tools and equipment if it is safer to hand-carry them upstairs, a ladder, or an aerial device.
Hoisting an Axe
The procedure for attaching and hoisting is the same for either a pick-head axe or a flat-head axe. The hoisting rope can also be used as the tag line. Refer to Skill Sheet 7-9 for more details.
Hoisting a Pike Pole
Raise a pike pole with the pike up. Tie a clove hitch near the butt end of the handle, followed by a half-hitch in the middle of the handle and another half-hitch around the head. Refer to Skill Sheet 7-10 for more details.
Hoisting a Ladder
Tie a figure-eight on a bight and slip it through two rungs of the ladder, about one-third of the way from the top of the ladder. Pull the loop through and slip it over the top of the ladder. Secure a tag line to the ladder near the foot. Refer to Skill Sheet 7-11 for more details.
Hoisting Hoselines
Use caution to avoid damaging the nozzle or coupling when hoisting hoselines to upper floors. Charged hoselines can be hoisted, but it is safer and easier to hoist a dry hoseline. Refer to Skill Sheet 7-12 for more details.
Hoisting a Power Saw
To hoist a rotary saw or chain saw, tie a figure-eight on a bight through the closed handle, then attach a tag line through the handle. Refer to Skill Sheet 7-13 for more details.
Lesson 4
Outcomes:
- Explain how ropes and knots are used during rescues and at other emergencies
Other Emergency Scene Uses
In addition to hoisting and lowering tools and equipment, utility rope and webbing may also be used in other applications. The most common applications are designating control zones, establishing a search lifeline, and stabilizing objects.
Rescue Uses
Personnel should never use utility rope during rescue operations. Instead, use life safety rope for:
- Rappelling
- Lifting victims and rescuers
- Removing victims from ice and swift water situations
These operations require specialized training beyond the Fire Fighter I and II levels, but you may be required to assist technical rescue personnel in these operations. You must be able to recognize and know how your department uses the life safety ropes, hardware, and equipment.


Control Zone Perimeter
Utility rope has traditionally been used to establish the perimeter to control access to required control zones. Clove hitches with overhand safety knots are used to tie the rope to trees, signposts, or other stationary objects.
Search Lines
Search lines are used to assist search teams working in dark, smoke-filled, or confined spaces. They allow team members to remain in contact with each other and with firefighters at the line’s entry point. They also provide a physical means of finding an exit route. Branch lines are sometimes attached to the main search line, allowing team members to search larger areas away from the search line while remaining in contact with the team (Figure 7.32). For more information about search lines, see Chapter 8, Structural Search and Rescue.
Object Stabilization
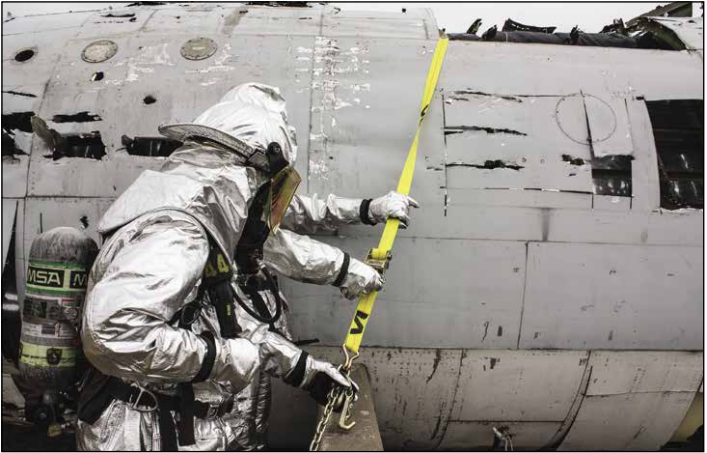
Utility rope and webbing are sometimes used to stabilize an object. For example, they may be used to prevent a vehicle from falling after it has rolled on its side or is suspended over an edge. The rope or webbing is secured to a strong stationary object and then tied to the object to be stabilized (Figure 7.33). Wire rope or cable from a winch may also be used for this operation.
Before any work is performed around the object, you must be certain that:
- The rope or webbing and the anchor point are strong enough to hold the weight of the object.
- The knots are tight and safety knots are in place.
- The attachment points at both ends are secure and will not pull free.
- Personnel are clear from the stabilizing line in case it breaks and snaps back.
Chapter Review
