16 Chapter 15: Overhaul, Property Conservation, and Scene Preservation
Introduction
Welcome! Tansi!
Essentials of Firefighting
Chapter Objectives
- Describe overhaul. [4.1.2, 4.3.8, 4.3.10, 4.3.13]
- Explain how to conserve property at a fire scene. [4.3.14, 4.5.1]
- Describe the duties that firefighters must perform to protect and preserve a fire scene. [4.3.8, 4.3.13, 4.3.14]
- Skill Sheet 15-1: Locate and extinguish hidden fires. [4.3.8, 4.3.10, 4.3.13]
- Skill Sheet 15-2: Roll a salvage cover for a one-firefighter spread. [4.3.14]
- Skill Sheet 15-3: Spread a rolled salvage cover using a one-firefighter method. [4.3.14]
- Skill Sheet 15-4: Fold a salvage cover for a one-firefighter spread. [4.3.14]
- Skill Sheet 15-5: Spread a folded salvage cover using a one-firefighter method. [4.3.14]
- Skill Sheet 15-6: Fold a salvage cover for a two-firefighter spread. [4.3.14]
- Skill Sheet 15-7: Spread a folded salvage cover using the two-firefighter balloon throw. [4.3.14]
- Skill Sheet 15-8: Construct and place a water chute. [4.3.14]
- Skill Sheet 15-9: Construct a catchall. [4.3.14]
- Skill Sheet 15-10: Construct a water chute and attach it to a catchall. [4.3.14]
- Skill Sheet 15-11: Cover building openings to prevent damage after fire suppression. [4.3.14]
- Skill Sheet 15-12: Clean, inspect, and repair a salvage cover. [4.5.1]
After a fire is under control and/or extinguished, firefighters still have work at the scene: overhaul, property conservation, and scene preservation. The fire service uses the term loss control to describe the activities performed before, during, and after a fire has been extinguished to minimize losses to property. Quality loss control practices show professionalism and exhibit good customer service.
Properly applied loss control activities include:
- Minimizing damage to the structure, exposures, and contents
- Eliminating the chance that a fire will reignite in the structure
- Reducing the amount of time needed to repair and reopen the business
- Reducing the stress on the owner/occupants of the structure
- Creating goodwill for the fire department within the community
- Minimizing financial loss for the owner/occupant, insurance company, and community
There are two types of damage result from a structure fire:
- Primary Damage: It is caused by fire and smoke.
- Secondary Damage: It is caused by fire suppression activities such as forcible entry, ventilation, and fire extinguishment operations cause secondary damage (Figure 15.1). Damage to a structure due to weather and vandalism following fire suppression is also considered secondary damage.

This chapter will describe the operations and procedures relating to:
- Overhaul
- Property conservation
- Scene preservation and protection
Now What?
Let’s get learning!
Lesson 1
Outcomes:
- Describe overhaul.
Overhaul
Overhaul refers to the comprehensive activities performed after the main body of a fire has been extinguished. These activities ensure that no hidden fires remain, the structure is safe, and any evidence of arson is preserved. This lesson covers the essential tasks, safety precautions, and the methods used to detect and extinguish residual fires.
Overhaul refers to all operations conducted after the main body of the fire has been extinguished and includes the following activities:
- Searching for and extinguishing hidden or remaining fire
- Placing the building and its contents in a safe condition
- Determining the cause of the fire
- Recognizing and preserving evidence of arson
The IC and the lead fire investigator should authorize when the overhaul should begin. Once the order is given, firefighters should try to make the building, its contents, and the fire area as safe and habitable as possible. Salvage operations performed during fire fighting will directly affect any overhaul work that may be needed later. Many of the tools and equipment used for overhaul are also those used for forcible entry, ventilation, and salvage operations.

Some of the tools and equipment used specifically for overhaul, along with their uses, may include the following (Figure 15.2):
- Pike poles and plaster hooks: Open ceilings to inspect for fire extension.
- Axes: Open walls and floors.
- Prying tools: Remove door frames, window frames, and baseboards.
- Power saws, drills, and screwdrivers: Install temporary doors and window coverings.
- Carryalls, buckets, and tubs: Carry debris or provide a basin for immersing smouldering material.
- Shovels, bale hooks, and pitchforks: Move baled or loose materials.
- Thermal imager (TI): Check void spaces and look for hot spots.
An officer not directly engaged in overhaul should direct overhaul operations. If a fire investigator is on the scene, he or she should be involved in planning and supervising overhaul activities to avoid disturbing potential evidence needed to determine fire cause.
Overhaul Safety
The first consideration before beginning overhaul operations is safety. After a fire has been controlled, there is time to plan and organize overhaul activities. The overhaul plan should provide the highest possible degree of safety to firefighters and others who might be allowed on the scene.
The steps to establish safe conditions include the following:
- Inspecting the premises
- Developing an operational plan
- Providing needed tools and equipment
- Eliminating or mitigating hazards (including securing any remaining utilities)


Toxic gases that continue to be produced from a smouldering fire are a significant threat to firefighters during overhaul operations. Even if the air in a structure appears free of smoke, toxic products of combustion can exist in dangerous concentrations. Carbon monoxide (CO) and hydrogen cyanide (HCN) are common toxic gases, and countless others can also be present depending on the building contents involved in the fire. In addition to inhalation hazards, firefighters’ skin can absorb carcinogens from particulates in the air or burned surfaces. In response to these hazards, air monitoring devices should be deployed, and firefighters should continue to wear PPE and SCBA until overhaul is complete (Figure 15.3).
Many other hazards exist for firefighters performing overhaul. Personnel may fall and become injured when fire-weak-need floors collapse or otherwise fail. Any potentially hazardous areas should be identified and marked or barricaded immediately. Because fire debris must often be handled during overhaul, firefighters are susceptible to cuts, punctures, and thermal burns if they are not wearing gloves. Firefighters can step on broken glass, nails, and other sharp objects and injure themselves, so boots are also necessary. Protection is critical to avoid injuries to the eyes. Injuries such as strains and sprains can be prevented through physical conditioning and practicing safe lifting techniques.
Fatigue is another preventable cause of injury. Exhausted firefighters are more susceptible to injury than those who are rested. Firefighters assigned to overhaul operations should either have completed rehabilitation at the scene or should not have been assigned fire control or rescue duties earlier.

Due to the threat of reignition, charged hoselines should be present during overhaul operations. Typically, 11⁄2-inch (38 mm) or 13⁄4-inch (45 mm) attack lines are used for overhaul (Figure 15.4). At least one attack line should be available in the event of a rekindle. Regardless of the type of hose being used, place the nozzle so that it will not cause additional water damage. In addition, hoselines should be constantly monitored for leakage, especially at the couplings. Using a 100-foot (30 m) section of hose as the first section on attack lines greatly reduces the chances that any couplings other than those at the nozzle will be inside a building.
To protect yourself during overhaul operations, you must maintain situational awareness and focus on safety. The following are some additional safety considerations during overhaul operations:

- Work in teams of two or more (Figure 15.5).
- Maintain awareness of available exit routes.
- Maintain a rapid intervention crew (RIC) throughout the operation.
- Monitor the need for personnel rehabilitation.
- Beware of hidden gas or electrical utilities.
- Continue using the accountability system until incident termination.
Hidden Fires
Before searching for hidden fires, evaluate an area’s structural condition. The intensity of the fire and the amount of water used for its control are two important factors that affect the condition of the building. Fire intensity determines how greatly the structural members have been weakened. The amount of water used determines the additional weight placed on floors and walls due to the absorbent properties of the building contents. These factors should be considered along with appropriate measures to ensure firefighter safety during overhaul.
When evaluating the stability of a fire-damaged structure, look for the following indicators of possible loss of structural integrity:
- Weakened floors due to floor joists being burned away or delaminated
- Evidence of spalling on concrete.
- Weakened steel roof members
- Walls offset because of the elongation of steel roof supports
- Weakened roof trusses due to burn-through of key members or connectors
- Mortar in wall joints opened due to excessive heat
- Wall ties holding veneer/curtain walls melted from heat
- Heavy storage on mezzanines or upper floors
- Water pooled on upper floors
- Large quantities of wet insulation
Firefighters can often detect hidden fires by sight, touch, sound, or electronic sensors.

The following are some of the indicators for each:
Sight
- Discolouration of materials
- Peeling paint
- Smoke emissions from cracks
- Cracked plaster
- Rippled wallpaper
- Burned areas
Touch
- Heat felt through walls and floors
Sound
- Popping or cracking of fire burning
- Hissing of steam
Electronic sensors
- Thermal (heat) signature detection with thermal imager
- Infrared heat detection
Thermal imagers (TIs) identify the heat signature of items and project the resulting image onto a screen for the firefighter to see. Firefighters can use TIs to find concealed fires in floors, ceilings, and walls without having to open the areas and visually inspect them (Figure 15.6). This reduces the time needed to perform a search and limits secondary structural damage.
 TIs do not always provide quality images of items behind reflective materials such as metal, mirrors, and glass. Traditional methods should be used to reveal hidden fire. If there are discrepancies between the image shown on the TI and signs of fire in a concealed space, the space should be opened and visually inspected.
Overhaul Procedures
Overhaul typically begins in the area of most severe fire involvement. The IC and the lead fire investigator should coordinate when overhaul should begin. Looking for fire extension should begin as soon as possible after the IC gives the order. If the fire has expanded to other areas in the structure, firefighters must determine the path that it travelled (concealed wall spaces, unsealed pipe chases, and others). If floor beams have burned ends where they enter a party wall, flush the voids in the wall with water. Also, inspect the other side of the wall to determine whether the fire or water has come through. Thoroughly check insulation materials because they can retain hidden fires for prolonged periods. It is usually necessary to remove insulation material to extinguish a fire in it. Do not make random openings in walls or ceilings.
Understanding the basic concepts of building construction will help when searching for hidden fires. If the fire has burned around windows or doors, pull open these areas to expose the inner parts of the frame or casing and visually verify full extinguishment. When fire has burned around a combustible roof or cornice, open the cornice and inspect for hidden fires. In structures using balloon construction, check the attic and basement for fire extensions.
Search for hidden fires in concealed spaces below floors, above ceilings, or within walls and partitions. First, move the furnishings of the room to locations where they will not be damaged. If it is not possible to move the contents, protect them with salvage covers. Remove only enough wall, ceiling, or floor covering to verify complete extinguishment. Weight-bearing members should not be disturbed.
To locate possible fire extension into the wall cavity, inspect openings such as:
- Electrical receptacle
- Electrical switches
- Return air ducts
- Heating vents
- Telephone connections
- Cable connections
The walls and ceilings in kitchens, bathrooms, and utility rooms contain ventilation fans and pipes, ducts, and other passages that permit fire to extend. If these rooms show evidence of fire spread, the walls and ceiling should be inspected.
When opening concealed spaces, consider whether the space contains electrical wiring, gas piping, or plumbing. Electrical outlets, gas connections, and water faucets all indicate the presence of utilities. Consideration should be given to the future repair of the structure. While openings must often be made to check for extension and allow extinguishment, they should be made in a neat and planned manner. This reduces the work necessary for future restoration and shows a firefighter’s professionalism.
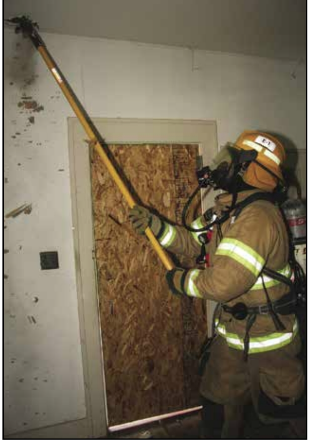
Ceilings may be opened from below using a pike pole or other appropriate overhaul tool. To open lath and plaster ceilings, break the plaster and then pull off the lath. Some plaster ceilings have wire mesh embedded in the plaster. When these ceilings start to come down, they may fall in one very large piece. Some newer plaster ceilings are backed with gypsum wallboard instead of wooden lath. Metal or composition ceilings may be pulled from the joists in a similar manner
 When pulling any ceiling, do not stand directly under the area to be opened. Position yourself between the area being pulled and a doorway to keep the exit route from being blocked with falling debris. Always wear full PPE including respiratory protection when pulling ceilings (Figure 15.7).
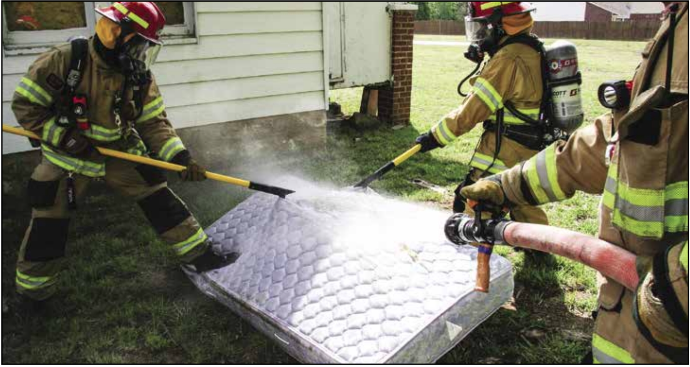
Small burning objects are frequently uncovered during over-haul. Because of their size and condition, it is often more effective to submerge the object in water than to drench it with hose streams. Bathtubs, sinks, lavatories, and wash tubs work for this purpose. Large smouldering items such as mattresses, stuffed furniture, and bed linens should be taken outside the structure to be extinguished in coordination with the fire investigator’s instructions (Figure 15.8). Investigators may want pictures of the furniture in place before it is moved for extinguishment. Scorched or partially burned articles may help an investigator in preparing an inventory or determining the cause of the fire. Firefighters need to work in close coordination with the fire investigator to ensure potential evidence is not disturbed.
Wetting agents such as Class A foam should be used to extinguish hidden fires. The penetrating qualities of wetting agents facilitate extinguishment in cotton, upholstery, and baled goods. The only way to ensure that fires in bales of items such as rags, cotton, and hay are extinguished is to break them apart. See Skill Sheet 15-1 for more information on how to locate and extinguish hidden fires.
Gross Decontamination Following Overhaul
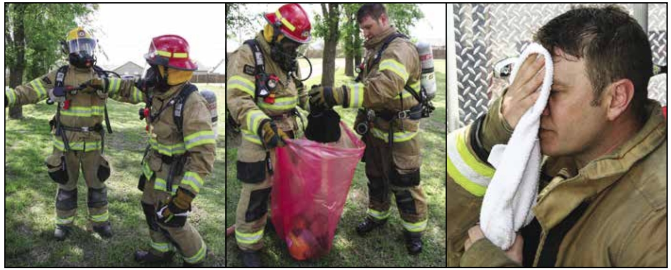
Wearing contaminated PPE can lead to the absorption of carcinogens through the skin. Following some basic, gross decontamination procedures of all PPE and equipment to remove soot and particulate matter is the best practice for preventing cancer later in life. See Chapter 1, Introduction to the Fire Service and Firefighter Safety for more information on carcinogens found at fire scenes.
Recommended procedures based upon research (Taking Action … 2013) which can be performed before leaving the scene include (Figure 15.9):
- Using a soft bristle brush and a damp towel to remove large debris from PPE
- Removing all turnout gear, if possible
- Using wet wipes/baby wipes or a wet towel to remove soot from your head, face, jaw, neck, underarms, hands and lower legs
- Using a hoseline to rinse off all PPE and equipment
- Bagging contaminated equipment for travel back to the station
- Showering immediately upon returning to the station
- Cleaning gear and apparatus interiors immediately following cleaning yourself when returning to the station
Lesson 2
Outcomes:
- Explain how to conserve property at a fire scene.
Property Conservation
Property conservation, also called salvage, is perhaps the most important aspect of loss control. During salvage, firefighters attempt to save property and reduce further damage from water, smoke, heat, and exposure during or immediately after a fire. Proper salvage operations involve preincident planning and knowledge of salvage procedures, and the tools and equipment necessary to perform the job. Improvisation is often necessary when presented with unique situations and limited equipment. In addition, the protection of damaged property from weather and trespassers is just as critical.
Purpose of Property Conservation
Firefighters must do everything they can to protect property without compromising their first priority, protecting life and health. Fire and smoke are not the only factors that contribute to property damage. If not carefully performed, fire suppression activities can cause more damage than the fire. Protecting property requires firefighters to practice good loss control techniques throughout an incident.
Salvage Equipment
Salvage operations require specific tools and equipment that should be stored in a specially designated salvage toolbox or other containers to make them easier to carry. Salvage materials and supplies may be kept in a plastic tub and brought into the structure as soon as possible. The tub itself provides a useful water-resistant container to protect items such as computers, pictures, and other water-sensitive materials.
Typical tools and equipment used in salvage operations include but are not limited to:
- Salvage covers
- Electrical tools
- Mechanical tools
- Plumbing tools
- General carpentry tools
- Mops, squeegees, and buckets
Salvage Covers
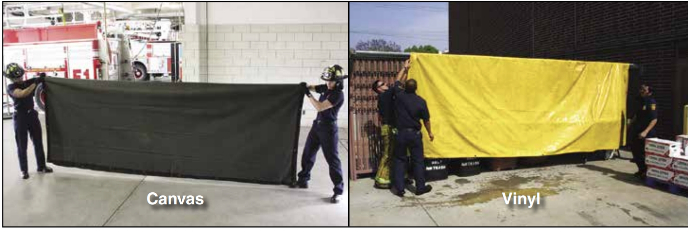
Salvage covers are used to protect unaffected furniture and areas of the building. They are made of waterproof canvas or vinyl and are manufactured in various sizes. These covers have reinforced corners and edge hems into which grommets are placed for hanging or draping (Figure 15.10). Vinyl covers are lightweight, easy to handle, economical, and practical for both indoor and outdoor use. They may melt if used to cover hot objects and may tear if used to cover sharp corners or edges. Many departments use disposable heavy-duty plastic covers. The plastic is available on rolls and can be extended to cover large areas. Salvage covers can also be cut from the rolls in different shapes and sizes.
Automatic Sprinkler Kit
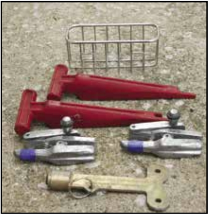
The tools in a sprinkler kit are used to stop the flow of water from an open sprinkler. Water flowing from an open sprinkler can do considerable damage to property on lower floors after a fire has been controlled in a building. Sprinkler tongs or stoppers and wooden sprinkler wedges are suggested tools for a sprinkler kit (Figure 15.11).
**NOTE:The AHJ determines responsibility for restoring automatic sprinkler systems to service. You may only restore systems if you are authorized and trained to do so. **
Carryalls
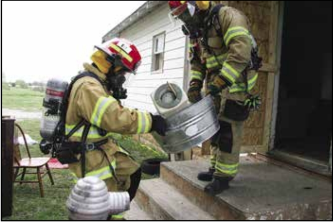
Carryalls are used to carry debris, catch falling debris, and provide a water basin for immersing small burning objects. Carryalls should be constructed of non-flammable material (Figure 15.12).
Floor Runners
Firefighters often unintentionally damage flooring with their boots and equipment during fire suppression operations. Using floor runners may protect floor coverings. Floor runners can be unrolled from an entrance to almost any part of a building (Figure 15.13).
Commercially prepared vinyl-laminated nylon floor runners are:
-
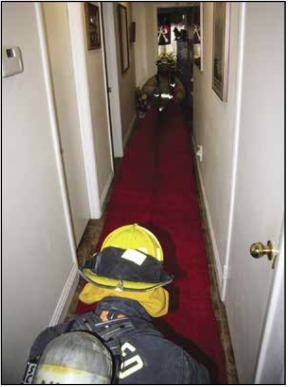
Figure 15.13 Firefighters placing a floor runner in a hallway to protect the flooring underneath. Lightweight
- Durable
- Flexible
- Heat resistant
- Water-resistant
- Easy to maintain
Dewatering Devices
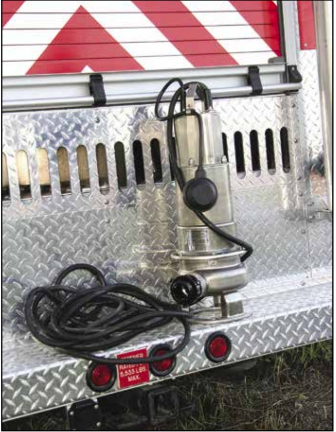
Dewatering devices are pumps used to remove water from basements, elevator shafts, and sumps. Portable pumps capable of passing grey water filled with debris, jet siphons, and submersible pumps work best for salvage operations (Figure 15.14). They can be moved to any point where a line of hose can be placed, and a water outlet can be provided.
Water Vacuum
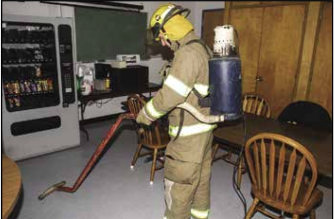
One of the easiest and fastest ways to remove water is with a water-vacuum device (Figure 15.15). These devices can be used where standing water is too shallow to be picked up with a submersible pump or siphon ejector. The water vacuum appliance consists of a tank (worn on the back or mounted on wheels), a pump, a hose, and a nozzle. Backpack-type tanks normally have a capacity of 15-20 L (4 to 5 gallons). They can be emptied by pulling a lanyard that empties the water through the nozzle or a separate drain hose. Floor models on rollers may have capacities of up to 20 gallons (80 L). They may be emptied using an attached hoseline or by conventional means (up-ending the basin).
Folding/Rolling and Spreading Salvage Covers
The proper folding and deploying of salvage covers is critical to salvage operations. The following sections describe the basic methods used to fold and deploy salvage covers.
One-Firefighter Spread with a Rolled Salvage Cover
The main advantage of the one-firefighter salvage cover roll is that a single person can quickly unroll a cover across the top of an object (Figure 15.16). Skill Sheet 15-2 describes the procedure for two firefighters to roll a salvage cover so that one firefighter can deploy it. A salvage cover rolled for a one-firefighter
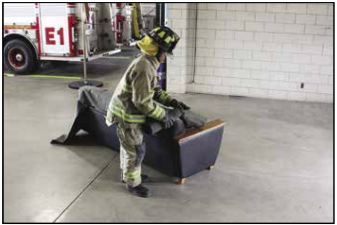
spread may be carried on the shoulder or under the arm. Use the steps described in Skill Sheet 15-3 for a one-firefighter spread with a rolled salvage cover.
One-Firefighter Spread with a Folded Salvage Cover
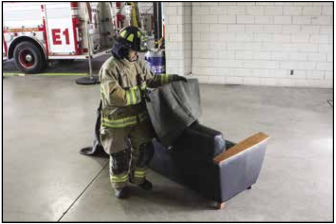
Some departments prefer to carry folded salvage covers instead of rolled ones. The procedures in Skill Sheet 15-4 describe the steps for folding a salvage cover for one-firefighter deployment. Two firefighters are needed to make this fold, performing the same functions simultaneously. Carrying a folded salvagecover on the shoulder is typically the most convenient, but any safe carrying method is acceptable. Skill Sheet 15-5 illustrates the procedure for one firefighter to deploy a folded salvage cover (Figure 15.17).
Two-Firefighter Spread with a Folded Salvage Cover
One firefighter cannot easily handle a large salvage cover. These covers should be folded for two-firefighter deployment. The procedure in Skill Sheet 15-6 illustrates the two-firefighter salvage cover fold. The most convenient way to carry this fold is on the shoulder with the open edges next to the neck. Position the cover so the firefighter carrying it holds the lower pair of corners and the second firefighter holds the uppermost pair.
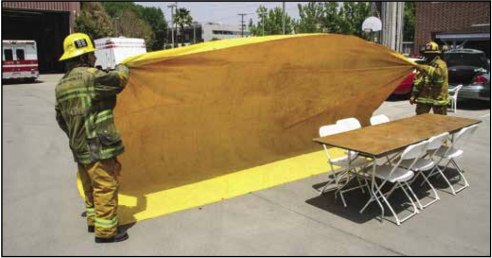
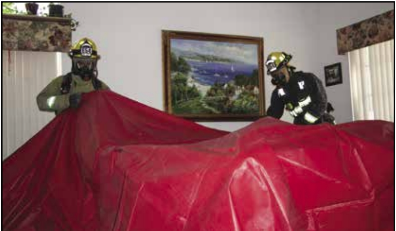
A method called the balloon throw is commonly used for two-firefighter deployment of a large salvage cover. The balloon throw works best when sufficient air is pocketed under the cover. This air pocket gives the cover a parachute effect that allows it to float into place over the article to be covered (Figure 15.18). Skill Sheet 15-7 highlights the procedure for making the balloon throw.
Salvage operations begin upon arrival and continue until the last unit leaves the scene. When the on-scene resources are sufficient and the situation permits, the IC may order salvage operations while suppression activities are underway. In some instances, the contents of the room(s) immediately below the fire floor can be protected with salvage covers while fire suppression operations are conducted on the floor above. In other instances, it may be necessary to delay suppression activities for a short time to remove vital contents. In these cases, the financial loss that primary damage causes is often small when compared to the cost of secondary damage from suppression efforts. The IC should make any decisions about delaying fire suppression.
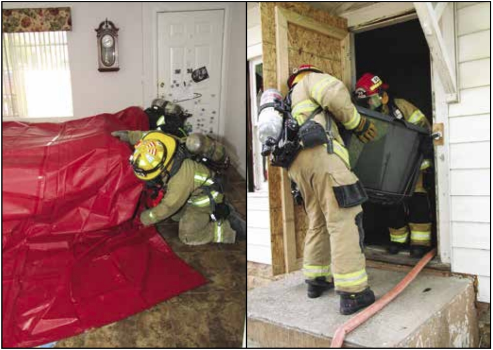
The choice of salvage procedures depends on:
- Number of personnel available
- Type, size, and quantity of the contents
Salvage procedures include (Figure 15.19):
- The extent and location of the fire
- Current weather conditions
- Moving contents to a safe location in the structure
- Removing contents from the structure
- Protecting the contents in place with salvage covers
One useful salvage technique is to move contents inside the structure to areas away from concentrations of smoke, not in danger of fire extension, and where water will not reach. This method is most effective when the fire is limited and not likely to spread and weather conditions would damage contents if they were moved outside. You should cover these contents with salvage covers or raise the contents off the floor to guard against secondary damage.
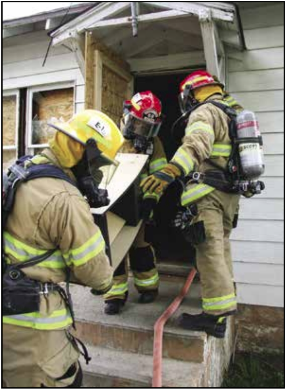
Removing contents from the structure will help protect them from additional primary and potential secondary damage. However, removing contents may interfere with fire suppression and ventilation crews that need to use the same doors to enter the structure (Figure 15.20). Opening and closing the doors may also interfere with the flow path of air to the fire. Contents should be stacked on dry surfaces, such as a parking lot or driveway, and not near areas where firefighters may be collecting debris for disposal. Contents stored outside must also be protected from theft or vandalism before and after the fire is extinguished. The owner/occupant must be told that the contents have been stored outside, or that the contents should be secured in some fashion.
The method typically used to protect contents is to leave them in the room where they are found. Contents are gathered into compact piles that can be covered with a minimum of salvage covers. Grouping contents this way provides more protection than if they were covered in their original positions. If possible, group household furnishings in the center of a room when arranging for salvage. In many cases, one salvage cover can protect the contents of a residential room. If the floor covering is a removable rug, slip the rug out from under furniture as each piece is moved and roll the rug to make it easier to move.
When arranging grouped items in a room, a high object should be placed in such a way that it can support a salvage cover. For example, in a bedroom, a dresser, chest, or high object should be placed at the end of a bed. Other furniture should be grouped nearby. Creating one high point in the furniture group allows water to run off without it collecting in depressions (Figure 15.21). Pictures, curtains, lamps, clothing, and other fragile items can be placed on something soft like a bed.
**NOTE:It may sometimes be necessary to place a salvage cover into position before some articles are placed on the bed. **
The first cover protects the bed while the second cover protects the contents placed upon the bed. Furniture sitting on wet carpet can absorb water and become damaged even though it is well covered. To prevent this damage, furniture should be raised off a wet floor with water-resistant materials such as precut plastic or foam blocks. If blocks are not available, you can improvise with items such as canned goods from the kitchen.
Commercial occupancies present challenges for firefighters trying to perform salvage functions. It may be difficult to cover contents in these occupancies when large stocks and display features are involved. In addition, display shelves are frequently built to the ceiling and directly against the wall. This construction feature makes contents difficult to cover because when water flows down a wall, it naturally encounters shelving and wets the contents. Contents stacked too close to a ceiling also present a salvage problem. Ideally, there should be enough space between the inventory and ceiling to allow firefighters to easily apply salvage covers.
Stock susceptible to water damage should be raised off the floor to prevent saturation. Skids or pallets are commonly used for stacking in these instances. Even if susceptible stock is raised off the floor, it still must be covered. However, when the number of salvage covers is limited, it is good practice to use available covers for water chutes and catchalls, even though the water must be routed to the floor and removed later.
Firefighters must be extremely cautious of high-piled stock such as boxed materials or rolled paper that has become wet at the bottom. The wetness often causes the material to expand and push out interior or exterior walls. Wetness also reduces the strength of the material and may cause the piles to collapse. Some rolls of paper can weigh a ton (900 kg) or more. If one of these rolls were to fall on firefighters, it could seriously injure or kill them.
You can remove large quantities of water in the following ways:
- Make use of existing sanitary piping systems.
- Create scuppers.
- Create chutes made of salvage covers, plastic, or other available materials to route water into other areas.
- Locate and clean clogged drains.
- Remove toilet fixtures.
Water left on cabinets and other horizontal surfaces may ruin finishes within hours. Wiping cabinets and tabletops with disposable paper towels is a quick and easy way to save the building owner/occupant a great deal of potential loss.
Improvising with Salvage Covers
While salvage covers are typically used to cover building contents, they may also be used to catch and route water from firefighting operations or other structural flooding situations. The following sections describe improvised uses of salvage covers.
Removing Water with Chutes
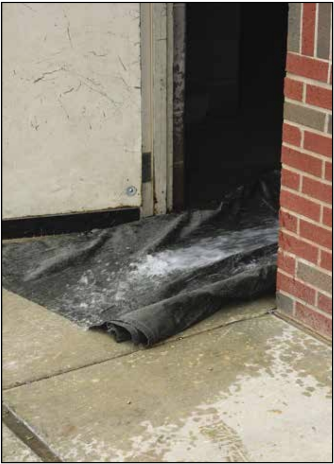
Water chute is one of the most practical methods of removing water that comes through the ceiling from the upper floors. Water chutes may be constructed on the floor below firefighting operations to drain runoff out of the structure through windows or doors (Figure 15.22). Some fire departments carry prepared chutes, approximately 10 feet (3 m) long, as regular equipment, but others find it more practical to construct chutes when and where needed using floor runners or one or more covers. Plastic sheeting, a heavy-duty stapler, and duct tape can be used to construct water diversion chutes. Skill Sheets 15-8 and 15-10 describe procedures for constructing water chutes.
Constructing a Catchall
Catchalls are constructed from a salvage cover placed on the floor to hold small amounts of water. The catchall may be used as a temporary means to control large amounts of water until chutes can be constructed to route the water outside the structure.
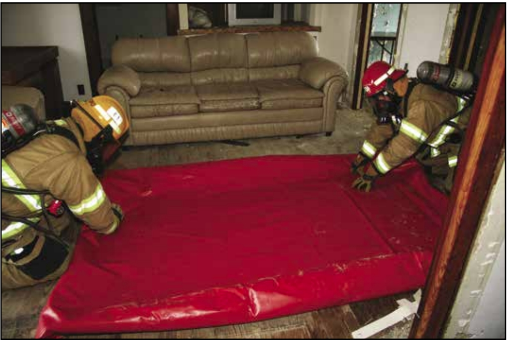
Properly constructed catchalls can hold several hundred litres of water and often save considerable time during salvage operations. The steps required to make a catchall are shown in Skill Sheet 15-9. To catch as much water as possible, place the cover into position as soon as possible, even if the sides of the cover have not been uniformly rolled. Two firefighters are usually needed to construct a catchall (Figure 15.23).
Splicing Covers
When objects or groupings are too large to be covered using a single cover or when long chutes or catchalls need to be made, it will be necessary to splice covers with watertight joints. There are many different methods for splicing salvage covers, and a department will offer training on the specific procedure to be used. Many departments use disposable rolled plastic sheeting that can be cut to size. The use of plastic rolls saves time and property because it eliminates the need for splicing and reduces the risk of leakage.
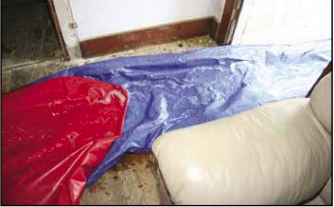
Splicing a Chute to a Catchall
A plan should be developed to remove water from a catchall as soon as it is constructed, especially if it appears that the volume of water will exceed the catchall’s capacity. Submersible pumps may be used if there is a significant and constant flow of water into the catchall. A commonly used method of water removal is to splice a water chute to the catchall (Figure 15.24). An advantage to this system is that as soon as water accumulates in the catchall it is drained to the outside. Steps to splice a chute to a catchall are illustrated in Skill Sheet 15-10.
Covering Openings
You should cover openings to prevent further damage to the property from weather and trespassers. Doors or windows that have been broken or removed
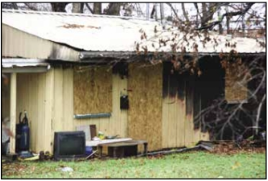
during suppression activities should be covered with plywood, heavy plastic, or some similar materials to keep out rain (Figure 15.25). Plywood, hinges, a hasp, and a padlock can be used to fashion a temporary door. Openings in roofs should be covered with plywood, roofing paper, heavy plastic sheeting, or tar paper. Use appropriate roofing nails if roofing paper, tar paper, or plastic is used. Place strips of lath along the edges of the material and nail them in place. Covering openings cut in floors of upper stories or over basements and crawl spaces is very important. These openings must be covered with lumber or thick plywood that will support a person’s weight. Skill Sheet 15-11 details the steps for covering building openings to prevent damage after fire suppression.
Salvage Equipment Care and Maintenance
Proper cleaning, drying, and repairing of salvage covers increases their service life.
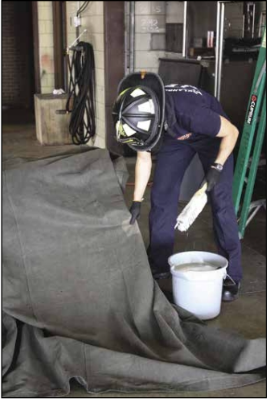
Typically, the only cleaning required for canvas salvage covers is wetting or rinsing with a hose stream and scrubbing with a broom. Extremely dirty or stained covers may be scrubbed with a detergent solution and then thoroughly rinsed (Figure 15.26). Some foreign materials, such as roofing tar, are difficult to remove (even with a detergent) when they have been allowed to dry on the cover.
Canvas salvage covers should be clean and completely dry before they are folded and stored on the apparatus. This practice is essential to prevent mildew and rot. Permitting canvas salvage covers to dry when they are dirty is not a good practice because carbon and ash stains can rot the canvas. It is usually acceptable to dry salvage covers outdoors but avoid doing so when it is windy. Skill Sheet 15-12 describes how to clean, inspect, and repair a salvage cover.
**NOTE: Long-term exposure of canvas to sunlight will result in damage from ultraviolet rays and degrade the material over time. **
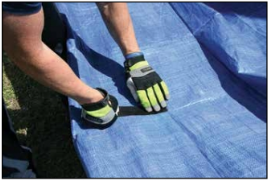
Synthetic salvage covers do not require as much maintenance as canvas covers. Synthetic covers may be folded when wet, but it is better to let them dry first so they will not mildew.After salvage covers are dry, they should be examined for damage. To inspect for holes, three or four firefighters stand side-by-side along one end of the cover.The firefighters pick up the end and pass it back over their heads while walking toward the other end, looking up at the underside of the cover. Light will show through even the smallest holes. Mark any holes with chalk or a marking pen. Use chalk for canvas salvage covers and a marking pen for vinyl covers. Depending upon the cover’s material, firefighters can place duct tape or mastic tape over holes to repair them or patch the cover with iron-on or sew-on patches (Figure 15.27).
Lesson 3
Outcomes:
- Describe the duties that firefighters must perform to protect and preserve a fire scene.
Scene Preservation and Protection
Scene preservation includes all attempts to prevent contamination and/or removal or loss of evidence relating to the origin and cause of the fire. Preserving evidence is the responsibility of all fire officers and firefighters at the scene. Fire scene security helps protect evidence and ensure that it is not damaged, altered, or removed. In a sense, scene security is the first step in establishing the chain of custody of the evidence.

Reasons for Protecting the Fire Scene
Evidence of the location of the area of origin and fire cause is necessary to determine the fire cause classification. Remember, unless you are qualified/certified to do so, you are not in a position to determine what is evidence, nor are you in a position to determine what is admissible in court. You should protect everything that looks odd or suspicious until those conducting the investigation have examined it. You must be familiar with the importance of preserving evidence, the methods for preserving it, and the methods for securing the fire scene.
Area of Origin
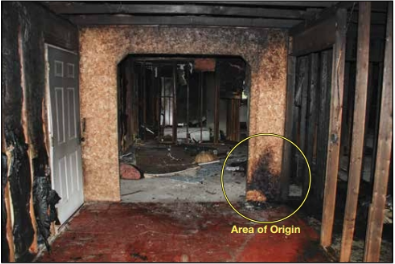
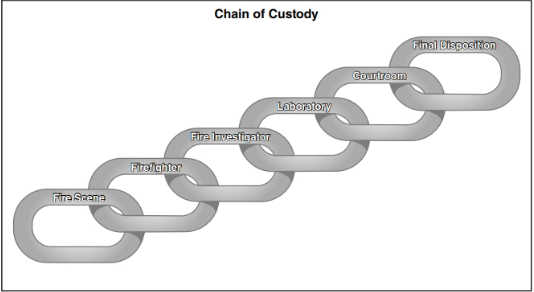
The area of origin is the general location where the fire began. It will contain the precise point of origin (Figure 15.28).Until ordered to move it, all debris should remain in place. If necessary, it may be removed and placed in a specific area where it can be controlled and protected. Control of all evidence must be maintained as part of the chain of custody required in legal cases. As part of the fire suppression team, you may become part of the chain of custody (Figure 15.29). It is important to remember what you see, smell, and hear during the incident.
Chain of Custody: Continuous changes of possession of physical evidence that must be established in court to admit such material into evidence. In order for physical evidence to be admissible in court, there must be an evidence log of accountability that documents each change of possession from the evidence’s discovery until it is presented in court.

Obvious Signs of Fire Origin
In structure and vehicle fires, the area of origin is often apparent. If not, firefighters can follow physical indicators from the area of least damage to the area of most damage to locate the area of origin. The most obvious sign of origin is the location with the most damage: where the fire was burning the hottest for the longest amount of time. Eyewitness accounts may also be valuable in locating where a fire began. Eyewitnesses can tell firefighters where they first saw smoke or what was burning before fire crews arrived.
Identifying witnesses, securing the scene, and noting initial scene observations are critical to the process. As soon as possible after the fire is under control, the Incident Commander (IC), and sometimes a fire investigator or criminal investigator, determines the area of origin, the fire cause, and protects or collects evidence that may be used in a legal proceeding. The area of origin in wildland or ground cover fires may be less apparent and require an experienced investigator to locate.

In situations where the area of origin cannot be accurately determined, firefighters should delay overhaul operations beyond locating and extinguishing fires, protecting the scene, and establishing scene security. A fire investigator should be requested to perform a thorough investigation of the scene (Figure 15.30).
Procedures for Protecting the Area of Origin
A secure fire scene has a recognizable perimeter, and someone assigned to maintain that perimeter. Fire scene security is initially the responsibility of the fire suppression personnel who respond to the emergency.
Early security measures should include the following:
- Restricting access to the scene
- Protecting any potential evidence located in the area
- Minimizing fire suppression and overhaul activities that could destroy important information regarding the origin and cause of the fire
The first-arriving fire investigator may alter the security measures in place or implement additional measures to protect the scene. This decision will be based on the investigator’s assessment of the scene, the circumstances surrounding the fire, and the measures in place. On incidents requiring the assistance of law enforcement agencies such as those involving injuries or fatalities, an investigator should request an officer to monitor each entrance and exit to the scene to document every individual who has entered the secured area.
There are several guidelines for establishing a perimeter of the proper size in the following situations:
- Explosions: The perimeter for explosions should be established at 1.5 times the distance from the farthest piece of debris found. As the investigation continues, this perimeter may expand as additional debris is located.
- Structure fires: Firefighters may establish a fire scene perimeter to limit access to the fire and keep bystanders at a safe distance. The perimeter may be expanded to encompass the area surrounding the building and any potential evidence that is located outside the building. The perimeter should extend beyond the farthest piece of evidence located during the exterior examination of the structure. If no evidence is found outside the building, it may be sufficient to restrict access into the building or an area of the building. The restricted area should provide fire investigators with room to work and protect all known or suspected evidence from unauthorized personnel or bystanders.
To be effective, fire scene perimeters must be recognizable and enforceable. Common ways to establish these perimeters are as follows:
-
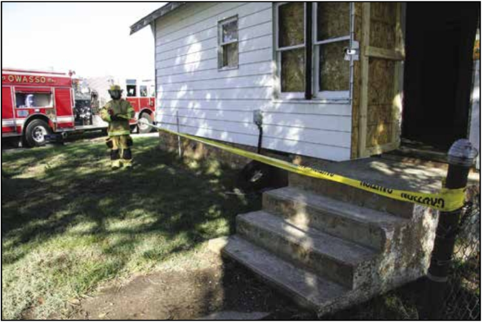
Figure 15.31 A firefighter marking the perimeter to a fire scene. Ensure that the initial perimeter is larger than is necessary for investigations. The perimeter can always be made smaller if needed, but increasing the size of a perimeter is much more difficult.
- Ensure that the perimeter is visible and recognizable to everyone on the scene. Methods used to mark the perimeter should be easy to use. Many public safety organizations use rope, traffic cones, or marked barrier tape (Figure 15.31).
- Use uniformed law enforcement officers or firefighters to control access into the established perimeter. For long-term operations, private security guards and/or the installation of construction barriers or fences may be necessary.
If an investigation is considered to be criminal in nature, the investigator may institute the following procedures:
- Keep a log of all persons who enter and leave the incident perimeter whenever it is necessary to limit the number of personnel entering a scene.
- Permit access only to those individuals who are authorized to be in the area.
- Ensure that firefighters and other emergency personnel move to a staging area outside the perimeter. This move to the staging area should occur after personnel have completed their tasks in the area. Once in the staging area, they should wait for additional assignments or release from the incident.
- Ensure that others brought into the area are always escorted.
-
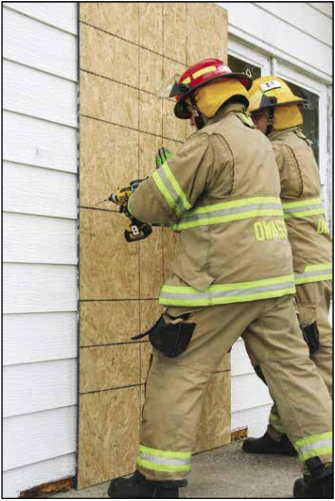
Figure 15.32 Firefighters covering an opening with oriented strand board (OSB) to secure the scene. Mark potential evidence located within the perimeter so that it will not be disturbed before detailed examination, documentation, and collection. Use available materials, such as rope, traffic cones, or barrier tape, to provide this protection.
Depending on local policies and procedures, once the fire is out and the investigation is complete, the structure may be secured and turned over to the owner/occupant or law enforcement officials. Leaving the fire scene intact can assist insurance and private investigators who perform inquiries on behalf of an owner or an insurance company (Figure 15.32).
If local protocol is to remove debris from the structure, this is the final activity before securing the structure. Remove charred materials to prevent the possibility of rekindling and to help reduce smoke damage. Unburned materials can be separated from the debris and cleaned. Debris may be shovelled into large containers to reduce the number of trips between the fire area and the debris collection location. Dumping debris onto streets, sidewalks, or shrubbery makes for poor public relations. Whenever possible, dump debris in areas that are not publicly visible like a backyard or back alley. If those locations are unavailable, it may be necessary to dump the debris in a driveway or front yard until it can be removed. Dumping debris on inexpensive plastic tarps makes it easier to clean up, protects the drive and yard, and is good for public relations.
Fire Cause
Once the area of origin has been identified, fire cause determination is the next step of the operation. Fire cause determination is the process of establishing the cause of a fire incident through careful investigation and analysis of the available evidence.
The following sections provide information on:
- Identifying signs of arson
- Protecting evidence in place
- Moving materials to a safe location
Identifying Signs of Arson
When the initial cause determination indicates that the fire was incendiary or undetermined, it will be necessary to gather evidence based on your observations and those of other firefighters. Depending on local protocol, local or state fire investigators or law enforcement officials may be assigned to perform a formal investigation. In addition to gathering physical evidence, these investigators will need all the information you can provide to them.
Some of the things you should notice include:
- Time of day: Are people and circumstances at the scene as they normally would be at this time of day?
- For example, if a fire is in a dwelling at 0300 hours, the building occupants would probably be wearing night clothes, not street clothes.
- If a fire is in an office building well after working hours, the owner or employees may need to explain why they are present at that hour.
- Weather and natural hazards: Is it hot, cold, or stormy? Is there heavy snow, ice, high water, or fog?
- If the outside temperature is high, the furnace in the structure would not be operating.
- If the outside temperature is low, the windows normally would not be wide open.
- Arsonists sometimes set fires during inclement weather because the fire department’s response may be delayed.
- Man-made barriers: Are there any barriers such as barricades, fallen trees, cables, trash bins, or vehicles blocking access to hydrants, sprinkler and standpipe connections, streets, or driveways?
- These situations could indicate an arsonist’s attempt to impede firefighters’ access and delay fire suppression efforts.
- People leaving the scene: Are people leaving the scene in haste? Fire intrigues most people, and they will remain in the area to watch.
- People leaving the scene by vehicle or on foot may be an important observation in an investigation.
- If a vehicle is seen leaving the scene (especially at high speed), note its colour and as many details about it as possible, especially the license plate number. If possible, note how many occupants are in the vehicle.
- If someone is seen leaving the scene on foot, try to remember that person’s attire, general physical appearance, and any peculiarities such as trying to leave undetected, walking briskly, or looking over his or her shoulder.
Additional information that firefighters may notice while carrying out their duties includes the following:
- Time of arrival and extent of fire: Note the extent of fire involvement at the time of arrival. Observe the colour and movement of smoke and flames.
- Wind direction and velocity: Note wind direction and velocity. These factors may have a great effect on the natural path of fire spread.
- Doors or windows locked or unlocked: Note the position and condition of doors and windows upon arrival. Before opening doors and windows, determine whether they are locked, unlocked, or show any signs of forced entry such as broken glass or damaged frames.
- In some cases, the insides of windows may be covered with blankets, paint, or paper to delay the discovery of fire.
- Location of the fire: Observe the location of the fire. This information may help to identify the area of origin. Also note whether there were separate, seemingly unconnected fires. If so, the fire might have been set in several locations or spread by trailers (combustible material used to spread fire from one area to another).
- Containers or cans: Note metal or plastic containers found inside or outside the structure. They may have been used to transport accelerants.
- Burglary tools: Note any tools such as pry bars or screwdrivers found in areas away from workshops. They may have been used to break into the facility.
- Familiar faces: Notice familiar faces in the crowd of bystanders — people who are seen at numerous fires in the area. They may be individuals who like to watch fire incidents, or they may be habitual fire-setters.
As the operation continues, you should continue to observe conditions that may lead to the determination of the fire cause:
- Unusual odours: Note any unusual odours.
- Even though firefighters wear SCBA during interior firefighting and overhaul operations, they may smell unusual odours outside the structure.
- In addition, odours may cling to personal protective equipment and be detectable after firefighters come out of the smoke.
- Abnormal behaviour of fire when water is applied: Observe how the fire behaves when water is applied to it.
- Flashbacks, re-ignition, several rekindles in the same area, and an increase in the intensity of the fire may indicate accelerant use.
- Water applied to a burning liquid accelerant may cause it to splatter, allowing flame intensity to increase and fire to spread in several directions.
- Water applied to fires involving ordinary combustibles usually reduces flame spread.
- Obstacles hindering firefighting: Note whether any doors are nailed shut or furniture is placed in doorways and hallways to hinder firefighting efforts.
-
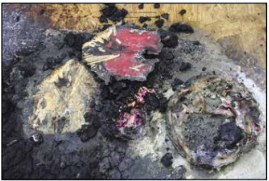
Figure 15.33 The remains of an incendiary device Holes may have been cut in the floors to hinder fire suppression activities and spread the fire.
-
- Incendiary devices: Note any pieces of glass, fragments of bottles or containers, and metal parts of electrical or mechanical devices.
- Most incendiary devices (any device designed and used to start a fire) leave evidence of their existence (Figure 15.33). More than one device may be found, and sometimes a malfunctioning device can be found during a thorough search.
- Trailers: Note combustible materials such as rolled rags, blankets, newspapers, or ignitable liquid that could be used to spread fire from one area to another.
- Trailers usually leave char or burn patterns and may be used with incendiary ignition devices (Figure 15.34).
- Structural alterations: Observe any alterations to the structure. The following methods can be used to allow a fire to spread quickly through the structure:
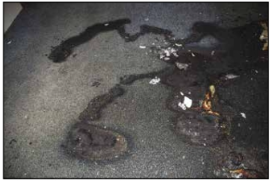
Figure 15.34 Evidence of trailers used to spread a fire. Courtesy of Donny Howard. - Removal of plaster or drywall to expose wood.
- Holes made in ceilings, walls, and floors
- Fire doors are secured in an open position.
- Fire patterns: Note the fire’s movement and intensity patterns.
- These can trace how the fire spread, identify the original ignition source and determine the fuel(s) involved.
- Carefully note any areas of irregular burning or locally heavy charring in areas of little fuel.
- Heat intensity: Look for evidence of high heat intensity, especially concerning other areas of the same room. This may indicate the use of accelerants or intentionally disconnected gas lines.
- Other factors may contribute to variations in heat intensity. One of these factors is synthetic materials, such as polyurethane, that may produce abnormally high heat intensity and may be confused with the use of accelerants.
- Availability of documents: Note anyone who conveniently produces insurance policies, inventory lists, deeds, or other legal documents that would normally be locked away. This may indicate that the fire was planned.
- Fire detection and protection systems: Check for evidence of tampering or intentional damage if fire detection and suppression systems and devices are inoperable.
- Intrusion alarms: Check intrusion alarms to see whether they have been tampered with or intentionally disabled.
- Location of fire: Note any possible ignition sources in the area of the fire. Fires burning in areas remote from normal ignition sources demand an explanation.
- Some examples are fires in closets, bathtubs, file drawers, or in the center of the floor.
- Personal possessions: Note anything that might suggest that preparations were made for a fire. For example:
- Absence or shortage of clothing, furnishings, appliances, food, and dishes
- Absence of personal possessions such as diplomas, financial papers, and toys
- Absence of items of sentimental value such as photo albums, special collections, wedding pictures, and heirlooms
- Absence of pets that would ordinarily be in the structure.
- Household items: Note whether any major household items appear to be removed or replaced with those of lesser value or inferior quality.
- Check to see whether major appliances were disconnected or unplugged and determine why they were in this condition.
- Equipment or inventory: Look for obsolete equipment or inventory, fixtures, display cases, and raw materials.
- Business records: Determine whether important business records are out of their normal places and left where they would be endangered by fire.
- Check safes, and fire-resistant files, to determine whether they are open and exposing the contents.
Protecting Evidence in Place
Firefighters should protect any potential evidence they find from being disturbed until an investigator arrives. A firefighter or investigator should be stationed with evidence until it can be processed if personnel are operating and there is a potential for damage due to foot traffic or from the operations being conducted. Another objective for limiting access to the fire scene is safety. As the perimeter is established, hazardous areas should be marked or otherwise secured to prevent injury to personnel operating in the area and bystanders.
Evidence must remain undisturbed except when absolutely necessary for the extinguishment of the fire. Some best practices to protect the fire scene are:
- Avoid walking on, cross-contaminating, or destroying potential evidence.
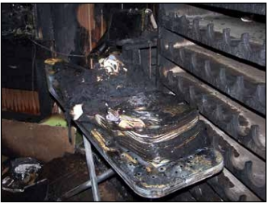
Figure 15.35 Charred documents may be salvageable by trained personnel. Courtesy of Nicole Fuge, Portland Arson Investigation, Portland, OR. - Avoid excessive use of water to avoid washing evidence away.
- Protect human footprints and tire marks.
- Cardboard boxes placed over footprints can prevent otherwise clear prints from being degraded before they are photographed or cast in plaster.
- Immediately close dampers and other openings to protect completely or partially burned papers found in a furnace, stove, or fireplace.
Leave charred documents found in containers such as wastebaskets, small file cabinets, and binders that can be moved easily. These documents may have been used to start the fire.
- Although the paper may be burned or appear destroyed, important data may be recovered during laboratory analysis (Figure 15.35).
- Protect these items from airflow that can disturb or scatter them.
- Plastic tarps or salvage covers may be placed over evidence to indicate its location and protect it.
Moving Materials to a Safe Location
You should not gather or handle evidence unless it is absolutely necessary to preserve it. If you handle, move, or gather evidence, you become part of the chain of custody for that evidence. You must accurately document all actions associated with that evidence as soon as possible as. you may be required to testify regarding the evidence. You must know and follow your department’s SOPs on evidence gathering and preservation.
Chapter Review
