9 Chapter 8: Ground Ladders
Introduction
Welcome! Tansi!
Essentials of Firefighting
Chapter Objectives
- Identify the parts of a ladder. [4.3.6]
- Differentiate among types of ladders. [4.3.6, 4.3.11, 4.3.12]
- Describe the process of cleaning, inspecting, and maintaining a ladder. [4.5.1]
- Describe safe practices for using ladders. [4.3.6, 4.3.11, 4.3.12]
- Describe the process of carrying a ladder. [4.3.6, 4.3.11, 4.3.12]
- Describe the proper procedure for placing a ground ladder. [4.3.6, 4.3.9, 4.3.11, 4.3.12]
- Describe ways to secure a ground ladder. [4.3.6]
- Describe methods for raising and lowering a ladder. [4.3.6, 4.3.11, 4.3.12]
- Describe how to safely work from a ladder. [4.3.9, 4.3.10, 4.3.6, 4.3.11, 4.3.12]
- Describe methods to assist a victim down a ladder. [4.3.9]
- Skill Sheet 8-1: Clean, inspect, and maintain a ladder. [4.5.1]
- Skill Sheet 8-2: Carry a ladder using the one-firefighter low-shoulder method. [4.3.6, 4.3.11, 4.3.12]
- Skill Sheet 8-3: Carry a ladder using a two-firefighter carry. [4.3.6, 4.3.11, 4.3.12]
- Skill Sheet 8-4: Raise and lower a ladder using a one-firefighter method. [4.3.6, 4.3.11, 4.3,12]
- Skill Sheet 8-5: Raise and lower a ladder using a two-firefighter method. [4.3.6, 4.3.11, 4.3,12]
- Skill Sheet 8-6: Reposition a ladder. [4.3.6, 4.3.11, 4.3,12]
- Skill Sheet 8-7: Leg lock on a ground ladder. [4.3.9, 4.3.10, 4.3.11, 4.3.12]
- Skill Sheet 8-8: Deploy a roof ladder on a pitched roof. [4.3.12]
- Skill Sheet 8-9: Assist a victim down a ground ladder. [4.3.9]
Fire service ground ladders are an important part of the equipment that you will use at emergency incidents. Ground ladders are carried on all pumpers, aerial ladder apparatus, and other apparatus. Depending on the ladder length, ground ladders require from one to six firefighters to carry and raise into position. While primarily used to access upper stories and roofs of buildings, ground ladders can also be used to reach areas, such as storm drains, trenches, and pits, that are below ground level.
To certify as a Level I Fire Fighter, you must know the following about ground ladders:
- Parts of a ladder
- Hazards associated with setting up ground ladders
- Foundations considered stable for ladder placement
- Different ladder angles for various tasks
- Safe angles for setting and climbing ladders
- Structural components considered reliable for top placement
You must also be capable of performing the following tasks alone or as a member of a team:
- Carrying ground ladders
- Raising ground ladders
- Extending ground ladders and locking the fly
- Determining that a structural component (wall or roof) is capable of supporting a ladder
- Judging extension ladder height requirements
- Placing a ladder to avoid obvious hazards
Now, what?
Let’s get learning!
Lesson 1
Outcomes:
- Identify the parts of a ladder.
- Differentiate among types of ladders.
Parts of a Ladder
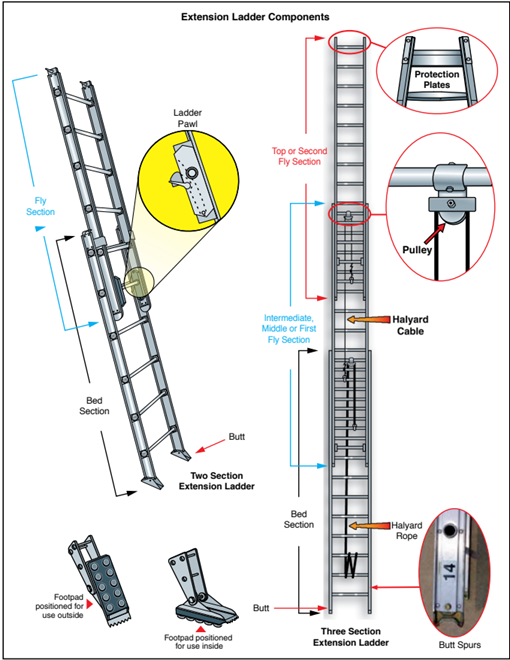
The following terms are used to describe the various parts of fire service ladders (Figures 8.1 and 8.2):
- Beam: Main structural member of a ladder supporting the rungs or rung blocks.
- Bed section (aka base section or main section): Lowest and widest section of an extension ladder; while the ladder is being raised or lowered, this section always maintains contact with the ground or other supporting surface.
- Butt (aka heel or base): Bottom end of the ladder; the end that is placed on the ground or other supporting surface when the ladder is positioned.
- Butt spurs: Metal plates, spikes, or cleats attached to the butt end of ground ladder beams to prevent slippage.
- Fly Section: Upper section(s) of extension or some combination ladders; the section that moves.
- Footpads (aka shoes): Swivel plates attached to the butt of the ladder; usually have rubber or neoprene bottom surfaces
- Guides: Wood or metal strips, sometimes in the form of slots or channels, on an extension ladder that guide the fly section while being raised.
- Halyard (aka fly rope): Rope or cable used for hoisting and lowering the fly sections of an extension ladder; also called fly rope.
- Heat Sensor Label: Label affixed to the inside of each beam of each ladder section; a colour change indicates that the ladder has been exposed to a sufficient degree of heat and should be tested before further use.
- Hooks: Curved metal devices installed near the top end of roof ladders to secure the ladder to the highest point on a peaked roof of a building.
- Pawls (aka dogs or ladder locks): Devices attached to the inside of the beams on fly sections used to hold the fly section in place after it has been extended.
- Protection plates: Strips of metal attached to ladders at chafing points, such as the tip, or at areas where it comes in contact with the apparatus mounting brackets.
- Pulley: Small, grooved wheel through which the halyard is drawn on an extension ladder.
- Rails: The two lengthwise members of a trussed ladder beam that are separated by truss or separation blocks.
- Rungs: Cross members that provide the foothold for climbing; the rungs extend from one beam to the other.
- Stops: Wooden or metal pieces that prevent the fly section from being extended too far.
- Tie rods: Metal rods located beneath rungs extending from one beam to the other of a wooden ladder.
- Tip (top): Extreme top of a ladder.
- Truss block: Spacers set between the rails of a trussed ladder; may support rungs.

Lesson 2
Outcomes:
- Differentiate among types of ladders
Ladder Types

The fire service typically uses four types of ground ladders:
- Single
- Combination
- Roof
- Extension
Depending on the local requirements, the fire department may also carry commercial ladders, such as stepladders. Commercial ladders may not meet NFPA requirements for emergency operations.
Single Ladders
Single ladders, sometimes called wall ladders or straight ladders, consist of one section of nonadjustable or fixed length (Figure 8.3). The overall length of the beams is used to define the length of single ladders, such as a 20-foot (6 m) straight ladder. They are often used for quick access to windows and roofs on one-and two-story buildings. Some single ladders are of the trussed type, a design intended to maximize their strength while reducing weight. Lengths of single ladders vary from 6 to 32 feet (2 to 10 m) with the more common lengths ranging from 12 to 24 feet (4 to 7 m).

Roof Ladders
Roof ladders are single ladders equipped with folding hooks that provide a means of anchoring the ladder over the ridge of a pitched roof or some other roof part (Figure 8.4). In position, roof ladders generally lie flat on the roof surface so that a firefighter can stand on the ladder while working. The ladder distributes the firefighter’s weight and helps prevent slipping. Roof ladders may also be used as wall or straight ladders. Their lengths range from 12 to 24 feet (4 to 7 m).

Extension Ladders
An extension ladder consists of a base or bed section and one or more fly sections that travel in guides or brackets to permit length adjustment (Figure 8.5). The full length to which it can be extended indicates its size. Extension ladders can be adjusted incrementally to the specific length needed to access windows and roofs. Extension ladders generally range in length from 12 to 39 feet (4 to 11.5 m)

Lesson 3
Outcomes:
- Describe the process of cleaning, inspecting, and maintaining a ladder.

Ladder Inspection, Cleaning, and Maintenance
Fire service ladders must be able to withstand considerable abuse including sudden overloading, exposure to temperature extremes, and falling objects striking the ladders. Clean and inspect ladders after each use. During inspection, you should cover all parts of the ladder, and determine the cause of a part that shows excessive wear. Inspect ladders per departmental policy. Periodic inspections, service tests, cleaning, and maintenance are critical to ensure the safe operation of ground ladders.
Inspecting and Service Testing Ladders
NFPA 1932, Standard on Use, Maintenance, and Service Testing of In-Service Fire Department Ground Ladders requires ground ladders to be inspected after each use and on a monthly basis.
When inspecting ground ladders, check the following on all types of ladders:
- Heat sensor labels on metal and fibreglass ladders for a colour change indicating heat exposure (Figure 8.6)
- Heavy carbon (soot) deposits or blistered paint on the ladder tips on ladders without heat sensor labels, indicating heat exposure
- Discolouration on fibreglass ladders that could indicate heat exposure
- Rungs for damage or wear
- Rungs for tightness
- Bolts and rivets for tightness
- Welds for any cracks or apparent defects
- Beams and rungs for cracks, splintering, breaks, gouges, checks, wavy patterns, or deformation
- Worn areas caused by vibration at points of contact with apparatus or other ladders
**NOTE: Replace heat sensors when their expiration date is reached. **
**NOTE: Bolts on wooden ladders should not be so tight that they crush the wood. **
In addition to these general inspections, other items need to be checked, depending on the type of ladder being inspected. If any damage is found, remove the ladder from service until it can be repaired and tested. Ladders that cannot be safely repaired must be destroyed or scrapped for parts. The following sections highlight some of these items. Skill Sheet 8-1 contains general procedures for cleaning, inspecting, and maintaining a ladder.


Checking Ladder Markings and Labels
All fire service ground ladders are required to have markings and warning labels. These markings and labels are factory applied although locally required markings may also be applied. These markings must be legible.
The following markings are commonly found on fire service ladders:
- Designated ladder length: NFPA 1931, Standard for Manufacturer’s Design of Fire Department Ground Ladders requires that the designated ladder length be marked on each beam within 12 inches (300 mm) of the butt plate (Figure 8.7).
- A manufacturer’s nameplate: Includes the month and year of manufacture. This is also a requirement of NFPA 1931.
- Apparatus’ designation or a locally assigned inventory number: Stencilled on the beam as required by the AHJ.
- A white tip or reflective tape attached to the tip: This makes the top of the ladder visible in smoky or dark conditions.
- A stripe: Indicates the balance point.

**NOTE: Wooden ladders should not be painted because it can conceal damage to the wood. **
NFPA 1931 requires the manufacturer to have a certification label affixed to the ladder indicating that the ladder meets the standard. A variety of warning labels are also required on all types of ladders, including:
- An electrical hazard warning label (Figure 8.8).
- A ladder positioning label indicating the climbing angle and the side of the ladder that must be away from the building.
- Heat sensor labels are required on metal and fibreglass ladders, placed on the inside of each beam, below the second rung from the tip of each section. The heat sensor is pre-set to 300°F (149°C) and must have the expiration date indicated on it.
Inspecting Metal Ladders
When inspecting metal ladders, you should look for:
- Evidence of flame impingement or heat damage
- Loose or missing rivets or fasteners
- Damaged or missing rubber on the footpads
- Dry rot or other damage to the halyard
- Corrosion or rust
- Loose or damaged rungs
- Cracks, bends, or other damage
Inspecting Fibreglass Ladders
When inspecting fibreglass ladders, you should look for:
- Cracks, chipping, or other damage in the fibreglass components
- Loose or missing rivets or fasteners
- Evidence of flame impingement or heat damage
- Corrosion or rust on metal components
- Loose or damaged rungs
- Damaged or missing rubber on the footpads
- Dry rot or other damage to the halyard
Wooden Ladders/Ladders with Wooden Components
Look for the following when inspecting wooden ladders or ladders with wooden components:
- Areas where the finish has been chafed or scraped
- Darkening (blistering or blackening) of the varnish (indicating exposure to heat)
- Dark streaks in the wood (indicating deterioration of the wood)
- Marred, worn, cracked, or splintered parts
- Shoes rounded or smooth
- Water damage


Inspecting Roof Ladders
When inspecting roof ladders, make sure that the roof hook assemblies operate with relative ease (Figure 8.9). In addition, the hook assemblies should not show signs of rust; the hooks should not be deformed; and the parts should be firmly attached with no sign of looseness.
Inspecting Extension Ladders
When inspecting extension ladders, check the following:
- Pawl assemblies: The hook and finger should move in and out freely.
- Halyard: If damage or wear is found, replace the halyard.
- Halyard cable: Check to see that it is taut when the ladder is in the bedded position. This check ensures proper synchronization of the upper sections during operation.
- Pulleys: Make sure they turn freely.
- Ladder guides: Check their condition and that the fly sections move freely.
Service Testing Ladders
Fire service ground ladders are subject to harsh conditions and physical abuse. They must be service tested to ensure that they continue to be fit for use. NFPA 1932 serves as the guideline for ground ladder service testing. Service test all ground ladders before being placed in service, test annually while in service, and service test after any use that exposes them to high heat or rough treatment. The fire department or an approved testing agency should conduct the specified tests from the standard. NFPA 1932 further recommends that caution be used when performing service tests on ground ladders to prevent damage to the ladder or injury to personnel.

Ladder Cleaning
Regular and proper cleaning of ladders is more than a matter of appearance. Accumulated dirt or debris from a fire may collect and harden to the point where ladder sections cannot function as designed. Therefore, ladders should be cleaned after every use.
Use the following guidelines when cleaning a ladder:
- Use a soft bristle brush and running water to clean the ladder (Figure 8.10).
- Remove tar, oil, or greasy residues with mild soap and water or environmentally safe solvents and apply lubrication occasionally according to departmental standard operating procedures (SOPs) and manufacturer’s recommendations.
- Look for damage or wear while cleaning the ladder. Report defects according to departmental SOPs.
- Wipe the ladder dry after cleaning or use.
Ladder Maintenance
It is important to understand the difference between ground ladder maintenance and repair. Maintenance means keeping ladders in a state of usefulness or readiness. Repair means to restore or replace that which is damaged or worn out.
All firefighters should be able to perform routine ground ladder maintenance according to departmental SOPs and the manufacturer’s recommendations. Any ladders in need of repair require the service of a trained ladder repair technician.
General maintenance requirements for ground ladders include the following:
- Keeping ground ladders free of moisture.
- Storing or position ladders where they are free from vehicle exhaust or engine heat.
- Keeping ladders in an area where they are not exposed to the elements of weather.
- Painting ladders only for the purposes of identification or visibility, limiting painted areas to 18 inches (450 mm) at the top and bottom of the beams.
Lesson 4
Outcomes:
- Describe safe practices for using ladders.
Ladder Safety
Exercise caution when lifting, carrying, and raising a ladder, otherwise, you risk possible injury or even death. The following sections provide general guidelines for ladder safety and safety when raising ladders.
General Guidelines for Ladder Safety
To be able to safely carry, raise, lower, and work on ladders you should:
- Develop and maintain adequate upper body strength.
- Operate ladders according to departmental training and procedures.
- Wear full personal protective equipment, including gloves and helmet, when handling and working with ladders.
- Choose the correct ladder for the assigned task.
- Use leg muscles, not back or arm muscles, when lifting ladders below the waist.
- Use an adequate number of firefighters for each carry and raise.
- Do not raise any ladders to within 10 feet (3 m) of electrical wires.
- Secure the tip and anchor the foot of the ladder when in use during training or emergency incidents.
- Grasp extension ladder beams when extending or retracting to prevent fingers from being pinched or caught between sections.
- Ensure that the hooks of the pawls are seated over the rungs.
- Ensure that the ladder is stable before climbing (both butt spurs in contact with a stable surface, with the ground/roof ladder hooks firmly set).
- Use caution when moving ladders sideways.
- Climb smoothly and rhythmically.
- Never overload the ladder (one firefighter every 10 feet [3 m] or one per section).
- Use a leg lock or ladder belt when working from a ground ladder.
- Relocate a positioned ladder only when ordered to do so.
- Use ladders for their intended purposes only.
- Inspect ladders for damage and wear after each use.
- Secure the foot of unattended ladders to a stationary object using ropes.
![]()
Because speed is often required, movements when carrying, raising, or lowering ladders should be smooth and controlled. Teamwork is important when more than one firefighter is needed. Individual and team proficiency in handling ladders is developed and maintained through training.

To prevent personal injuries, you must use the following proper lifting and lowering techniques when handling ground ladders:
- Use the correct number of firefighters for the length and type of ladder to be lifted.
- Bend your knees, keeping your back as straight as possible, and lift with your legs, not with your back or arms (Figure 8.11).
- Lift on the command of a firefighter who can see the other members of the team.
- Make it known immediately if you are not ready to lift a ladder when working with a team; lifting should occur in unison.
- Reverse the procedure for lifting when it is necessary to place a ladder on the ground before raising it as follows:
-
- Lower the ladder using your leg muscles.
- Keep your body perpendicular to the ladder and your feet parallel to the ladder so that when the ladder is placed, it does not rest on your toes
Safety When Raising Ladders
Before raising a ladder, there are several things you need to consider and precautions you must take. Some of the more important ones are the presence of electrical hazards, the position of the extension ladder fly section, and tying the halyard.
Electrical Hazards
People climbing ladders that come in contact with live electrical wires can result in electrocution. Before making the final selection on where to place a ladder or what method to use for raising it, use the following guidelines to avoid electrical contact hazards:
- Look up to check for overhead electrical wires or equipment.
- Look up AGAIN before raising the ladder.
- Keep a distance of at least 10 feet (3 m) from all energized electrical lines or equipment; the Occupational Safety and Health Administration (OSHA) refers to this distance as the “Circle of Safety” and includes the distance in its regulations and worker safety documentation.
- Maintain this distance while raising the ladder, using the ladder, and lowering the ladder.
- Use an alternate method for raising the ladder if the ladder may come to rest a safe distance from electrical equipment but comes too close to the equipment during the actual raise..
- Alternatively, raise the ladder parallel to the structure as opposed to perpendicular (Figure 8.12).

![]()
Position of the Fly Section on Extension Ladders
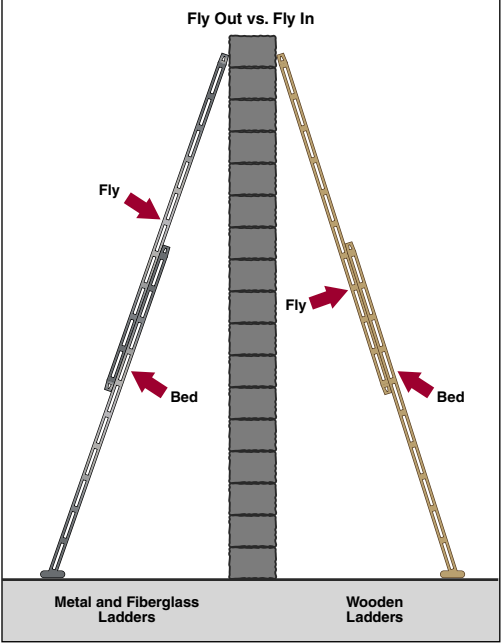
Each ladder manufacturer specifies whether a ladder should be placed with the fly in, toward the structure; or out, away from the structure. This placement is based on the ladder design, construction materials, and the fly position at which the manufacturer’s tests show it to be strongest. Failure to follow this recommendation could void the ladder’s warranty if a failure or damage occurs.
Fly Out Position
Modern metal and fibreglass ladders are designed to be used with the fly out.
Consult departmental SOPs or the ladder manufacturer to determine the correct fly position.
Some departments have ladders that are intended to be used with the fly out but prefer that the firefighter extending the halyard be on the outside of the ladder. In this case, firefighters will need to pivot or roll the ladder 180 degrees after it has been extended.
Fly In Position
Wooden ladders that are designed with the rungs mounted in the top truss rail are intended to be used with the fly in (Figure 8.13).
Securing the Halyard
Once an extension ladder is resting against a structure and before it is climbed, the excess halyard should be secured (tied off) to prevent anyone from becoming tangled in the rope when ascending or descending the ladder. Some halyards (closed halyards) are already tied as a feature of the ladder.
Lesson 5
Outcomes:
- Describe the process of carrying a ladder
Carrying Ladders
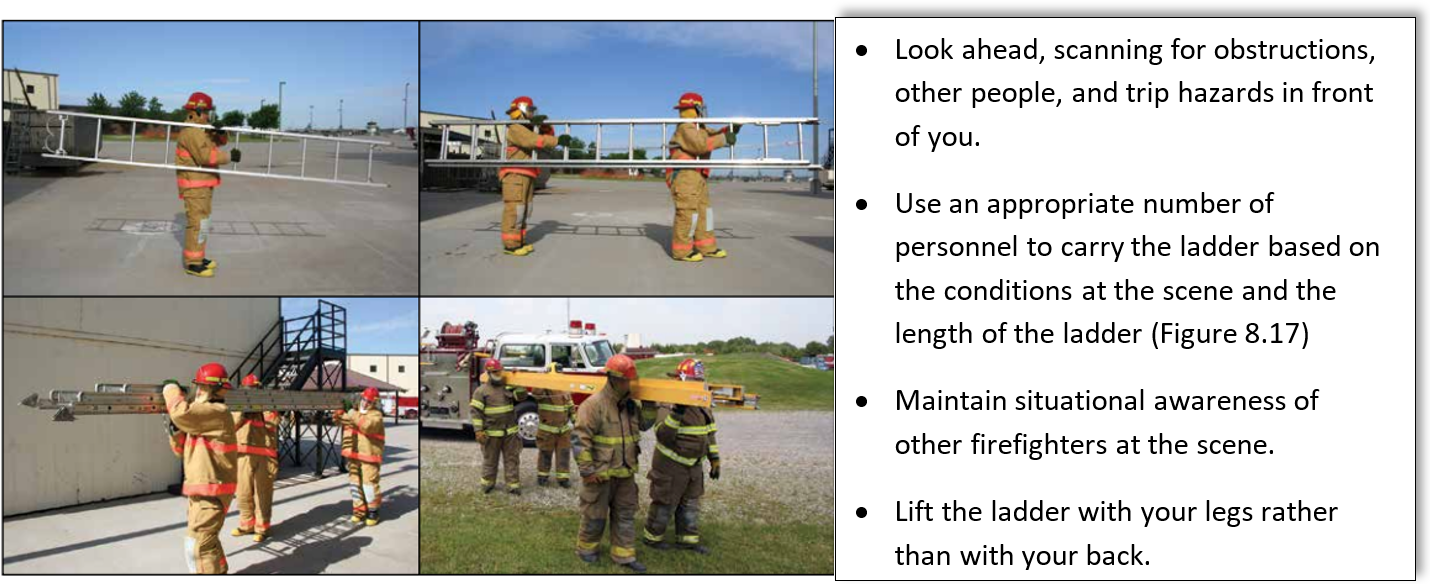
Firefighters must safely and quickly carry ground ladders from the apparatus to where they are to be used. First, remove the ladder from the apparatus. On pumping apparatus, one or two firefighters should be able to remove the ladder. On aerial apparatus, three or four firefighters may be required.
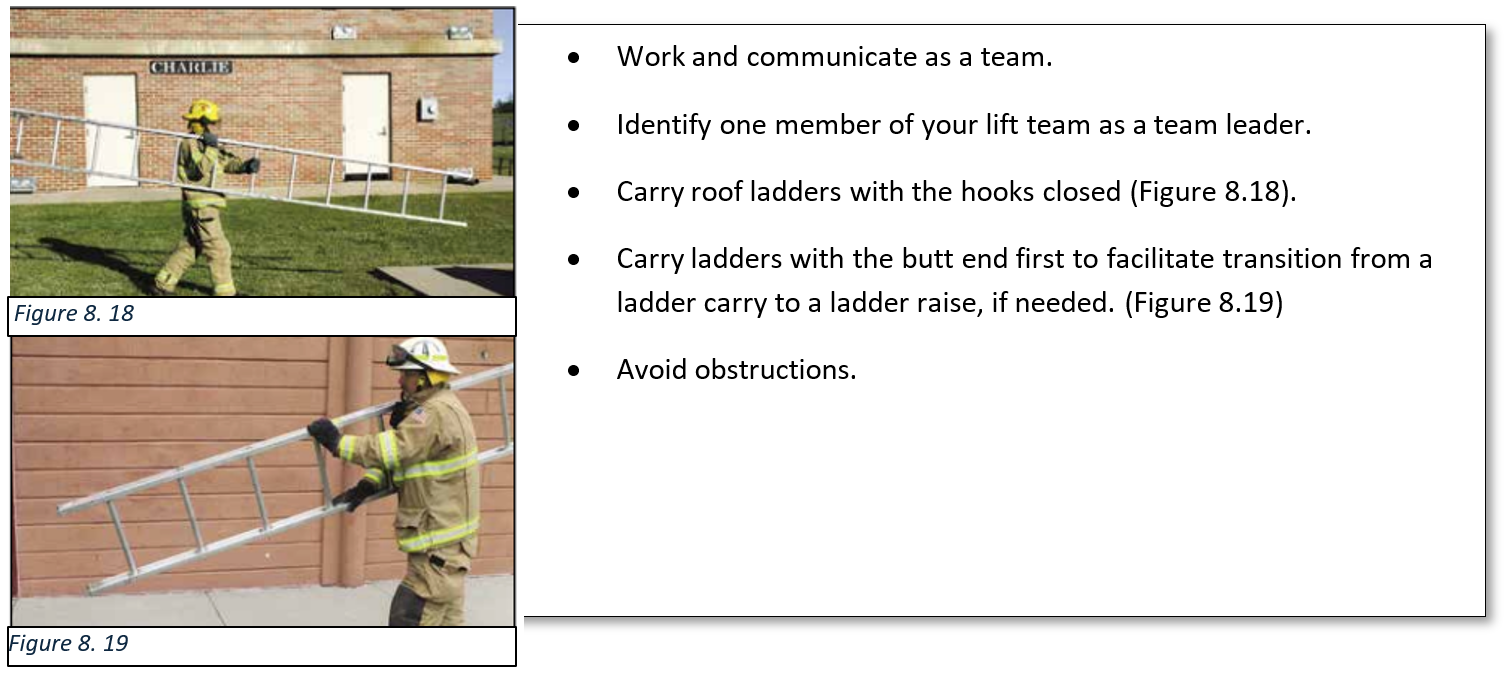
As there are different types of apparatus and means of mounting ladders, all carries in this section are demonstrated from the ground. In most cases, the ladders are carried butt end forward. Refer to Skill Sheets 8-2 and 8-3 for steps to perform one-firefighter and two-firefighter ladder carries.
Selecting the Correct Ladder
The Incident Commander (IC) or your supervisor at an incident will usually tell you which ladder to use and/or where to place the ladder. In the absence of those orders, you must be able to select on your own an appropriate ladder and a safe location for its placement.
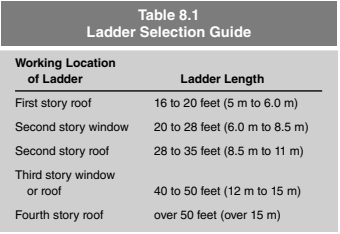 When personnel are working on a roof or upper stories, there must be at least two means of escape with at least two ladders at remote locations from each other. Ground ladders or aerial devices may provide escape routes.
Selecting a ladder to reach a specific point requires the ability to judge distance. Depending upon the height of the foundation and other factors, a residential story averages about 10 feet (3 m), and the distance from the floor to a windowsill averages about 3 feet (1 m). A commercial story averages 12 feet (4 m) from floor to floor, with a 4-foot (a little more than 1 m) distance from the floor to the windowsill.
Table 8.1 is a general guide that can be used in selecting ladders for specific locations.
Determine how far various ladders will reach based on their designated length. The designated length is a measurement of the total length of a single-section ladder and the maximum extended length of an extension ladder. The designated length is not the ladder’s reach because ladders are set at angles of approximately 75 degrees for climbing. The reach will be less than the designated length.
Single, roof, and folding ladders meeting NFPA 1931 are required to have a measured length equal to the designated length. In the case of extension ladders, however, the maximum extended length may be as much as 6 inches (150 mm) less than the designated length.
Once you understand the concept of designated length, you should be able to select the correct ladder lengths for various ladder placements such as the following:
- Extending a ladder a minimum of three to five rungs beyond the roof edge to provide both a footing and a handhold for anyone stepping on or off the ladder (Figure 8.14a).
- Placing the tip of a ladder even with the top of the window and to the upwind side of it to gain access to a narrow window or to open the window for ventilation (Figure 8. 14b).
- Placing the tip of a ladder just below the windowsill when performing rescue from a window opening (Figure 8.14c).

**NOTE: Building walls or parapets that extend more than 6 feet (2 m) above the roof may require the use of an additional ladder to reach the roof deck. You can place a roof or straight ladder on the roof side of the parapet and next to the extension ladder to assist firefighters to and from the roof. **
Table 8.2 provides information on the maximum working heights of various ground ladders when placed at the proper climbing angle.
Note the following measurements when considering the information contained in this table:
- For lengths of 35 feet (11 m) or less, reach is approximately 1 foot (300 mm) less than the designated length.
- For lengths over 35 feet (11 m), reach is approximately 2 feet (600 mm) less than the designated length.
Removing Ladders from the Apparatus
Ground ladders are mounted on pumping apparatus, aerial ladder apparatus, quints, and specialized apparatus. Ground ladders carried on pumping apparatus may be mounted in the following ways (Figure 8.15):
- Hanging on a beam in racks on the right side of the apparatus
- Standing on the lower beam in a compartment between the hose bed and the right side of the body, accessed from the rear
- Laying flat in a compartment under the right side of the hose bed, accessed from the rear of the apparatus
- Ladder mounting locations on apparatus. Horizontal interior compartment photo courtesy of Ron Jeffers.
- In a mechanically operated rack that lowers the ladder from the top of the hose bed to the right-hand side.
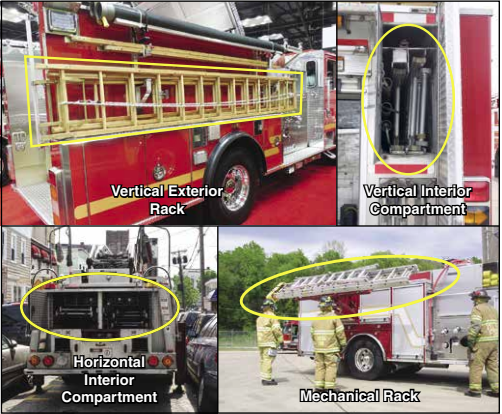
On aerial and quint apparatus, the ladders may be mounted vertically on the left or right side of the apparatus bed or horizontally in racks within the bed, which are accessed from the rear of the apparatus.
Specialized apparatus, such as mobile water supply apparatus and aircraft rescue and firefighting apparatus, generally carry ladders vertically on the outside of the apparatus body.
When using the ground ladders mounted on your apparatus, you must know the following:
- Types, lengths, and locations of ladders carried on your apparatus
- How the ladders are stored, either with the butt toward the front or the rear of the apparatus
- How the ladders are nested together
- How one nested ladder can be removed leaving the other securely in place
- The order in which nested ladders are stored
- Whether the extension ladder’s fly is located on the inside or the outside when the ladder is stored on the side of the apparatus
- The method used to secure ladders in place
- The location at which mounting brackets extend through vertically mounted ladders
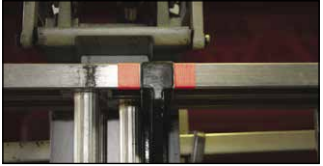
**NOTE: Many departments find it a good practice to mark ladders to indicate which rungs go in or near the brackets as shown in Figure 8.16. **
Procedures for Removing Side/Top Mounted Ground Ladders
These procedures differ from when they are mounted in flat position.
- Unlatch the securing devices and lift the ladder off the bracket and into the correct carrying position.
- Remove any equipped ladder protective covers.
Procedures for Removing Internally Stored Ladders in Compartments
- Open the compartment access panel (if there is one) and then slide the ladder out to the proper carrying point.
- When multiple firefighters are required to carry the ladder, they stand on either side of the horizontally racked ladder and take their assigned location as the ladder is pulled out.
- Once the ladder has been removed from the apparatus, firefighters should reposition on the same side of the ladder for carrying.
Carrying Ladders Safely
Safety considerations when carrying ground ladders include the following:
