15 Chapter 14: Fire Suppression
Welcome! Tansi!
Essentials of Firefighting
Chapter Objectives
- Explain the science behind fire suppression. [4.3.10, 4.3.11]
- Describe methods for suppressing structural fires. [4.3.8, 4.3.10, 4.3.13]
- Explain the role of firefighters with regard to supporting fire protection systems during fire suppression. [4.3.13, 4.3.14]
- Explain the duties of firefighters related to building utilities. [4.3.18]
- Describe the process of attacking a vehicle fire. [4.3.7]
- Describe the process of attacking fires in exterior Class A materials. [4.3.8]
- Describe ground cover fire attack. [4.3.19]
- Skill Sheet 14-1: Attack an interior structure fire at ground level using a direct, indirect, or combination attack. [4.3.10]
- Skill Sheet 14-2: Attack a structure fire using a transitional attack. [4.3.10]
- Skill Sheet 14-3: Attack a structure fire above and below grade level using an interior attack. [4.3.10]
- Skill Sheet 14-4: Operate sprinkler system control valves. [4.3.14]
- Skill Sheet 14-5: Stop the flow of water from an activated sprinkler. [4.3.14]
- Skill Sheet 14-6: Turn off building utilities. [4.3.18]
- Skill Sheet 14-7: Attack a passenger vehicle fire. [4.3.7]
- Skill Sheet 14-8: Attack a fire in exterior stacked or piled Class A materials. [4.3.8]
- Skill Sheet 14-9: Attack a fire in a small unattached structure. [4.3.8]
- Skill Sheet 14-10: Extinguish a fire in a trash container. [4.3.8]
- Skill Sheet 14-11: Attack a ground cover fire. [4.3.19]
- Skill Sheet 14-12: Construct a fire line. [4.3.19]
Up to this point in your training, you have gained the basic knowledge and skills necessary to control and extinguish fire.
Now it is time to learn to apply those skills and knowledge to control fires involving:
- Structures
- Vehicles
- Stored Class A materials (outside fires)
- Ground cover (vegetation/wildland fires)
Now What?
Let’s get learning!
Lesson 1
Outcomes:
- Explain the science behind fire suppression.
The Science Behind Fire Suppression
Temperature Reduction
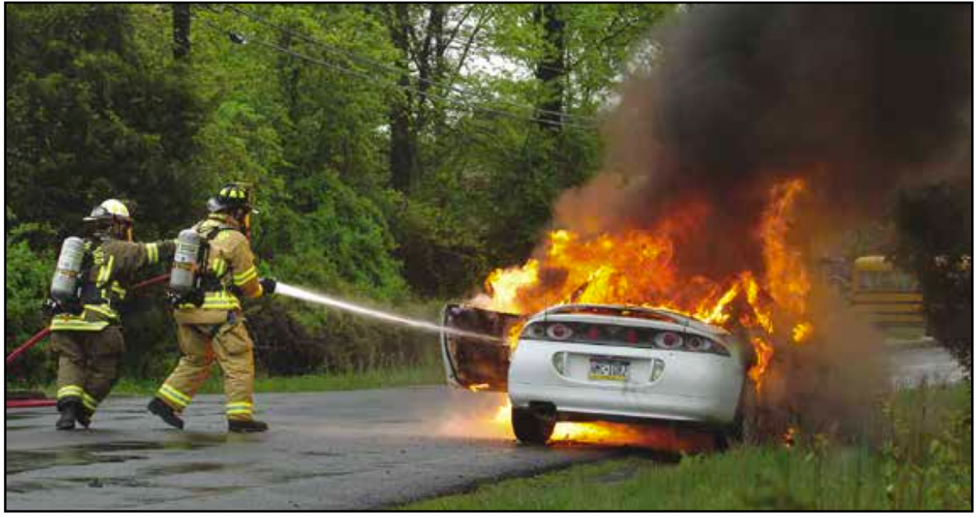
One of the most common methods of fire control and extinguishment is cooling with water (Figure 14.1). To extinguish a fire by reducing its temperature, enough water must be applied to absorb the heat being generated and stop the gas phase chemical reaction.
Cooling reduces the temperature of a fuel to a point where it does not produce sufficient vapours to burn. The use of water for cooling is the most effective method available for the extinguishment of smouldering fires. Water can be used to control burning gases and reduce the temperature of hot products of combustion in the upper gas layer.
Cooling burning gases:
- Limits or stops flaming combustion in the upper layer
- Slows the pyrolysis process of combustible materials
- Reduces radiant heat flux from the upper layer
- Reduces the potential for flashover
A coordinated combination of cooling hot fire gases from the exterior using a straight stream paired with tactical ventilation lowers the risk that a ventilation-limited fire will reignite and re-enter the growth stage when it receives more oxygen. This tactic may lead to full fire extinguishment or may make the interior tenable for fire attack or search and rescue. Firefighter research testing has shown that this tactic can make the environment tenable for victims and could save their lives.
Water absorbs significant heat as its temperature is raised, but it has its greatest effect when it is vaporized into steam. When water is converted to steam, it absorbs five times more energy than warming the liquid to the boiling point. It also rapidly expands approximately 1,700 times. Because of this expansion rate, firefighters should avoid creating steam during interior attack. Excess steam production can reduce visibility, increase the chances for steam burns, and disrupt the thermal layer.
Control steam production as follows:
- Use good nozzle technique.
- Apply the appropriate amount of water.
- Apply water using the most effective form (fog, straight, or solid stream based upon scene conditions).
If an appropriate amount of water is used with good nozzle technique as described in this chapter, the hot gases within the fire compartment will contract. The contraction of the hot gases may offset the expansion of the steam. If the cooling process is effective, steam production will be kept to a minimum.
Fuel Removal
Removing the fuel source effectively extinguishes any fire. For example, wildland firefighting crews often dig trenches to remove fuel in the path of the fire to try to contain it. Removing fuel at a structure fire is very rarely an option as an extinguishment method.
Removing fuel is a more common tactic at:
- Ground cover fires (Figure 14.2)
- Exterior stacked material fires
- Vehicle fires
- Flammable liquid/gas fires
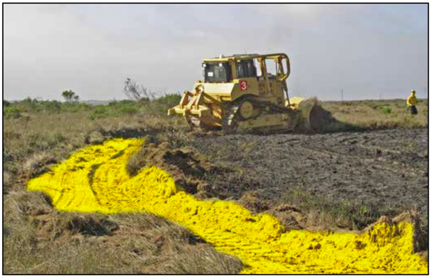
Allowing a fire to burn until all available fuel is consumed while firefighters protect exposures is another example of fuel removal. For instance, flammable liquid spills may create greater environmental harm if they are extinguished with water, creating substantial runoff and contaminating soil or bodies of water. The best solution may be to allow the fire to burn, maximizing thermal damage but minimizing groundwater pollution.
A fuel source may be removed as follows:
- Stopping the flow of a liquid fuel
- Closing valves to stop the emission of gaseous fuels
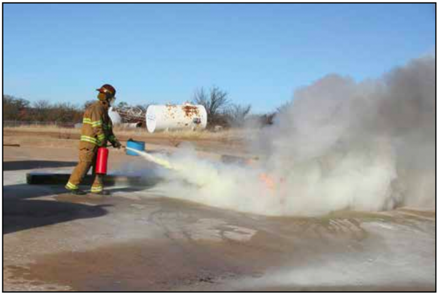
Figure 14. 3 Firefighting foams are used to prevent fuel vapours from mixing with oxygen. - Moving solid fuels out of the path of the fire
Oxygen Exclusion
Reducing the oxygen available to the combustion process reduces a fire’s growth and may result in extinguishment over time. In its simplest form, this method is used to extinguish stove-top fires when a cover is placed on a pan of burning grease. Flooding a compartment with an inert gas such as carbon dioxide displaces the oxygen and disrupts the combustion process; reduces the chance for occupant survivability. Blanketing some fuels with foam can displace the oxygen (Figure 14.3). None of these methods work on fuels that are self-oxidizing such as ammonium nitrate found in fertilizer.
Limiting the fire’s air supply can be a highly effective fire control action. The simplest example of this is when a building occupant closes the door to the fire room before leaving the building. This limits the air supply to the fire and can prevent flashover. Control of doors and windows into and within the structure can aid in controlling the flow path of oxygen to heated, fuel rich products of combustion.
Chemical Flame Inhibition
Extinguishing agents such as some dry chemicals, halogenated agents (Halons), and Halon-replacement “clean” agents, inhibit or interrupt the combustion reaction and stop flame production (Figure 14.4).

This method of extinguishment is effective on flaming fires. These agents do not easily extinguish non-flaming fires because there is no effective means to cool the fuel and stop the chemical chain reaction. The very high agent concentrations and extended periods necessary to extinguish smouldering fires make these agents impractical in these cases.
Test Your Knowledge!
Lesson 2
Outcomes:
- Describe methods for suppressing structural fires.
Structural Fire Attack
Extinguishing a structure fire may take just a few minutes or several hours, depending on the size and scope of the structure, the fire, and available resources.
Your duties and assigned tasks will depend on:
- Departmental SOPs
- Assigned duties
- Amount of fire involvement
- Type of structure involved
This section will focus on the strategy and tactics used to suppress structure fires including:
- Making entry
- Gas cooling
- Direct, indirect, and combination fire attacks
- Transitional attack
- Fires in upper levels of structures
- Attic fires and fires in void spaces
- Belowground structure fires
- Exposure protection
- Controlling building utilities
Situational Awareness: Structural Fire Attack
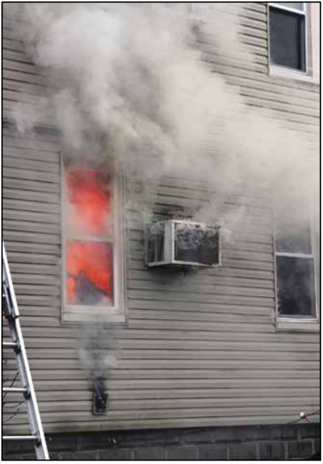
As mentioned in Chapter 1, Introduction to the Fire Service and Firefighter Safety, communicating your observations when assigned a task is essential for your safety. The following conditions specific to structural fire attack should be observed and communicated:
- Location and extent of the fire
- Changes in heat level
- Changes to fire behaviour, spread, and growth, including signs of rapid fire development
- Hazards encountered
- Locations of safe havens and alternate exits
- Changes to structural stability
- Indications of ceiling/floor collapse such as ceiling burn-throughs or sagging floors
- Changes to the neutral plane in the structure (smoke lowering/smoke rising)
- Smoke colour or change of smoke colour
- Volume and behaviour of smoke
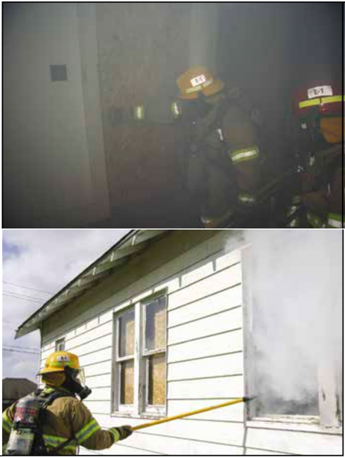
- Locations where smoke is escaping the structure (under eaves, vented windows, around doors) (Figure 14.5)
- Location of any victims or occupants
- Wind direction and strength
- Fire threat to exposures
Making Entry
The IC or supervisor will decide where and from what direction to make entry for an interior fire attack. Generally, attack hoselines are placed to protect firefighters, occupants, and property.
Every member of the crew should conduct a quick entry check before entering a burning building and maintain a high level of situational awareness while inside the structure. Entry check begins well before reaching the entry point and may include visual observations and the use of a thermal imager (TI).
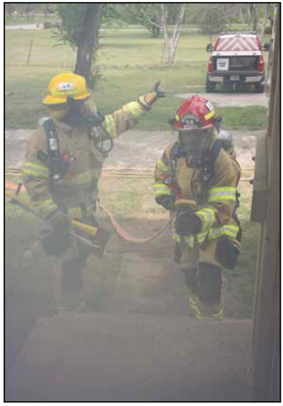
The following are also pre-entry considerations critical to firefighter safety and effectiveness:
- Reading fire behavior indicators
- Understanding the crew’s tactical assignment
- Identifying potential emergency escape routes (other doors, windows)
- Evaluating forcible entry requirements
- Identifying hazards (overhead wires, structural instability)
- Verifying that radios are receiving and transmitting on the correct channel
- Ensuring that self-contained breathing apparatus (SCBA) is on, cylinder is full, and operating properly
- Ensuring that all Personal Alert Safety System (PASS) devices are on and operating properly
- Doing a buddy check to ensure other team members are prepared to enter the structure
Interior fire attack crews advancing hoselines must carry the tools and equipment needed to open interior doors, check concealed spaces for fire extension, or to make an emergency exit. This equipment could include such tools as (Figure 14.6):
- Portable radio
- Hand light
- Pike pole
- Thermal imager
- Forcible entry tools
Before entering the building or the fire area, the firefighter assigned to the nozzle should (Figure 14.7):
- Open the nozzle fully to ensure adequate flow
- Check the pattern setting
- Ensure hose is kink free
- Bleed the air from the hoseline

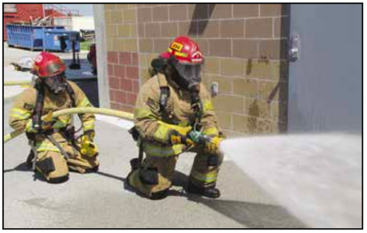
Opening the bale slightly while waiting for water to arrive hastens this process. Without rapidly opening and closing the nozzle, firefighters should either test the range of stream patterns of the nozzle or set the proper nozzle pattern for the attack to verify that the nozzle is working properly.
When an interior attack is planned on a structure fire, firefighters should position themselves in a safe area near the building entrance. From this location, look for fires near the entrance.
Make sure fires in the following areas are extinguished before moving forward, so there are no fires in your exit route if you have to retreat:
- Fascia or soffit, boxed cornices
- Open windows and doors
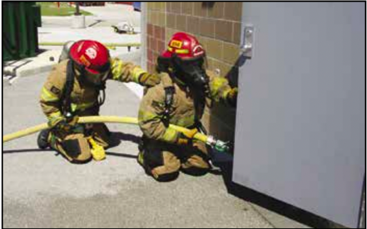
Figure 14. 8 Firefighters checking water flow and pattern prior to making entry into a structure. - Entry or exit points
- Exterior overhangs
When the attack crew moves to the building entrance, they should stay low and out of the doorway while the door is forced open (Figure 14.8). Use a TI or apply a small amount of water spray to the surface of the door in order to check the door for heat. If the door is very hot, the water will evaporate and convert to steam. Excessive heat may be obvious from the smoke, air flow, and other fire behaviour indicators. Even if there are no signs of heat, you should still expect that there will be heat and fire beyond the door. The door should remain closed until the hoseline is charged and the crew is ready to enter. If the fire is ventilation controlled and the door is opened, a significant increase in heat release rate can quickly occur. Unburned fuel in the form of smoke will escape at the top of the doorway, while fresh air will enter at the bottom, providing oxygen for fire development. In this situation, cooling the hot gases overhead can reduce the risk of ignition and potential flashover and provide a safer operating environment. You must observe the smoke movement and air flow when the door is opened: fast air movement in at the bottom and smoke moving out at the top indicates an active fire in the structure. With the hoseline in place, open the door and observe conditions. Apply water to the ceiling using a straight stream in a side-to-side motion to improve conditions in the entry (Figure 14.9). When conditions improve, advance to the seat of the fire cooling the overhead as you advance.
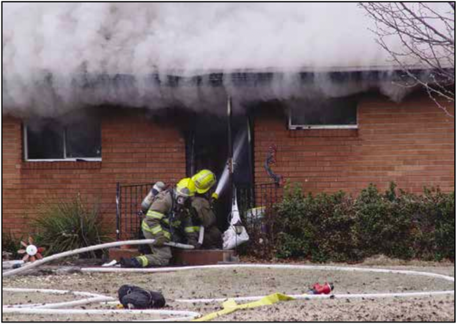
If preflashover conditions are observed upon opening the door (high volume of turbulent smoke and a low neutral plane), apply water to the hot gas layer but do not enter the structure. If necessary, close the door, retreat, and use different tactics to improve interior conditions before attempting re-entry. Firefighters must control the door as it is opened. Place a rope hose tool or utility strap over the doorknob so it can be quickly pulled closed if needed. Once entry is made, the door should be closed enough to limit airflow into the structure without pinching or constricting the hoseline.
A conventional guideline in the fire service for many years has been to “attack the fire from the unburned side.” Major fire departments and NIST/UL have performed fire analysis and laboratory tests that largely disprove this traditional guideline (Kerber 2012 “Analysis of Changing …” and Kerber 2012 “Analysis of One …”).
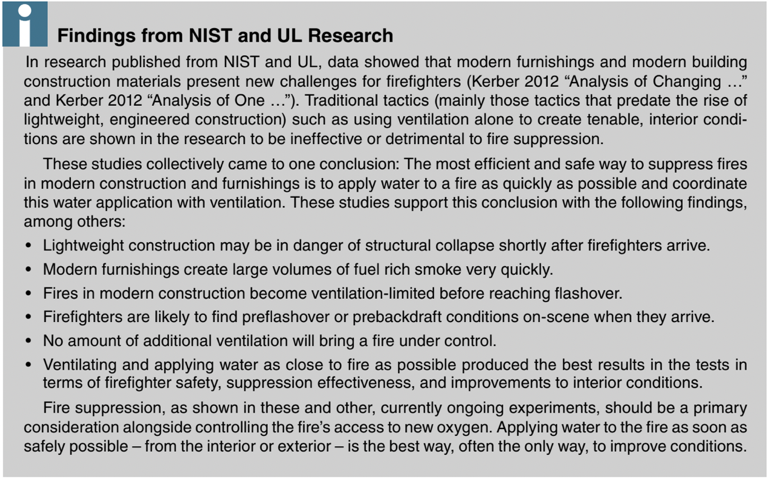 The following factors have changed the fire service’s understanding of structure-fire behaviour:
- Greater heat release rates of modern building construction materials and modern furnishings
- Increased effect of wind on fire expansion and development
Wind and open doorways create flow paths within the structure that increase fire growth and spread and can cause firefighter casualties. Because wind can cause unpredictable changes to the fire, you should attack with the wind to your back. To determine the best entry point based upon wind direction, the IC should complete a thorough size-up and do a 360-degree survey, whenever possible, before deploying attack hoselines. Doors throughout the structure between the entrance and the fire should be controlled to limit air flow along the flow path. A firefighter may be stationed at each door to help move hose and control the door.
Gas Cooling
Gas cooling is a way of reducing heat release from the hot gas layer. This technique is effective when faced with a shielded fire; that is, a fire you cannot see from the doorway because it is located in a remote part of the structure or objects are shielding the fire. In these situations, you cannot apply water directly onto the burning material without entering the room and working under the hot gas layer.
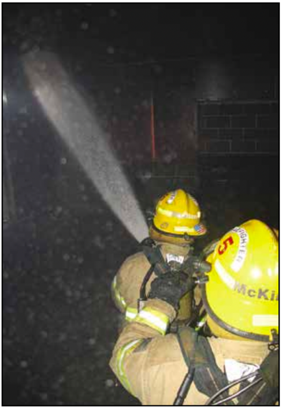
The hot gas layer accumulating in the upper levels of the compartment can present problems for you and other members of the hoseline crew. Remember that smoke is fuel, and it may transition to rollover, flashover, or a smoke explosion at any time. In addition, hot smoke radiates heat to furniture and other combustibles in the compartment. This increases pyrolysis which adds more flammable fuel to the gas layer. Cooling the hot gas layer slows the transfer of heat to other combustibles and reduces the chances of the overhead gases igniting. To cool the hot gas layer, direct short bursts or pulses of water into it.
Direct the stream upward toward the gas layer and quickly and smoothly open and close the nozzle (Figure 14.10). The length of the pulse will depend on the size of the space, varying from less than a second to much longer. The nozzle pattern may need to be adjusted based on the fire conditions in the compartment and its configuration and size. In narrow hallways, the nozzle pattern may need to be restricted. In large-volume compartments or when the upper layer temperature is extremely high, the duration of the pulses may need to be increased. The reach of the stream is also important for cooling the gas layer. The majority of the water should reach and enter the gas layer. Water droplets will fall out of the smoke layer in greater quantities as the layer cools. If the fire burns unchecked, the gas layer will regain its heat, and the gas-cooling technique may have to be repeated. The gas- cooling technique should be repeated as necessary, while the hose team advances under the gas layer toward the fire.
Direct Attack
Depending on the nature and size of the fire, firefighters may use a direct, indirect, or combination method of attacking the fire. Hoseline selection and stream selection are made when the fire attack is conducted. Skill Sheet 14-1 describes the methods for making interior direct, indirect, and combination attacks on a structure fire.
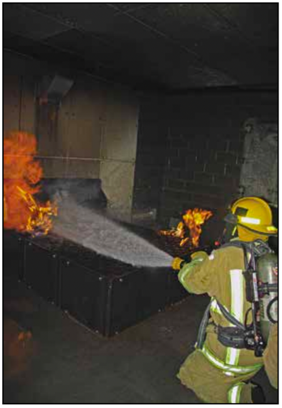
A direct attack on the fire using a solid or straight stream uses water most efficiently on free-burning fires. The water is applied directly onto the burning fuels until the fire is extinguished (Figure 14.11).
Indirect Attack
The indirect attack can be made from inside or outside a structure. The attack is made by directing the stream toward the ceiling to cool the room or by banking the stream off of the walls (Figure 14.12). This method usually produces more steam than a direct attack and must be coordinated with ventilation. While an indirect attack cools the fire environment, it results in a fairly uniform temperature from floor to ceiling and fills the compartment with a mixture of smoke and steam.
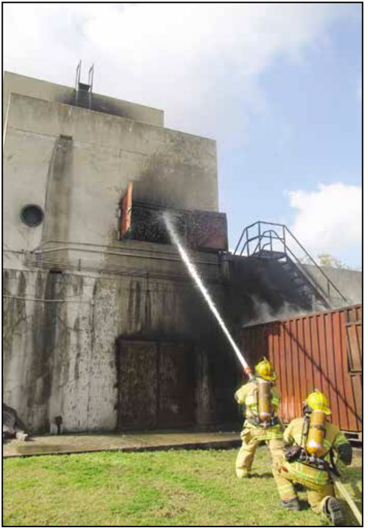
However, this may be the only method of attack possible until temperatures are reduced. To make an indirect attack on the fire from the exterior, a solid or straight stream is introduced through an opening (in a doorway or window) and directed at the ceiling where the temperature is the highest. Discharge water until the desired effect (room cooling, fire control) is reached. Once the temperatures of the heated overhead and the room have been reduced, hoselines can be advanced in-side and firefighters can make a direct attack on the body of the fire. To make an indirect attack from an interior position, the firefighters advance as near to the seat of the fire as possible while still remaining outside the fire compartment and use the ceiling and walls to deflect or bank the stream onto the fire. This will break up the stream(s) resulting in conversion of water to steam. Because the indirect attack will create a large volume of steam, firefighters should not be in the compartment when they perform the attack. The room may need to be ventilated to allow steam to escape before it is safe to enter.
An effective technique is to direct the stream onto the ceiling and walls, which can slow or stop the pyrolysis process on these hot surfaces. Water should not be applied long enough to upset the thermal layering (sometimes called thermal balance) in the compartment; the steam produced will begin to condense, causing the smoke and heat to drop rapidly to the floor and move sluggishly thereafter.
Combination Attack
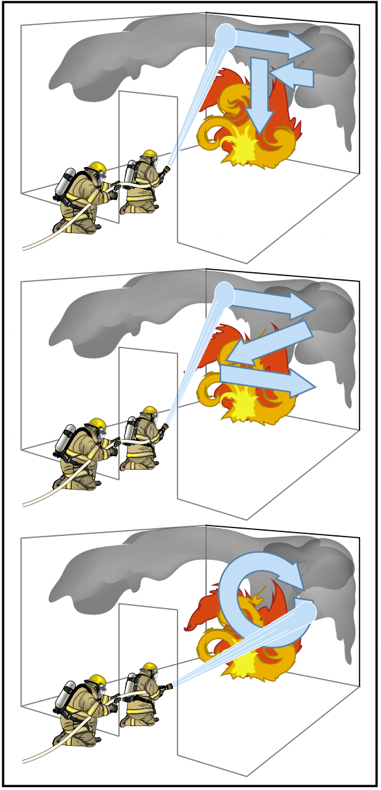
A combination attack combines cooling the hot gas layer at the ceiling level using an indirect attack with a direct attack on the fuels burning near the floor level. To combine both attacks, move the nozzle from the area overhead to the floor in a Z, T, or rotational manner (Figure 14.13). Excessive application of water may cause unnecessary water damage and disturbance of the thermal layering.
Transitional Attack
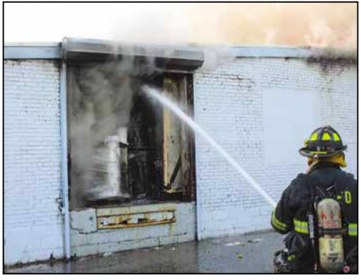
Transitional attack uses an exterior fire attack through a ventilation opening to help a fire transition from ventilation-limited conditions to fuel-limited conditions. Transitional attack reduces the potential for flashover and creates a more survivable interior environment. Following this transitional attack, an interior attack crew can more easily make entry and reach the seat of the fire to complete fire suppression. Transitional attack is not a new tactic. Fire research shows it to be very effective at combatting fires in buildings with modern, synthetic furnishings and structures built with lightweight construction (Kerber “Analysis of Changing … 2012). Through water application to the heated gases within the structure, transitional attack also reduces temperatures within the structure to increase occupant and firefighter survivability.
Short applications (approximately 30 seconds) of a solid or straight stream applied in a side-to-side motion into the super-heated products of combustion overhead can inhibit flashover conditions. A straight stream may be the best nozzle pattern to use in well-involved, unventilated interior fires. Compared to a fog stream, a straight stream will not upset the thermal layering as much, will generate less steam, and will have better reach to knock down the main body of a fire.
Upon arrival at the scene, the IC should conduct a size-up to determine the fire’s location and other pertinent information. Once the fire’s location is determined and fire attack hoselines have been deployed, you can proceed with a transitional attack if instructed to do so. A door or window should be opened near the fire and water applied into the heated gases in the structure (Figure 14.14). The transitional attack can continue to flow water until the desired change in the fire has been achieved.
After the transitional attack, the temperatures within the structure will have been reduced, increasing survivability for victims and firefighters. Firefighters will then have a safer path to the fire. If an interior crew is not ready to enter following a transitional attack, conduct a transitional attack again if temperatures rise in the structure or the fire grows before their entry. If transitional attack is performed correctly, then it may be possible for interior crews to enter the structure while water is being applied from the exterior. However, if performed incorrectly, interior fire crews could be put at risk. When in doubt, do not enter the structure until exterior water application ends. Skill Sheet 14-2 demonstrates recommend steps for a transitional attack.
Fires in Upper Levels of Structures
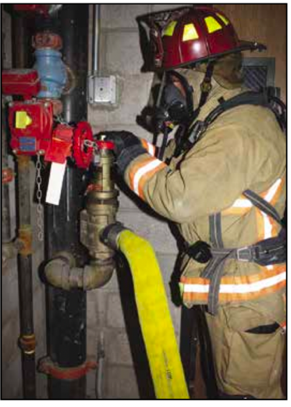
Multi-story structures may contain standpipe systems. Depending on the local building code and age of the structure, a standpipe may be required in structures three stories or higher. In structures that lack standpipes, fire attack may include entering the building at a stairwell nearest to the fire and moving up the closest stairway to the fire location. Always check for fire extension below the fire floor before advancing up the stairs. More personnel will be required to advance the fire hose and ensure that there are no kinks or bends in the hose. In structures equipped with standpipe systems, the location of the standpipe connection determines the fire attack method. Standpipe connections in older structures may be located in corridors or near open stairwells. Most modern structures have the standpipes located in protected stairways (Figure 14.15). If standpipe connections are located in unprotected locations, the attack hoseline is connected on the floor below the fire floor and advanced up the nearest stairwell.
If the standpipe connection is in a protected stairway, hoselines may be connected on the fire floor. Extra sections of the attack hoseline may be flaked up the stairway to the first landing above the fire floor so it will feed more easily into the fire floor as the line is advanced.
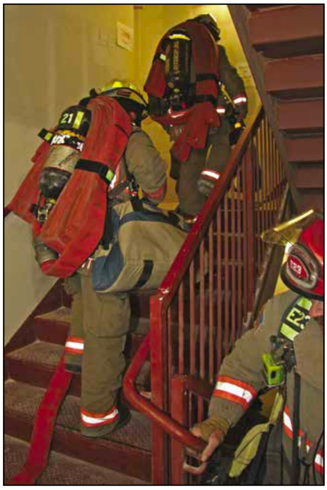
In addition to attacking the fire directly, crews should be checking floors above the fire floor for fire extension and any victims. Fires in upper levels of structures, especially high-rise buildings, can require large numbers of personnel to conduct large-scale evacuations, carry tools and equipment to upper levels, and maintain a sustained fire attack. In many cases, firefighters must carry additional tools and equipment up many flights of stairs (Figure 14.16). Elevators must not be used to transport fire crews to the fire floor. The fire may damage the elevator or its controls and strand the firefighters in the elevator car or deposit them directly onto the fire floor. Some departments allow elevators to be used to transport personnel, firefighting tools, and equipment to a staging area normally located two floors below the fire floor. Always follow your department SOPs when using elevators in fire buildings.
Personnel must exercise caution in the streets around the outside perimeter of a high-rise building on fire. Glass and other debris falling from far above the street can severely damage equipment, cut hoselines, and injure or kill firefighters. To minimize the danger, cordon off safe paths into the building. Conditions dictate how large an area needs to be cordoned off.
Belowground Structure Fires
Fires originating in basements or subfloors are some of the most difficult and dangerous structure fires that you may encounter. The IC must make a thorough and accurate risk/benefit analysis before committing personnel into a structure experiencing a basement fire.
Residential Basements
Residential basements exist in many communities. They may be used as:
- Self-contained living quarters
- Entertainment rooms
- Utility spaces for:
- Storage
- Heating, ventilation, and air-conditioning equipment (HVAC)
- Water heaters
- Coal or fuel oil storage
- Workshops or hobby rooms
- Garages
- Storm shelters
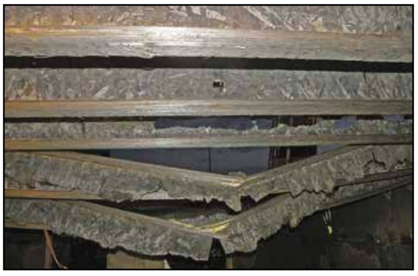
The spaces may be unfinished, partially finished, or completely finished. In unfinished basements, the first floor joists are exposed to the fire and will fail sooner than a ceiling protected with drywall (Figure 14.17). Because unfinished basements are generally unoccupied, the fire may have the chance to spread before it is found. In some partially or completely finished basements, the ceiling may be covered with tiles that offer minimal fire resistance and add to the fuel load.
Collapse hazards during basement fires include:
- Fuel loading, especially the fuel load on the floor above the basement
- Age of exposed joists
- Hidden paths for fire in walls and ducts that could be exposed in basements
- Use of lightweight construction materials that are susceptible to rapid collapse
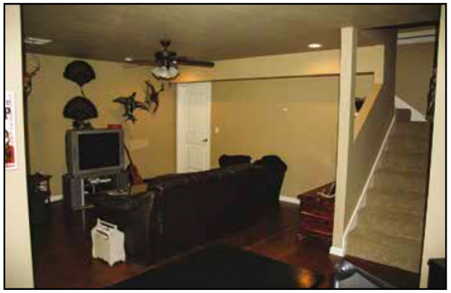
- Basements that have been converted to living spaces create life safety hazards for the occupants and firefighters (Figure 14.18). Although some jurisdictions require windows that can be used for egress, owner/occupants may not comply with these regulations.
Initial size-up of any basement fire is essential because of the extreme danger, especially with regards to structural collapse. Floor assemblies, especially when the assemblies are unprotected, over basements can reach a point of collapse before firefighters arrive on the scene. In tests that Underwriters Laboratories Inc. (UL) performed, supporting joists collapsed before the floor decking burned through, resulting in floor failure (Kerber, et al 2012). Firefighters working on the floor above a basement fire and those fighting the fire are at an increased risk of floor collapse during operations and after fire extinguishment.
Test Your Knowledge!

During initial firefighting operations, first, firefighters need to verify from the outside that the floor above the basement is there. If so, then they must understand that other than visual inspection, there are no reliable ways to determine if the floor is structurally sound.
Sounding the floor and using a thermal imager (TI) are less likely than they used to be in traditional construction (pre-1990s) at identifying whether or not the floor is safe. When the fire is extinguished, a visual inspection of the floor joists should be made before personnel are permitted to work above the basement.
 Depending on the design, basements may be accessed through:
- Interior enclosed stairwells
- Exterior enclosed stairwells
- Exterior open stairwells
- Window wells
- Ground-level walk-in doors or windows
Because of the inherent danger of using the interior stairs for fire attack, any identified, alternative entrances to the basement should be communicated to a supervisor or IC as safer points of entry. Interior and exterior enclosed stairwells can act as flow paths for smoke, flames, and heated gases, much like a fireplace chimney. Advancing attack hoselines down an enclosed stairwell may be the only avenue available, but it exposes firefighters to tremendous hazards. A wide nozzle pattern may be needed to protect firefighters while they descend stairs. However, if the stairwell is the flow path for exhaust gases away from the fire, this tactic is unlikely to provide protection. Accessing a basement fire from above must be coordinated with ventilation to prevent the crew from being caught in the exhaust portion of the flow path.
If the first floor is determined to be unsafe, an exterior attack can be made through basement windows. If any opening into the basement exists, use it to apply water to the area before ventilating or entering the first floor. A penetrating or cellar nozzle can also be used if it can be installed without placing personnel on the weakened floor. Reduce the amount of fire and then make another assessment of the basement conditions.
Skill Sheet 14-3 describes how to attack a structure fire above and below grade level with an interior stairwell attack. You must have enough hoseline to reach the base of the stairs and additional hose at the bottom to get through the door and out of the narrow area that the doorway and stairwell create. In a ventilation-limited fire, added ventilation will increase the heat release rate, may result in a flashover of the basement, and be fatal to any firefighters on the stairs or in the basement. UL data shows that the conditions in the basement may be untenable even if a flashover has not occurred (Kerber, et al “Improving …” 2012). Basement fires are hot, and opening a vent point to allow oxygen to enter is going to create more problems unless ventilation is coordinated with water application.
Commercial Basements and Subfloors
Basements and subfloors in commercial structures may have similar construction to those in residential structures, though they may be more robust if there is a significant fuel load on the main floor. In older Type III construction, the first floor joists may be exposed wood joists or even heavy timbers. In more modern structures, the floors may be exposed or unexposed concrete panels or metal C-joists. These floors are designed to support the weight of machinery, products, and upper stories. Some structures may have multiple subfloors used for mechanical spaces or parking garages.
Exposure to fire may weaken metal floor supports. Heavy objects on the floor above the fire can increase the chances of floor collapse because the added weight accelerates the failure of supporting members. Unprotected steel girders and other supports elongate when exposed to temperatures of 1,000°F (538°C) or more and have been known to topple walls during a fire. The longer steel supports are subjected to fire, the more likely they are to fail. In some commercial structures, standpipe connections are located in stairwells leading to the subfloors.
Attacking a fire in these lower levels follows the same process used for upper floors. A risk/benefit analysis of a commercial basement fire gets performed in the same way as one for a residential
basement fire. Preincident surveys and inspections help determine the type of basement ceiling construction and the amount of fire it can withstand before a collapse. The location of standpipe connections, potential ventilation air flow paths, and the amount of breathing air needed to access a basement fire will influence the tactics used.
Exposure Protection
Preventing a fire from spreading to unaffected areas is a critical tactic. Unaffected areas are referred to as expo-sures and may exist inside or outside of a structure. Exposure protection can take a number of forms depending on the location and type of exposure and the resources available to the fire department.
Interior exposure protection generally involves closing doors or other openings between the fire area and the unaffected area and the proper use of tactical ventilation to ensure limited smoke movement (Figure 14.19). Controlling ventilation with positive pressure in adjoined, uninvolved areas of a structures can also pressurize those areas and isolate the fire to one area of an overall structure. Passive forms of exposure protection, such as fire-rated walls and doors, are also used to prohibit fire and smoke movement.
In order to determine which doors and openings must be kept closed and where to locate ventilation fans, you must be aware of the following:
- Arrangement of the building
- Potential flow path(s) of fresh air to the fire
- Location of the fire
- Planned or ongoing tactical ventilation
To protect exterior exposures, either remove the endangered persons, property, or items or apply a protective spray of water or foam extinguishing agent between the fire and the exposure. Removing exposures is especially useful at fast-moving fires, ground cover fires, and flammable liquid fires.
The following are actions consistent with removing the exposure:
- Evacuating persons who are in the path of the fire
- Relocating parked vehicles or railroad cars
- Using forklifts or other heavy equipment to move piled storage
- Relocating fire apparatus when fast-moving fires have put them in danger.
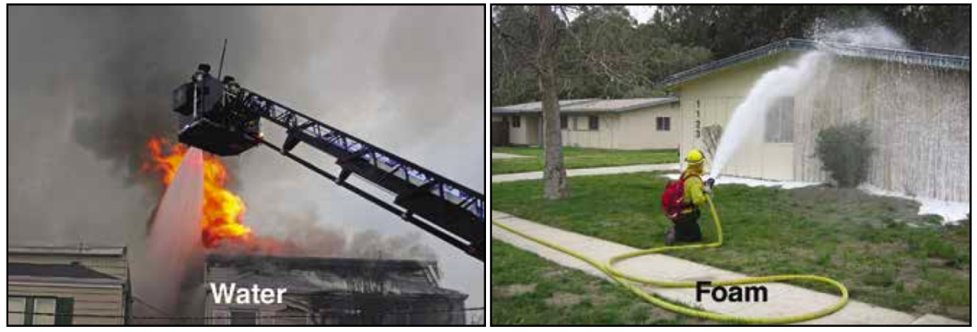
The most likely approach to exterior exposure protection is using water spray or foam extinguishing agents to place a protective cover on the exposure, especially if the exposure is an adjacent structure (Figure 14.20). This spray keeps the exposed surface cool, limiting the effect of radiated heat on the exposure.
Lesson 3
Outcomes:
- Explain the role of firefighters with regards to supporting fire protection systems during fire suppression.
Supporting Fire Protection Systems
Protected structures feature a fire protection system such as an automatic sprinkler system and/or standpipe system. Fire protection systems can be found in residential and commercial structures. When these systems are present, you should work with the system to control the fire. Automatic sprinkler systems are designed to increase the survivability of occupants and firefighters during a structure fire. Most fire sprinkler systems are designed with control mode sprinklers. These sprinklers are only intended to control fire growth and prevent flashover. Firefighters need to enter and complete suppression before turning off the system. Therefore, activated systems should not be discontinued before the fire is under control and an IC gives a shutdown order. The sections that follow describe ways firefighters can support protection systems to control a fire at protected structures.
Connecting to a Fire Department Connection (FDC)
One of the first priorities at a fire in a protected structure is to connect the pumping apparatus to the fire department connection (FDC). FDCs allow a pumper to supplement the water supply and pressure in a structure’s sprinkler or standpipe systems. Each FDC is labeled for the system and/or building zone that it serves (Figure 14.21). Once the order is given to connect to the FDC, firefighters should locate the appropriate FDC, select the proper supply hose, and make the connection. Pre-incident plans should identify the system type (sprinkler or standpipe) and the location and size of FDCs.

Closing a Main Control Valve
One means to stop the water flow from activated sprinkler heads is to close the system’s control valve. The control valve is located between the sprinkler system and the main water supply and is used to shut down water supply to the entire system. The control valve is usually located directly under the sprinkler alarm valve, the dry-pipe or deluge valve, or outside the building near the sprinkler system it controls. Some systems are designed with sectional valves to shut down small areas or individual sprinklers. Sprinkler control valves are either secured in the open position with a chain and padlock or are electronically supervised to make sure they are not inadvertently closed. Shutting the sprinkler system’s control valve should only be done once the fire is under control and the IC has given the order to do so.
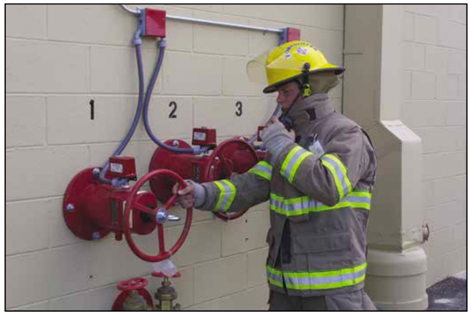
Closing the valve before the fire is under control can lead to a rapid increase in fire conditions. Once the system is off, it will not activate should another fire occur and the system will not alarm if there is a fire. Some jurisdictions have procedures in place to maintain or protect the scene until a qualified technician can bring the system back into service. Steps for operating a sprinkler control valve can be found in Skill Sheet 14-4. A firefighter with a portable radio should be stationed at any control valve that has been closed so that the valve can be reopened. The firefighter stationed at the valve should be familiar with the common types and operation of control valves on fire protection systems (Figure 14.22).
**NOTE: Some departments prefer to plug active sprinklers individually rather than close the fire suppression system’s control valve. **
Several types of control valves are installed on fire suppression systems. You need to recognize each type and understand its operation. Valves used in sprinkler systems are typically of the indicating type because they indicate at a glance whether they are open or closed.

Types of indicating control valves include the following (Figure 14.23):
- Outside screw and yoke (OS&Y) valve: Has a yoke on the outside with a threaded screw that opens and closes the gate inside the valve housing. The threaded portion of the screw is visible beyond the yoke only when the valve is open.
- Post indicator valve (PIV): Has a hollow metal post that houses the valve stem. Attached to the valve stem is a movable plate with the words OPEN or SHUT visible through a small glass window on the side of the housing. When not in use, the operating handle locks to the valve housing.
- Wall post indicator valve (WPIV): Similar to a PIV, except that it extends horizontally through the wall with the target and valve operating nut on the outside of the building.
- Post indicator valve assembly (PIVA): The PIVA does not use a plate with words OPEN and SHUT as does a PIV. Instead, a PIVA uses a circular disk inside a flat plate on top of the valve housing. When the valve is open, the disk is perpendicular to the surrounding plate. When the valve is closed, the disk aligns with the plate that surrounds it. Unlike the PIV or WPIV, the PIVA operates with a built-in crank.
Stopping the Flow from a Sprinkler
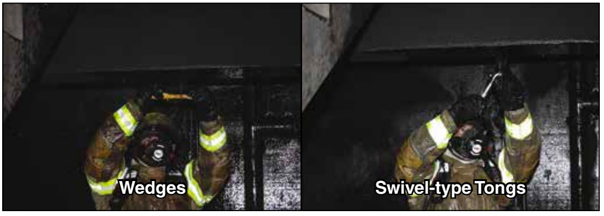
Once the fire has been brought under control in a protected structure, firefighters should stop the flow from any activated sprinklers to minimize water damage to the structure and its contents. Wooden wedges, sprinkler tongs, and other devices can be used to stop the flow of water (Figure 14.24). Skill Sheet 14-5 illustrates the steps for stopping the flow of an activated sprinkler.
Lesson 4
Outcomes:
- Explain the duties of firefighters related to building utilities.
Building Utilities
Controlling building utilities (electric, natural gas, and water supplies) helps control the fire and limits damage. The IC or your supervisor will determine which utilities must be controlled and will assign the task to you. You must know the location of the control switches and valves and how to shut them off. The locations and means of control will vary among types of structures, although some general concepts can be applied and will be introduced in the appropriate section below. For more information on turning off building utilities, see Skill Sheet 14-6.
**NOTE: Fire department personnel are not responsible for turning utilities back on and should not attempt to do so. **
The utility provider will have to determine if the building and the building’s utility distribution system are safe before the service can be re-established. Turning the electricity or natural gas back on could reignite the fire due to damaged wiring, pipes, or appliances.
Situational Awareness: Building Utilities
As mentioned in Chapter 1, Introduction to the Fire Service and Firefighter Safety, communicating your observations when assigned a task is essential for your safety. In addition to those observations, the following conditions specific to building utilities should be observed and communicated:
- Location of utility services, I.e. electric, gas, and water meters
- Status of power to or within the structure (on or off)
- Damage to utilities: broken pipes, downed power lines, unauthorized modifications to utilities
- Presence and condition of fire department connections and/or fire suppression systems
- Presence and condition of standpipes
- Location of alternative utility sources (solar panels, LP gas tanks)
Electricity
Electricity usually comes from a commercial power company or an alternative source such as solar panels, wind generators, or fuel-powered generators. In any case, electric service must be disconnected when there is a structure fire unless the IC, in consultation with the Incident Safety Officer (ISO), order otherwise. Power may be left on at larger structures with multiple breaker panels and electrical zones according to preincident surveys. In some cases, structures are total electric, meaning that electricity is the sole power source for light, heat, and cooking. In other cases, electricity only provides lighting while a form of gas provides hot water, heating, and cooking. Firefighters must be able to control the flow of electricity into structures.
Commercial Power Supply
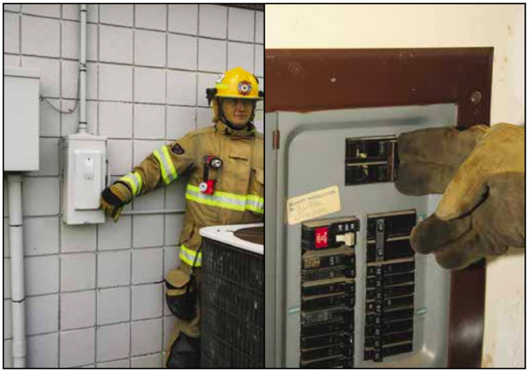
Commercial power companies provide electricity in urban, suburban, and rural areas. Electric lines connect structures to the main power grid. If the lines are above ground, they will run from the power company pole to a weather head and service mast (a metal pipe extending above the roof of the house) that extends down the side of the house to the electric meter box and shutoff. The electric meter is the primary location for shutting off power. If the lines are buried, the meter box and shutoff may be on the side of the pole where the line extends underground. In multifamily dwellings, meter boxes may be clustered together on the side of the building. In commercial, industrial, and institutional occupancies, preincident surveys should identify the location of the power connection. The only safe way to cut all power to a structure is at the main breaker or meter shutoff. When shutting off the power, pull down the handle on the side of the meter box. In a residential structure, you can also shut off the main circuit breakers and cut power to the structure (Figure 14.25). However, turning off individual circuit breakers will not cut all the power off and may not isolate the area where the fire occurred. If neither method is successful or if the main breaker is inaccessible, take no further action. Instead, contact the electric utility and request a technician respond to the scene.

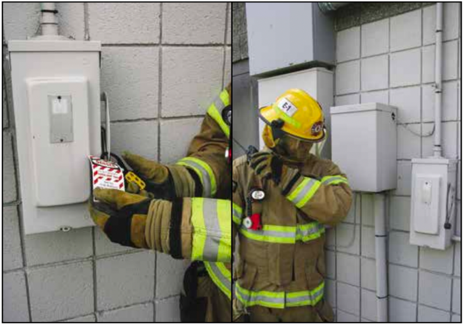
Electrical power to the entire building should not be shut off until ordered because it is necessary to operate elevators, air-handling equipment, and other essential systems in all types of occupancies. In some instances, securing the electrical power in commercial/industrial occupancies can stop essential chemical processes or safety systems and create an unsafe situation. The decision to shut off the power is based on knowledge gained through pre-incident surveys. Both high-voltage and low-voltage systems may be found in a building, each supplying some of the power needed to operate the building services. If power is shut off to the entire building or any device in it, the main power switch should be locked out and tagged out to prevent it from being turned back on before it is safe. If lockout/ tagout devices are not available, assign a firefighter with a portable radio to stand at the switch (Figure 14.26).
Solar Panel Arrays Generators
In many structure fires, it helps for electrical power to remain on to provide power for lighting, ventilation equipment, fire pumps, and other essential systems. The IC will make this decision in consultation with the Incident Safety Officer (ISO). When a fire involves only one area of a structure, it would be counterproductive to shut off power to the entire building. When the building becomes damaged to the point that service is interrupted or an electrical hazard is created, a power utility employee should turn off the main panel. As always, firefighters must follow their departmental SOPs.
Alternative Energy Sources
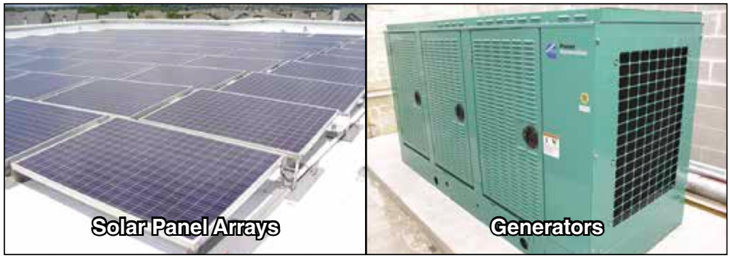
You may encounter a structure with a wind turbine providing alternative power in addition to or in place of the power company. In any case, the power can be turned off at the meter box with the main power shutoff. The power line from the wind turbine to the meter will remain energized, however. Fuel-powered generators are primarily used to replace the power company’s service when service is interrupted. In some locations, the generator may be the sole source of power for a structure. Shutting off the generator should control these systems. However, if the system supplements the power company’s service, shut off the supply at the meter box.

**NOTE: When shutting off building utilities, do not assume there is no alternative source of energy present. Always use caution and refer to local policy for further guidance. **
Gas Utilities
To control gas utilities, you must have a working knowledge of the hazards and correct procedures for handling incidents involving gas and liquefied petroleum gas (LPG). Many houses, manufactured homes, businesses, and industrial properties use natural gas or LPG for cooking, heating, or industrial processes.
Natural Gas
Natural gas in its pure form is methane, which has a flammability range of 5 percent to 15 percent, but it is nontoxic. Natural gas is lighter than air, so it tends to rise and diffuse in the open. While it is nontoxic, it is classified as an asphyxiant because it may displace air in a confined space and lead to suffocation. Although natural gas has no odour of its own, the utility companies add mercaptan, which causes a distinctive sulphur-like odour, like rotten eggs.
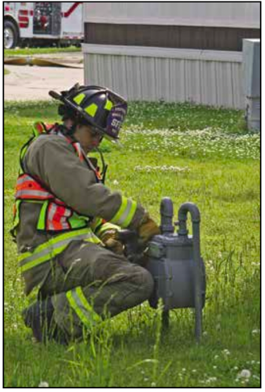
When ordered, the natural gas supply to a structure must be shut off at the meter. The meter is usually located outside the structure near the foundation or on the easement near the property line. However, it may be inside the structure in a basement or mechanical space. In some industrial and institutional occupancies, critical equipment and processes depend upon an uninterrupted supply of natural gas; for example, natural gas fuels emergency generators in some hospitals. The shutoff is an inline valve located on the owner supply side of the meter between the distribution system and the meter. When the valve is open, the tang (a rectangular bar) is in line with the pipe. To close the valve, use a spanner wrench, pipe wrench, or similar tool to turn the tang until it is 90 degrees to the pipe (Figure 14.28). If shutting off the inline valve does not stop the gas supply to the structure, take no further action and contact the gas utility.
The local utility will provide:
- An emergency response crew equipped with non-sparking tools
- Distribution system maps
- Training and experience needed to help control the flow of gas
Contact the local utility company when the gas has been shut off or when any emergency involving natural gas occurs in its service area. The utility company, not the fire department, is responsible for turning gas utilities back on after they have been shut off.

Liquefied Petroleum Gas (LPG)
Also known as bottled gas, liquefied petroleum gas (LPG) refers to fuel gases stored in a liquid state under pressure. While there are two main gases in this category — butane and propane — propane is the most widely used.
Propane is used primarily as a fuel gas in:
- Campers
- Agricultural applications
- Businesses
- Manufactured homes
- Rural homes
- Motor vehicles
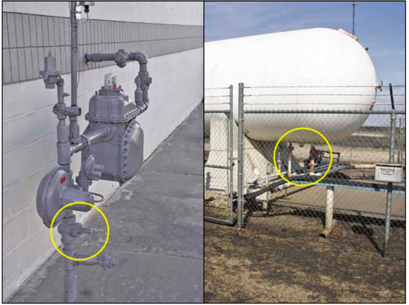
Propane gas has no natural odour, but added mercaptan gives it a very distinctive smell. The gas is nontoxic, but it is classified as an asphyxiant because it may displace normal breathing air in a confined space and lead to suffocation. LPG is about 11/2 times as heavy as air, so it will sink to the lowest point possible. The gas is explosive in concentrations between 2 percent and 9.5 percent. LPG is shipped from its distribution point to its point of usage in cylinders and in tanks on cargo trucks. It is stored in cylinders and tanks near its point of use. Steel piping and copper tubing then connect the tank or cylinder to gas powered appliances. Shutting the tank valve may stop the supply of gas going into a structure. An LPG leak will produce a visible cloud of vapour that hugs the ground. A fog stream of at least 100 gpm (400 L/min) can be used to dissipate this cloud of unburned gas. A shutoff valve should be located at the point where the supply line from the LPG tank enters the structure. This valve may be similar to the type used for natural gas or water supply lines. There will also be a control valve located on the LPG tank (Figure 14.29). Do not attempt to open the valve after the fire or emergency has been terminated. Turning on the gas is the responsibility of the owner and the LPG supplier.
Water
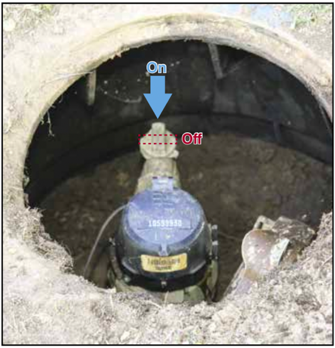
It will be necessary to shut off the water supply to prevent water damage from broken pipes. Water shutoff valves are located underground with the water meter. Their location will depend on the location of water distribution lines in the jurisdiction. Residential water shutoff keys or pipe wrenches are used to turn the tang 90 degrees to the pipe (Figure 14.30). In some jurisdictions, a valve may be located inside the structure. Use caution when touching water pipes because the electrical ground wire may be connected to the water pipe in residential structures. Commercial structures and large institutional and industrial facilities have larger diameter supply lines than residential single-family structures. Therefore, the shutoff valve has a larger, usually square-shaped tang. This will require a special water shut-off key that the fire department may assign to certain units, or the water department may have to provide. Restoring the water supply will be the responsibility of the water department or the owner.
Lesson 5
Outcomes:
- Describe the process of attacking a vehicle fire.
Vehicle Fires
Fires in passenger vehicles are among the most common types of fires to which you will be called. These fires may result from a collision, a malfunction of the vehicle’s propulsion system or an intentional act. You should wear full PPE including SCBA when combating vehicle fires (Figure 14.31). Vehicle fires generate a wide variety of toxic and nontoxic smoke and vapours. Until the atmosphere is tested, you must treat the incident with the same care you treat a structure fire. Fire protection at vehicle fires can range from someone with a portable fire extinguisher to a crew of firefighters with fully charged hoselines. Personnel must always follow local protocols. It is recommended that at least two firefighters equipped with full PPE, including SCBA, have at least one 11/2-inch (38 mm) charged and ready for use hoseline (Figure 14.32).
Modern vehicles use a variety of power sources, sometimes in combination:
- Gasoline
- Diesel
- Electricity
- Compressed or liquefied natural gas (CNG or LNG)
- Hybrids (fuel and electricity)
- Biofuels
- Hydrogen
- Vehicle Scene Safety
Vehicle Scene Safety
The 5 S’s: Secure Safety, Save, Source, Stabilize
- Secure the Scene
- Determine traffic diversion needs.
- Follow DOT or local guidelines for traffic management.
- Safety Zone
- Establish a safe working area around the incident.
- Focus on protecting responders from vehicular traffic.
- Save and Extinguish
- Prioritize saving occupants and extinguishing any fire.
- Identify if victims need extrication and if the vehicle is on fire or leaking fuel.
- Source Isolation
- Identify the type of fuel.
- Isolate the vehicle from ignition sources or eliminate them.
- Stabilize and Control
- Stabilize the vehicle if possible.
- Manage downed power lines and other hazards.
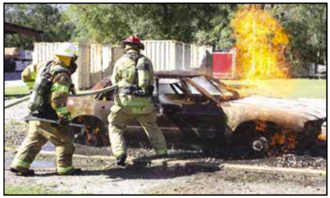
The first action upon arrival at a vehicle accident is to decide if the incident scene will necessitate traffic being diverted and request assistance. Follow the U.S. Department of Transportation (DOT) or provincial/territorial Emergency Responders Traffic Management guidelines for protecting the scene from vehicular traffic in order to establish a safe working zone around the incident as described in Chapter 1, Introduction to the Fire Service and Firefighter Safety. Once scene safety is established, focus on saving the vehicle occupants and extinguishing the fire. Determine if there are victims in the vehicle and if they require extrication. Determine if the vehicle is on fire or leaking fuel. Confirm the type of fuel and select the appropriate extinguishing agent. Before attacking the fire or commencing with extrication, isolate the vehicle from any ignition sources or eliminate the ignition source. Next, stabilize the vehicle (if safely possible), control any downed power lines, and address any additional hazards.
Avoiding Common Injuries at Vehicle Scenes
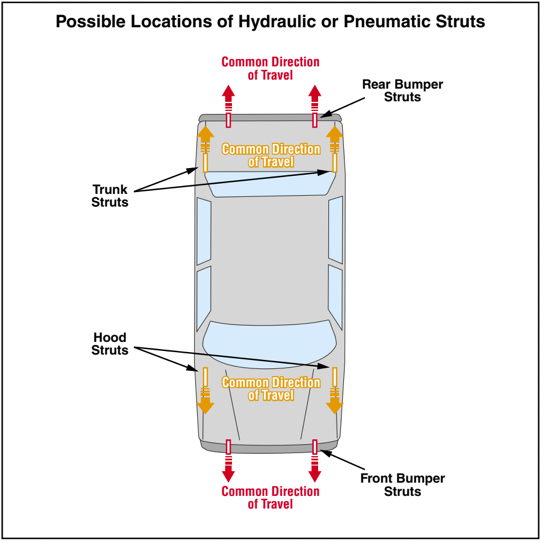
When approaching the vehicle, avoid components that are under constant pressure such as bumpers and some-times hoods and trunk lids. These components incorporate hydraulic or pneumatic struts intended to absorb the shock of minor collisions. If the fire heats these struts, they can explode and catapult the bumper (Figure 14.33). Likewise, the struts used to support the engine hood and trunk lid can also be launched from the vehicle with tremendous force. Anyone standing in the travel path could be injured or killed.
Controlling Fuel Leaks
Fuel may be found leaking from the tank or from fuel lines. This fuel can add to the risk of fire or intensify a burning fire.
Controlling fuel leaks can be accomplished in various ways.
- Broken fuel line may be:
- Crimped with pliers
- Plugged with rubber, plastic, or wooden plugs
- Broken or punctured fuel tanks may be:
- Plugged with rubber, plastic, or wooden plugs
- Sealed with a fuel resistant sealing compound
Selecting Hose Streams for Vehicle Fires
In most passenger vehicle fires, one or two 11⁄2-or 13⁄4-inch (38 mm to 45 mm) handlines can extinguish an auto-mobile fire. For large vehicles, such as tractor trailers, larger handlines (2 1⁄2-or 3-inch [65 mm or 77 mm]) may be necessary. It may be necessary to use defensive firefighting techniques such as deploying unstaffed master steam devices and isolating and denying entry to the area.
Maintaining Flash Fire Protection
To counteract the risk of a fire starting at an automobile accident, firefighters should provide flash fire protection to protect victims and rescuers. Some jurisdictions require at least two personnel on scene in full PPE and SCBA equipped with a charged hoseline (Figure 14.34). Other jurisdictions require one or two personnel in full PPE and SCBA equipped with fire extinguishers. The firefighters should monitor the scene for any indication of fire and be prepared to extinguish one.
Vehicle Fire Attack
The basic procedures for attacking a fire in a vehicle are as follows:
- Position a hoseline between the burning vehicle and any exposures.
- Position for attack uphill of the fire to avoid standing in the path of leaking fuels running downhill.
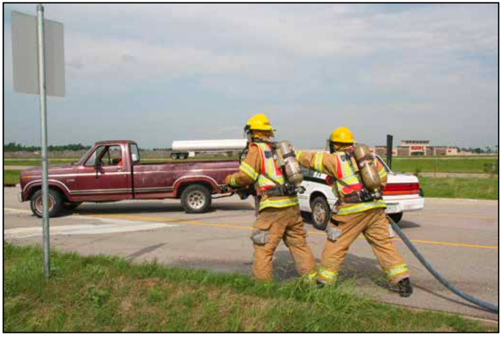
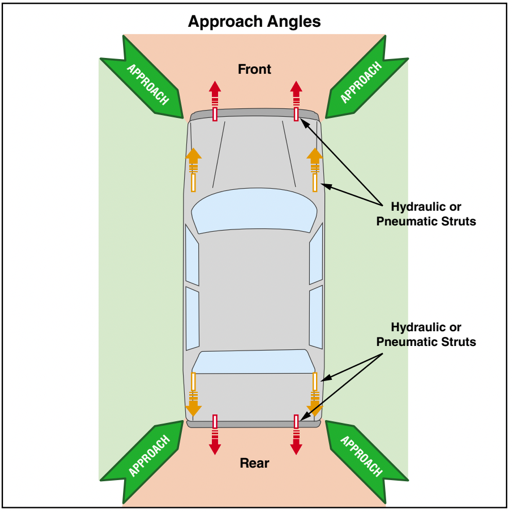
- Attack the fire at a 45-degree angle from the side of the vehicle to avoid the potential for injuries from exploding hydraulic or pneumatic struts (Figure 14.35).
- Extinguish any fire near the vehicle occupants first.
- Issue an “all clear” when all occupants get out of the vehicle.
- Extinguish any ground fire around or under the vehicle.
- Extinguish any fire remaining in or around the vehicle.
A backup hoseline should be deployed as quickly as possible. Portable fire extinguishers can extinguish some fires in the vehicle’s engine compartment or electrical system and some alternative fuel types. The steps for attacking a passenger vehicle fire are in Skill Sheet 14-7.
Apply water to cool combustible metal components that are exposed to fire. If combustible metal components become involved, apply large amounts of water to protect adjacent combustibles while applying Class D extinguishing agent to the burning metal. Some vehicles may contain extraordinary hazards requiring you to isolate the area and request the assistance of a hazardous materials team.
Extraordinary hazards include the following:
- Large-capacity saddle fuel tanks
- Alternative fuel tanks
- Pressurized natural gas tanks
- Hazardous materials
Once the fire has been controlled, conduct overhaul as quickly as possible to check for extension and hidden fires. Other overhaul considerations include disconnecting the battery, securing air bags, and cooling fuel tanks and any intact, sealed components.
Be aware that air bags can deploy from (Figure 14.36):
- Steering wheel
- Dashboard
- Area above the doors
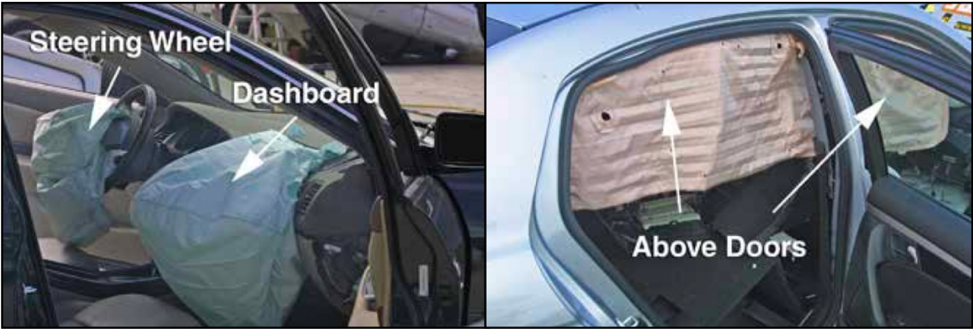
Vehicle Doors
Fires that originate in certain compartments of a vehicle require special tactics or skills. The sections that follow highlight some of these special fire attack situations.
Test Your Knowledge!
- When approaching a vehicle fire, which precaution is NOT recommended to ensure firefighter safety and effective fire suppression?
a) Positioning for attack uphill of the fire to avoid standing in the path of leaking fuels
b) Using at least one 1½-inch (38 mm) charged hoseline with two firefighters equipped with full PPE and SCBA
c) Avoiding components under constant pressure, such as bumpers and struts, which may explode when heated
d) Attacking the fire from directly in front of the vehicle to ensure a clear line of sight
Answer: d) Attacking the fire from directly in front of the vehicle to ensure a clear line of sight
Engine or Trunk Compartment Fires
If a fire is isolated to the trunk or engine compartment, you will need to gain access in order to extinguish the fire. To gain access to the engine compartment or trunk, first try conventional methods such as the release lever or button near the driver’s seat. If these methods do not work, then use forcible entry methods similar to those listed in Chapter 9, Forcible Entry.
Before attempting forcible entry, cool the front and rear bumper struts to prevent accidental activation from heat exposure. Forcing entry into the engine compartment or trunk can be accomplished with manual or power tools. Once the trunk is open, direct the hose stream into the space until the fire is extinguished.
You may need to use a variety of methods to access the hood or trunk, such as:
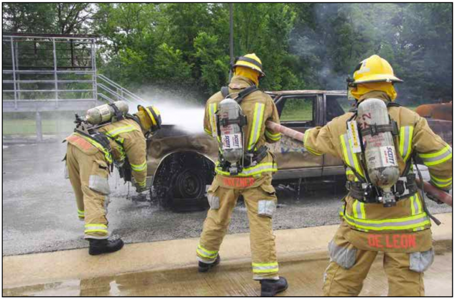
- Pry the hood or trunk free with a Halligan or crowbar (Figure 14.37).
- Remove the metal around the key or latch.
- Attack from the side with an axe and lever the hood or trunk open.
- Direct hose streams under the car.
- Use a piercing nozzle to pierce the hood or trunk.
In many engine compartment fires, the fire can be controlled before the hood can be opened using one of these methods:
- Direct a hose stream through the grill or air scoop.
- Drive a piercing nozzle through the hood, fenders, or wheel wells. This is not a safe tactic for hybrid or electric vehicles.
- Make or cut an opening large enough for a hose stream to be introduced.
- Use a pry tool to create an opening between the hood and the fender, and then direct a straight stream or narrow fog stream in the opening.
![]()
Passenger Compartment Fires
When attacking a fire in the passenger compartment, use the appropriate nozzle and pattern for the situation. Attempt to open the door, but if it is locked, the driver may have the key. If normal entry is not possible, break a window and attack the fire with a medium fog pattern.
Undercarriage Fires
The following three methods can be used for fires in the undercarriage (Figure 14.38):
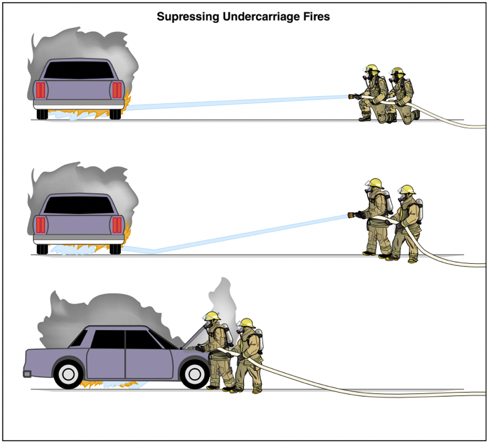
- If there is a hazard in getting close to the vehicle, use a straight stream from a distance to reach under the vehicle.
- If the vehicle is on a hard surface such as concrete or asphalt, direct the stream downward and allow the water to deflect up toward the underside of the vehicle.
- Open the hood and direct the stream through the engine compartment.
Alternative Fuel Vehicles
Alternative fuels create different risks to emergency responders. Table 14.1 shows the flammability and other hazards associated with alternative fuels. The information in the table is drawn from various manufacturers’ Safety Data Sheets (SDS). Visual indicators on vehicles such as vehicle or fuel logos may indicate the presence of alternative fuels. Most car manufacturers provide Emergency Response Guides for their vehicles that include emergency response procedures, notices, cautions, warnings and dangers. These guides can provide information that will enhance safety at the scene.
Alternative fuels currently include:
- Natural gas (CNG and LNG)
- Liquefied Petroleum Gas (LPG)
- Electric or hybrid electric
- Ethanol/Methanol
- Biodiesel
- Hydrogen

**NOTE: There is no national requirement in Canada or the United States for markings to indicate the type of fuel used to power cars, trucks, and buses. As a result, you may have no idea about a vehicle’s fuel source. (Some states/provinces may regulate markings.) **
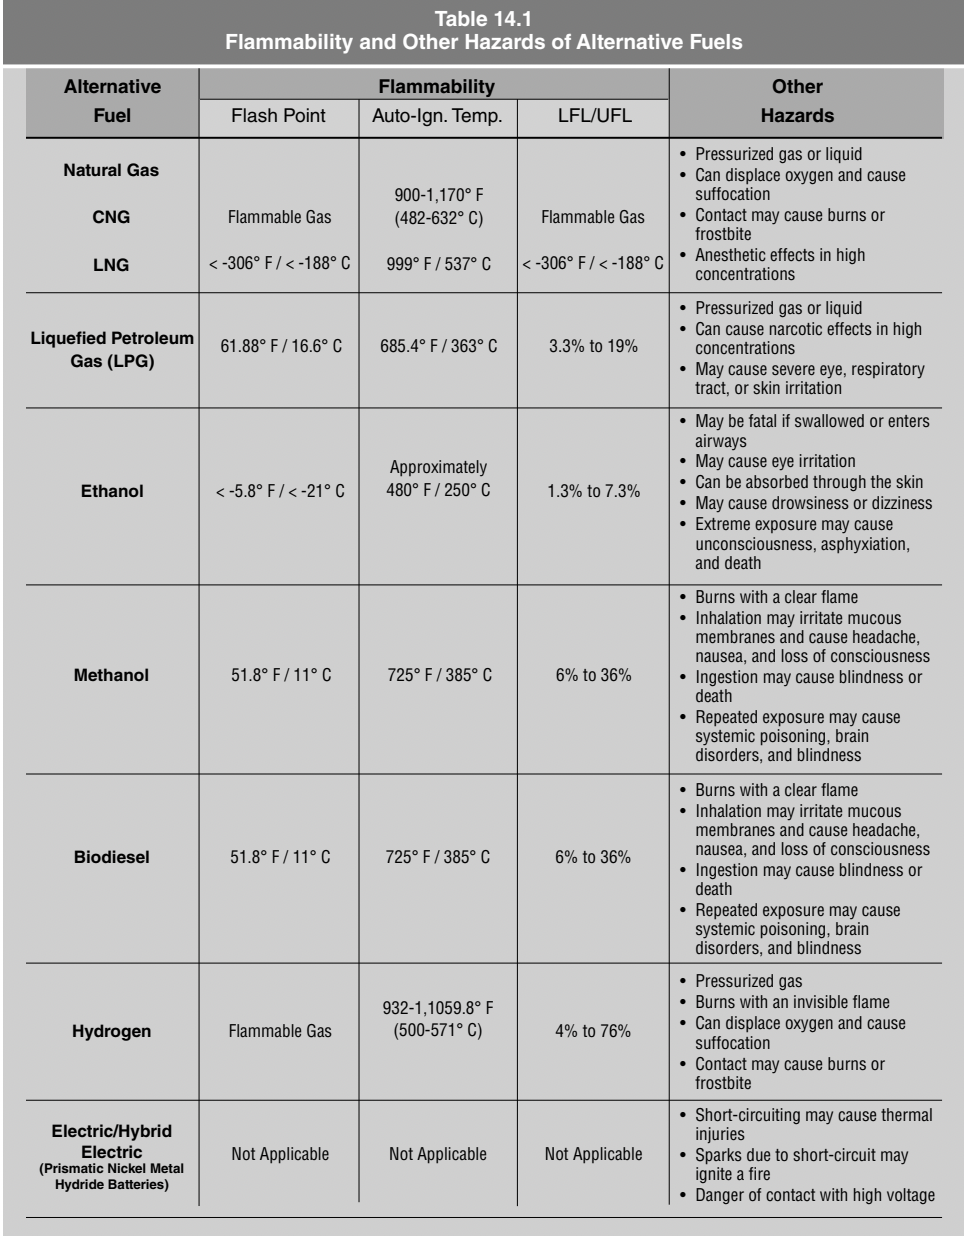
Natural Gas Vehicle Fuel (CNG and LNG)
Natural gas is used in vehicles in the form of compressed natural gas (CNG) and liquefied natural gas (LNG). Government agencies and taxicab, utility, refuse, and mass transit bus companies are most likely to use CNG or LNG vehicles. A CNG or LNG diamond logo may be affixed to the front and rear of the vehicle (Figure 14.39). Fuel tanks are usually located in the trunk area, under side panels or in the open bed of pickup trucks. CNG and LNG tanks can rupture if exposed to fire resulting in an explosion. A pressure-relief device and vent and a fuel shutoff valve may be located in the wheel well with a placard nearby. CNG is stored under high pressure.
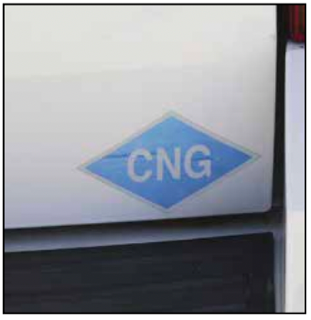
Tactics for fires or leaks involving CNG vehicles include the following:
- If no fire is visible:
- Use a gas detector to locate leaks
- locate shutoff valves
- eliminate any ignition sources.
- Stay clear of any detected vapour clouds.
- If fire is visible:
- Allow fuel to burn itself out.
- Use water or foam to extinguish if necessary.
- Cool the container from a safe distance.
- Avoid contact with high velocity jet of escaping gas.
LNG is stored in a liquid state by cooling to –260 degrees F (–162 degrees C) in double-walled, vacuum-insulated pressure tanks. It is lighter than water and has a vapor cloud that is heavier than air. Frost on the fuel tank exterior indicates tank failure.
If there is no fire or leak:
- Stabilize the vehicle
- Set the emergency brake or chock the tires
- Turn off the ignition
- Shut off the gas cylinder valve handle
- Tactics and guidelines for fires or leaks involving LNG include the following:
- Avoid contact with LNG.
- Stay clear of vapour clouds identified.
- Shut off the ignition to stop the fuel flow to a leak or fire.
- Use Purple K dry-chemical agent or high-expansion foam on the surface of the fuel.
- Use sand or dirt to prevent LNG from entering storm drains.
LPG Vehicle Fuel
Liquefied Petroleum Gas (LPG) VehiclesKnown as propaneThird most common fuel typeMay be marked with a logo
Liquefied petroleum gas (LPG), also known as propane, is the third most common vehicle fuel type after gasoline and diesel and is safer than gasoline. An LPG vehicle may be marked with a logo.
The following tactics should be used at incidents involving LPG vehicles:
- Use gas detectors to determine leaks and isolate leaks from ignition sources.
- Allow the fire (if present) to self-extinguish.
- Use foam or water when necessary for extinguishment.
- Direct hose streams at the top of the LPG tank to provide adequate cooling or high-expansion foam on the surface of the fuel.
- Stay clear of any identified vapour clouds.
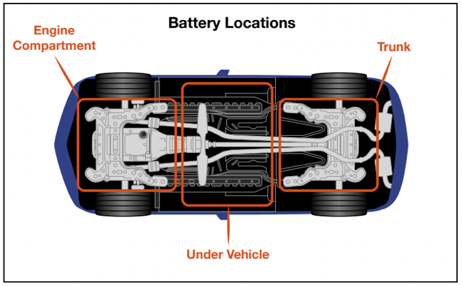
Electric or Hybrid Electric
Electric or hybrid electric vehicles should have certain visible indicators such as the vehicle name, logo, charging port on a side or the front of vehicle, and a distinctive profile. Batteries may be located in the engine compartment, trunk area, or under the vehicle (Figure 14.40).
When the engine is running, there may not be any noise. Most electric and hybrid electric vehicles also contain a 12-volt battery system with separate battery and wiring harness. If no fire is visible, secure the vehicle, chock wheels, turn off the ignition, and remove the key. If smoke is visible, wear full PPE and SCBA because the fumes are toxic until air monitoring indicates that the atmosphere is clear. Do not approach the vehicle if it is on fire or there is arcing under the hood. Establish scene security and protect exposures. Avoid contact with all fluids because they may include battery acid that can cause injuries.
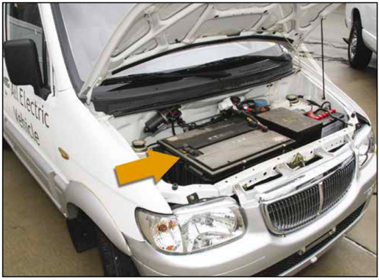
Electric vehicles run solely on electricity stored in batteries that must be recharged periodically. There are many types, designs, and locations of vehicle battery packs (Figure 14.41). Use inertia switches and pilot circuits to shut off a high-voltage system. It will take approximately five minutes for energy in the system to dissipate. Do not cut orange high-voltage cables because electrocution is possible. Blue and yellow colour-coded cables also present an electrocution hazard although they do not carry high voltage. Wear full PPE.
Use insulated tools, water or foam to extinguish, and specific recommended extinguishing agent for battery pack fires. Hybrid vehicles combine battery powered electrical systems with gasoline, diesel, biodiesel, and natural gas to run the engine. Some hybrid vehicles use a roof-mounted photovoltaic solar panel as a power source. Shut off power with the ignition or power switch and remove the ignition key.
For vehicles with keyless, push-button starts, locate keyring remote and move it 20 ft (6 m) or more away from the vehicle to make sure that the vehicle doesn’t turn on. Water is the recommended extinguishing agent, although specific agents or tactics may be required for specific fuels or battery types.
Ethanol/Methanol
Ethanol and methanol are gasoline blends. They are water soluble, electrically conductive, clear liquids that have a slight gasoline odour. Ethanol and methanol use the same fuel tanks as conventional gasoline engines. The vehicle may not have a visible logo. If no fire is visible or leak is detected, secure the vehicle, chock the tires, and turn off the ignition. If a fuel leak is suspected, use caution and approach in full PPE and SCBA, with hoselines deployed and charged. If the vehicle is leaking or on fire, establish a control zone and request a hazardous materials response team.
Biodiesel
Biodiesel is a blend of liquids made from natural plants and diesel. It is a yellow liquid with the odour of cooking oil that is nontoxic, biodegradable, and sulfur free. It is slightly lighter than water and has a flash point 266 degrees F (130 degrees C) spray, or foam to extinguish. Biodiesel is used in vehicles designed for diesel fuel, and no logo is required. If there is a fuel leak, control the leak per local SOPs and request a hazardous materials team. If the vehicle is on fire, use dry chemical, CO2, water fog spray, or foam, to extinguish.
Hydrogen
Hydrogen-fuelled vehicles are in use in some areas of North America, though most are still in the concept stage. Hydrogen is colourless, odourless, non-toxic, and energy efficient. According to NFPA 325, it has an ignition temperature of 932 degrees F (500 degrees C) with a flammability range between 4 percent and 75 percent. Because the flame is invisible during the day, you should use a TI to see the flame. Vehicles are marked with a manufacturer’s logo, and the vented fuel cell is in the trunk. Tactics for a leak and a fire include shutting off the ignition, isolating the fuel from ignition sources, and chocking the wheels. Do not extinguish the fire. Instead, protect the exposures and allow the fuel to burn off. If extrication is required, do not cut C-posts which contain the vents.
Test Your Knowledge!
Lesson 6
Outcomes:
- Describe the process of attacking fires in exterior Class A materials
Exterior Class A Fires
Exterior fires may occur in stacked and piled materials, small unattached structures, and trash containers. These fires can create a hazard to nearby structures, flammable/combustible storage tanks, parked vehicles, and vegetation. How you extinguish these fires will depend on the type of material involved, the weather, and the type and quantity of extinguishing agent you use.
Situational Awareness: Exterior Class A Fires
As mentioned in Chapter 1, Introduction to the Fire Service and Firefighter Safety, communicating your observations when assigned a task is essential for your safety.
The following conditions specific to Class A exterior fires should be observed and communicated:
- Changes to the configuration of the materials
- Changes to firefighter position to the fire based upon changes to fire spread or other factors
Indicators of imminent collapse:
- Spread of fire to exposures
- Wind direction and speed
- Effectiveness of fire attack
Stacked and Piled Materials
Stacked and piled combustible materials can be found around all types of occupancies and in all types of jurisdictions.
This includes:
- Raw materials such as those found at sawmills, lumberyards, and manufacturing facilities
- Bales of used cardboard or pallets near large retail outlets
- Bales or large rolls of hay or cotton on farms
- Loose flammable materials, such as mulch or fertilizer, at nurseries or garden centres
- Miscellaneous and varied materials stored outdoors at residencies
The value of these materials varies widely, but the possibility that any portion can be salvaged once a fire starts is small. The greatest danger is to exposures, primarily nearby structures and ground cover. A fire may also spread to the interior of an exposed structure.
The goal is to confine the fire to the pile or building of origin. Depending on the material and how involved the fire is, fire streams should be directed at the fire’s extreme edge, controlling the spread. Use a straight stream from a distance and then shift to a fog pattern. As the fire is reduced, move the nozzle closer to the stacked material using the fog pattern to protect yourself.
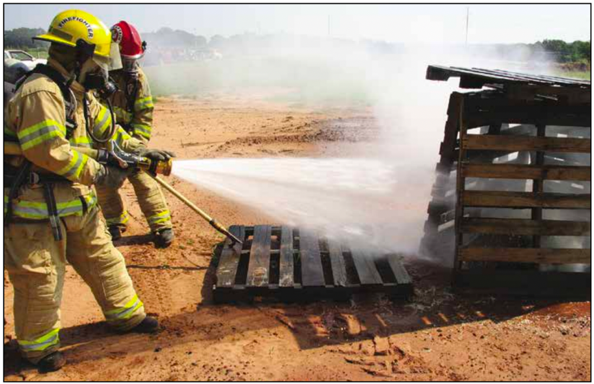
Other personnel can use pike poles and hay hooks to break up or pull apart the stacked or piled material so that the stream can reach all the burning material (Figure 14.42). A collapse danger exists when fighting fires in stacked and piled materials. As fire damages the materials low in the stack or pile or as the upper materials become saturated with water, the stack or pile may collapse or fall over. Flying embers may also spread the fire requiring additional units to perform spark patrol downwind of the fire. For information on attacking a fire in stacked or piled materials, see Skill Sheet 14-8. Class A foam, applied with an educator or through a compressed-air foam (CAF) system, is very effective for these types of fires. The foam will soak into the materials and coat the ground cover and exposures, preventing fire spread.
Small Unattached Structures
Small unattached structures (storage buildings, sheds) can be found in all jurisdictions, in all shapes. Their age, construction type and material, and value will cover a wide spectrum.
Examples of small unattached structures include but not limited to:
- Storage sheds
- Outhouses
- Pump houses
- Bath houses
- Fishing houses
- Ice houses
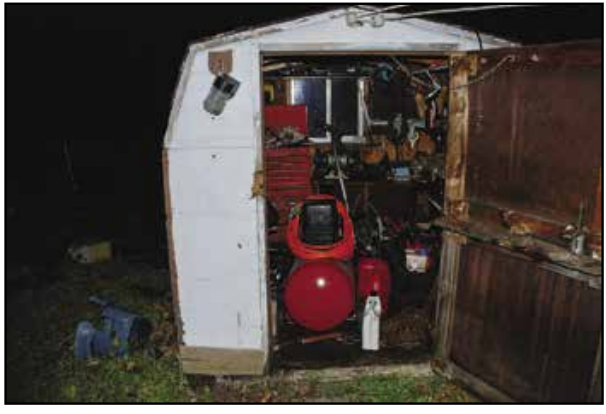
Figure 14. 43 A shed filled with tools, equipment, a gasoline can, and other common materials. Courtesy of Donny Howard.
NFPA does not define what constitutes a small structure, only that such a fire should be attacked from the exterior. Like stacked and piled materials, unless there is some compelling reason to try to save the structure, the primary mission is to prevent fire spread to exposures and then extinguish the fire. Class A foam and fog streams can be very effective for exposure protection, advancing close to the fire, and extinguishment. Because small structures are generally used for storage of household materials, you should assume that chemicals, flammable/combustible liquids, explosives, or illegal materials may be inside the building (Figure 14.43). The volume of smoke and fire, as well as the color of the smoke, can provide an indication of the primary materials that are on fire. Apply a straight stream from the exterior to extinguish most fires. If there is any question of the hazard, protect exposures, prevent fire spread, and allow the structure to self-extinguish. For information on attacking a fire in a small unattached structure, see Skill Sheet 14-9.

Trash Container Fires
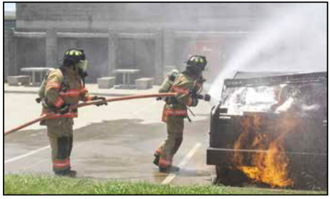
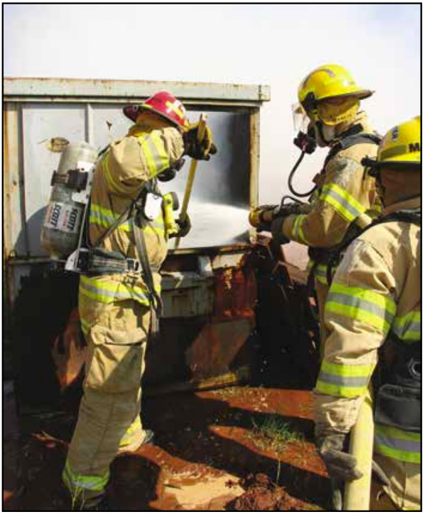
Trash containers may be as small as a garbage can or a dumpster. Toxic products of combustion will be present in trash container fires of all types, so full PPE and SCBA should be worn when attacking any trash container fire (Figure 14.44).
The refuse may include:
- Hazardous materials or plastics that emit highly toxic smoke and gases
- Aerosol cans and batteries that may explode when exposed to heat
- Biological waste in marked or unmarked containers
Once the fire has been controlled, it may be possible to use standard overhaul techniques to complete the extinguishment. However, it may help to attack the fire using Class A foam.
In some departments, it is SOP to use a master stream to flood the container with water to drown any fire that may be hidden. However, this technique can present containment problems if the water used to fill the container becomes contaminated with a hazardous substance. Extinguishment of fire in a trash container is described in more detail in Skill Sheet 14-10.
Lesson 7
Outcomes:
- Describe ground cover fire attack.
Ground Cover Fires
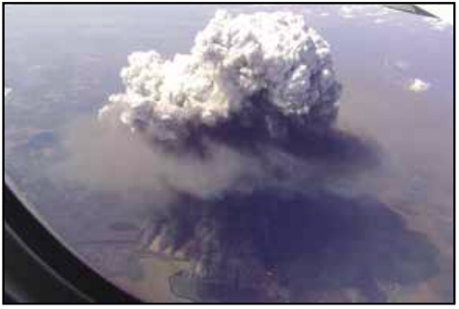
Ground cover or wildland fires can occur in vacant urban lots, parks, cemeteries, farmlands, and forests. Not only can they destroy hundreds of acres of natural resources, destroy houses, and farm structures, and kill live-stock and wild game, they place firefighters at risk.
Ground cover fires include those in (Figure 14.45):
- Weeds
- Field crops
- Forests
- Grass
- Brush
- Similar vegetation

Because ground cover fires are unconfined, they differ from fires in burning buildings. The three main influences on ground cover fire behavior are fuel, weather, and topography. Weather is the most significant. Because local topography, fuel types, water availability, and predominant weather patterns vary from one region to another, the tools and techniques used to control ground cover fires also vary.
Once a ground cover fire starts, burning can be rapid. For your survival, you must learn how ground cover fires behave in a variety of conditions and how temperature and humidity, winds, fuel types, and terrain features influence flame lengths and rate of fire spread (Figure 14.46).
Situational Awareness: Ground Cover Fires
As mentioned in Chapter 1, Introduction to the Fire Service and Firefighter Safety, communicating observations when assigned a task is essential for safety.
In addition to those observations, the following conditions specific to ground cover fires should be observed and communicated:
- Fuel characteristics
- Fuel type such as grass, trees, or underbrush
- Fuel moisture content (wet or dry)
- Arrangement of fuels and location of exposures
- Topography
- Location of the fire
- Upward slope or downward slope
- Terrain features (canyons, chutes)
- Weather
- Visibility
- Wind speed and direction
- Relative humidity
- Thunderstorm development or other weather events
- Fire behaviour
- Location of the fire
- Changes to spread, and growth
- Location of resources
- Water supply
- Personnel
- Apparatus/equipment
- Fire Suppression


Types of Ground Cover Fires
There are three basic types of ground cover fires based on the type and location of the fuel: ground fires, surface fires, and crown fires (Figure 14.47).
Ground Fire
Ground fires burn in the layer of dead organic matter (called humus) that generally covers the soil in forested areas. These are slow-moving, smoldering fires that can go undetected for months before they enter a flaming stage. Due to the composition of the fuel, these fires are generally limited to forests and are very difficult to extinguish.
Surface Fire
The surface or crawling fire is the most common type of ground cover fire, burning on the soil surface consuming low-lying grass, shrubs, and other vegetation. Surface fires can occur anywhere and can be natural or human caused.
Crown Fires
Crown Fire Crown or canopy fires are wind-driven, high-intensity fires that move through the tree tops of heavily forested areas. Ground or surface fires are sometimes the causes of crown fires. These extensions occur when the fire spreads upward through ladder fuels such as small trees, fallen timber, and vines to reach the forest canopy.
Ground Cover Fire Behaviour
Typically, two of the elements of the fire triangle — oxygen and fuel — are always present where ground cover is found. Adding a natural or human-made ignition source is the last remaining element needed to start a ground cover fire. Weather and topography also contribute to the intensity and spread of the fire.
Ground Cover Fuels
Ground cover fuels are typically categorized based upon the location of the fuels as follows:
- Subsurface or ground fuels: Roots, peat, and other partially decomposed organic matter that lie just under the ground
- Surface fuels: Needles, duff, twigs, grass, field crops, brush up to 6 feet (2 m) in height, downed limbs, logging slash, and small trees on or immediately adjacent to the surface of the ground
- Aerial fuels: Suspended and upright fuels (brush over 6 feet [2 m], leaves and needles on tree limbs, branches, hanging moss) physically separated from the ground’s surface (and sometimes from each other) to the extent that air can circulate freely between them and the ground
The following factors affect the burning characteristics of ground cover fuels:
- Fuel size: Small or light fuels burn faster than heavier ones.
- Compactness: Tightly compacted fuels burn slower than those that are loosely piled.
- Continuity: When fuels are close together, the fire spreads faster because of heat transfer. In patchy fuels (those growing in clumps), the rate of spread is less predictable than in continuous fuels.
- Volume: The amount of fuel present in a given area (its volume) influences the fire’s intensity and the amount of water needed to achieve extinguishment.
- Fuel moisture content: Fuels that contain less moisture ignite more easily and burn with greater intensity (amount of heat produced) than those with a higher moisture content.

Weather
Some weather factors that influence ground cover fire behaviour are the following:
- Wind: Fans the flames into greater intensity and supplies fresh air that speeds combustion and affects the rate and direction of fire spread; very large-sized fires create their own winds and/or weather systems (Figure 14.48).
- Temperature: Closely related to relative humidity; primarily affects the fuels as a result of long-term drying.
- Temperature differences: Wind usually moves from areas of high pressure and heat to areas of low pressure and cold. Large wildfires can sometimes create their own wind systems due to the increases in temperature difference.
- Relative humidity: Significantly affects dead fuels that only gain moisture from surrounding air rather than their root system.
- Precipitation: Largely determines the moisture content of live fuels. Dead fuels (those easily ignited) may dry quickly; large, dead fuels retain this moisture longer and burn slower.
Topography

Topography refers to the earth’s surface features. The steepness of a slope affects the rate and direction of a ground cover fire’s spread. Fires will usually spread faster uphill than downhill, and the steeper the slope, the faster the fire spreads (Figure 14.49). Other topographical factors influencing ground cover fire behaviour include the following:
- Aspect: The compass direction a slope faces (aspect) determines the effects of solar heating.
- In North America, full southern exposures receive more of the sun’s direct rays and therefore more heat. Ground cover fires typically burn faster on southern exposures.
- Local terrain features: Features such as canyons, ridges, ravines, and even large
rock outcroppings may alter air flow and cause turbulence or eddies, resulting in erratic fire behaviour.
- Drainages (or other areas with wind-flow restrictions): These steep ravines are terrain features that create turbulent updrafts causing a chimney effect.
- Wind movement can be critical in chutes (narrow V-shaped ravines) and saddles (depression between two adjacent hilltops).
- Fires in these areas can spread at an extremely fast rate, even in the absence of winds, and are potentially very dangerous.

Parts of a Ground Cover Fire
The names used to identify the parts of a typical ground cover fire are shown in Figure 14.50. Every ground cover fire contains at least two or more of the following parts:
- Origin: The origin is the area where the fire started and the point from which it spreads.
- Head: The head is the part of a ground cover fire that spreads most rapidly.
- The head is usually found on the opposite side of the fire from the area of origin and in the direction toward which the wind is blowing.
- The head burns intensely and usually does the most damage.
- Usually, the key to controlling the fire is to control the head and prevent the formation of a new head.
- Finger: Fingers are long narrow strips of fire extending from the main fire.
- They usually occur when the fire burns into an area that has light fuel and patches of heavy fuel.
- Light fuel burns faster than the heavy fuel, which gives the finger effect.
- When not controlled, these fingers can form new heads.
- Perimeter: The perimeter is the outer boundary, or the distance around the outside edge, of the burning or burned area.
- It will continue to grow until the fire is suppressed.
- Also commonly called the fire edge.
- Heel: The heel, or rear, of a ground cover fire is the side opposite the head.
- Because the heel usually burns downhill or against the wind, it burns slowly and quietly and is easier to control than the head.
- Flanks: The flanks are the sides of a ground cover fire, roughly parallel to the main direction of fire spread.
- The right and left flanks separate the head from the heel.
- It is from these flanks that fingers can form.
- A shift in wind direction can change a flank into a head.
- Spot fire: Flying sparks or embers landing outside the main fire cause spot fires.
- Spot fires present a hazard to personnel (and equipment) working on the main fire because they could become trapped between the two fires.
- Spot fires must be extinguished quickly or they will form a new head and continue to grow in size.
- Islands: Patches of unburned fuel inside the fire perimeter are called islands.
- Because they are unburned potential fuels for more fire, they must be patrolled frequently and checked for spot fires.
- Green: The area of unburned fuels next to the involved area is called the green.
- The green area of a ground cover fire should not be confused with the green zone often indicated at hazardous materials incidents or fire scenes.
- Green at ground cover fires is simply the opposite of the burned area (the black) and does not indicate that the area is safe.
- Black: The opposite of the green, the black is the area in which the fire has consumed or “blackened” the fuels.
- The black can be a relatively safe area during a fire but is often hot and smoky.
Ground Cover Fire Attack
The methods used to attack ground cover fires revolve around perimeter control. The control line may be established at the burning edge of the fire, next to it, or at a considerable distance away. The objective is to establish a control line that completely encircles the fire with all the fuel inside.

Types of Fire Attack

The direct and indirect approaches are the two most basic methods for attacking ground cover fires. A direct attack is action taken directly against the flames at its edge or closely parallel to it. The indirect attack is used at varying distances from the advancing fire (Figure 14.51). This method is generally used against fires that are too hot, too fast, or too big for a direct attack. As with any other type fire, size-up must continue throughout a ground cover fire so that these adjustments can be made when required (NWCG, 2015). The steps for attacking a ground cover fire can be located in Skill Sheet 14-11. Either type of attack may also be referred to as either flank attacks or parallel attacks. Flank attacks are normally used for moderately intense fires and can be either direct or indirect. The attack begins at a secure anchor point (road, highway, body of water, previous burn) on one or both of the fire’s flanks and works toward the head. A parallel attack is a form of indirect attack. A parallel attack involves creating a control line quickly using bull-dozers or other heavy equipment. The control line can be constructed much closer to the fire than a line created with hand tools, and more quickly (Figure 14.52). This attack sacrifices less territory to the fire as it burns and frees up firefighters to patrol the control line (NWCG, 2015).
Fire Lines
One of a Fire Fighter I’s responsibilities according to NFPA 1001 is the construction of fire lines using hand tools. Fire lines are parts of control lines along which fuel and sometimes earth are removed to create a fire stop. Starting from an anchor point, a fire line is constructed some distance from the fire’s edge and the unburned intervening fuel is allowed to self-extinguish. Creating the line involves using shovels, axes, power saws, and other hand tools to remove all surface and subsurface fuels, such as roots, along the assigned fire line.
To make a line as effective as possible, the following must be done:
- Remove all vegetation and debris from the line.
- Clear the line down to mineral soil.
- Widen the line as directed in order to provide a sufficient fire break depending upon height of the vegetation.
- Throw all burned/charred material into the black.
- Scatter all cut and unburned fuels into the green.
- Remove all branches that hang over the line.

When the fire line is being created close to the fire’s edge, such as during a direct attack, firefighters may combine fire suppression with creation of the fire line. As the firefighters use shovels to create the fire line, they throw the dirt that they are removing onto the fire to cool and smother the fire (Figure 14.53). Constructing a fire line is described in more detail in Skill Sheet 14-12.
Ground Cover Fire Safety Principles and Practices
The primary principle of ground cover fire safety is life safety, both for the civilian population and firefighters. The sections that follow describe some widely followed safety practices when combatting ground cover fires.
Lookouts, Communications, Escape Routes, and Safety Zones (LCES)

Applying situational awareness can be more effective if the concept of LCES is applied. LCES is a situational awareness technique that stands for the following (Figure 14.54):
- Lookout
- Escape Routes
- Communications
- Safety Zones
Developed for large-scale wildland fires, LCES can be used on any size ground cover fire. Lookouts monitor fire development and spread. Watch for rekindles within the burned area and keep the IC informed of these changes. Lookouts go to locations that can observe the fire without being in front of the fire. In some jurisdictions, airborne lookouts in helicopters, airplanes or drones monitor the fire.
Communications is an essential part of any ground cover operation. Lookouts, fire suppression crews, support personnel, and members of the Command Staff must keep the IC informed. The IC must be in communication with every unit or person at the incident. Rapid communication can prevent personnelfrom being trapped by changes in fire behaviour and/or wind speed and direction.
Units operating near the fire line must work from the burned side and always have an established escape route. An escape route is a marked path that leads to a safety zone and is short enough to allow personnel to safely travel to it. A change in wind direction can cause a fire to ignite unburned or partially burned materials behind fire line crews.
A safety zone may be in the burned area if it is sufficiently cooled and accessible. Safety zones and escape routes ensure firefighters will not become trapped if fire behaviour or fire spread direction changes.

Non-fire Hazards
Other hazards may be encountered during ground cover fire operations as follows:
- Unstable Trees: Trees that have been weakened by age or fire and may collapse.
- Animals: Animals that have escaped the fire.
- Insects: Usually more of a nuisance than a hazard; some insect stings can be fatal to persons with allergies.
- Repellant sprays and first aid creams should be carried when needed.
- Extreme temperatures: Extreme hot temperatures can cause exhaustion, dehydration, heat exhaustion, and sunburns. Cold temperatures could lead to hypothermia.
- Electrified fences: Electrified fences have caused numerous firefighter deaths. All wire strand fences should be considered electrified until proven otherwise.
- Electrical power lines: Ground cover fires can cause power poles to fall and power lines to break. See the section on Class C fires for safety tips.
- Explosives: Explosives and unexploded ordnance may be found around military training areas, near construction sites, and in areas open to hunting. Do not touch or move any explosives that have been exposed to fire, and establish a perimeter around them.
- Hazardous materials: Broken pipelines, storage tanks, oil and gas wells, and storage buildings can create hazardous materials hazards when exposed to fire. Treat these situations like hazardous materials incidents, establishing a perimeter, and withdrawing a designated distance.
- Rolling or falling debris: In rough terrain, rocks, burned vegetation, and limbs can fall and strike you or create a slipping or tripping hazard.
- Pits or shafts: Loose debris may cover abandoned mine shafts, pits, and natural sink holes.
- Animal traps: Traps used for hunting may be hidden under brush. In areas where illegal activities have been reported, these devices may be used to protect them.
- Lightning: Lightning is a unique non-fire hazard that requires special precautions. The lightning that started a ground cover fire can also injure or kill firefighters. Take the following precautions to protect yourself from lightning hazards:
- Be aware of the weather.
- Do not stand under tall, isolated trees.
- Stay away from open water, metal objects, equipment, or wire fences.
- Find suitable shelter when lightning could affect your safety.
- In a forested area, seek shelter in a low ravine.
- If you are in a flat field and feel your hair stand on end, it is an indication that lightning is about to strike.
- Drop to your knees and bend forward, putting your hands on your thighs. Do not lie flat on the ground.
- Heart failure: Most line-of-duty deaths at ground cover fires result from heart failure. Monitor your stress level, check heart and lung rates, stay hydrated, and use the rehabilitation facilities that are provided.
Chapter Review
