50 Windows
Learning Objectives
Demonstrate installing or repairing a window.
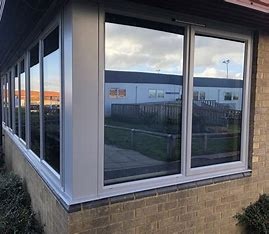
There are four basic types of windows used in housing: sliding, casement, awning and fixed windows. Each of these has a number of different designs. We will be describing only those windows which are commonly used in housing units.
1. Slider Window
The slider window has two units and one or both slides back and forth in the window frame. The slider is the least energy efficient and is prone to air and water leaks.
2. Casement Window
A casement window swings with the hinges on the side. It is opened or closed by a cranking mechanism, or a push bar mounted on the frame. It is closed with a latch which keeps it tight against the weather stripping.
Casement windows are excellent for ventilation because the total area of the window can be opened to let air in.
3. Awning Window
Awning windows also swing, except they are hinged at the top and swing out at the bottom. The complete area of the window can let the air in. They have an advantage over casement windows in that they can let the air in but keep the rain out.
Awning windows are often installed with fixed units.
A hopper window is hinged at the bottom. It opens in at the top.
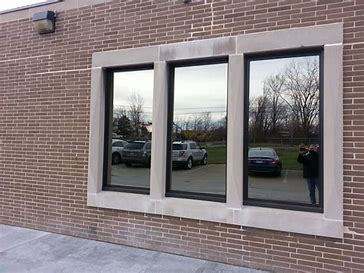
4. Fixed Units
Fixed units can be completely fixed or installed in combination with sliding or swinging units.
The main purpose is to let light into the room. The most common type of fixed unit is the thermo pane unit. Thermo panes are generally fixed units which consist of two fixed panes separated by an air space installed in a metal frame. This metal frame is inserted into the window frame.
Thermo panes are more energy efficient than the other types. First because they are fixed, they are more air tight than the movable type which can not be completely sealed from the outside. And second, because there is airspace between each pane of glass.
Screens
Ventilating windows need screen to keep the insects out. The mesh should have a minimum of 252 openings per square inch and should be made of non-corrosive materials, such as plastic, aluminum or stainless steel.
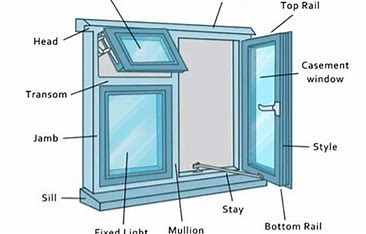
Window Frames
Most window frames are made up in the factory and ready to install into the rough opening. The parts of the window unit are: head jamb, side jamb, sill, glass, and stop moulding.
Please refer to the following drawing for a description of each.
The materials used for the frame are either metal, wood or vinyl. Metal is stronger than wood and therefore the frame can be smaller. Aluminum has another benefit over wood; it does not have to be painted. Vinyl is most common now and also may not need to be painted.
Repairing Windows
Sometimes a window will stick in its guides and will be difficult to open.
a) Lubricate the window guide using soap or candle wax. If this does not work go to step (b).
b) Remove the window, by removing part of the window casing, and lifting the window out.
c) Sand or plane the window frame edge until it slides freely. Lubricate if necessary.
Replace the window and replace the window casing.
Replace the Thermo Pane Window
Thermo panes consist of a metal frame enclosing two or three panes of glass separated by an air space of 1/4 to 1/2 inch. The air is sealed inside.
This unit fits into an opening of the window frame and is held in place by two wood mouldings.
- Remove the trim from the inside of the window unit.
- Remove the glazing compound.
- Apply knife grade glazing compound to the top, bottom and sides of the backstop.
Do not use putty. - Snap two new neoprene setting blocks on each of the four sides of the thermo pane at the quarter points of each side.
- Place the bottom edge of the thermo pane in position on the sill and press it until the neoprene setting blocks rest firmly against the backstop.
- Nail the face stop in place. Do not toenail.
Install Window in Existing Wall
Sometimes you may have to install a new window in an existing wall. To install the window, follow these steps:
1. Locate existing wiring and piping.
Avoid locating a window where piping or wiring may be present. Refer to the blueprints of the housing unit for this information.
2. Cut away the interior wall covering.
a) Remove the wall paneling.
Punch the finishing nails through the wall panel using a nail set.
Remove the wallboard.
b) Remove the drywall.
Determine the location of the studs outside the window opening location and cut at the middle of the studs using a utility knife. Do not cut through the drywall into the vapour barrier.
c) Cut the vapour barrier between the studs and fold it into the opening.
d) Remove the insulation.
3. Reroute electrical wires and plumbing pipes if they are located in the area of the new window. This is done by electricians and plumbers.
4. Support the existing ceiling.
a) Build a temporary frame, 2 x 4 at 16” centers, with 2 x 4 plates top and bottom.
b) Position the temporary wall approximately four feet from the exterior wall.
c) Drive shims between the floor and the bottom plate.
To protect the ceiling finish, put towels or something between the top plate and the ceiling.
Friction and pressure will hold the temporary support in place.
5. Measure out the opening.
(Note: You will need to check the Building Code to determine what size lintels (headers) to use. This will depend on the snow load for your area and whether or not it is supporting just a roof or a roof and one or two storeys. Lintels can be two 2 x 6, 2×8, or 2×10 in most cases.)
Rough opening dimensions
1) Top of the rough opening: 1/2” plus 5 1/2” (two 2 x 6 headers on edge) higher than the top of the finished window frame.
2) Bottom of the rough opening: 1/2” plus 1 1/2 (2 x 6 sill) lower than the bottom of the window unit frame.
3) Sides of the rough opening: 1” plus 3” (two 2 x 4 studs) wider than the width of the new window unit.
6. Frame the rough opening.
a) Cut the existing studs.
b) Cut the two main trimmers and fasten to existing studs.
c) Cut and nail in the rough sill.
d) Cut and nail in the header.
e) Cut and nail cripple studs to plate and rough sill.
f) Install additional trimmer to give the required rough opening.
7. Cut the opening in the outside wall.
a) Drive a nail from the inside of the four corners of the rough opening through the outside wall.
b) Mark out the opening on the exterior wall.
c) cut out the opening.
8. Install the new window unit, complete with frame.
a) Bag the vapour barrier.
b) Insert the frame.
c) Level the window unit, shim, nail through the shims into the trimmer studs, header, and sill.
d) Seal the vapour barrier.
e) Stuff the opening between the rough opening and the window unit with fiberglass insulation or foam rope, or spray in foam insulation.
f) Caulk the cracks between the window casing and the rough opening.
9. Repair the inside wall.
a) Replace the insulation between the studs.
b) Replace the vapour barrier. Ensure that the vapour barrier is not broken. Tape and caulk it up where there is a break or a tear.
c) Cut and nail the wall paneling or drywall.
d) Prepare the drywall for painting.
e) Paint the drywall.
f) Nail the inside trim boards in place.
10. Repair the outside finish.
a) Nail the outside trim boards.
b) Caulk any cracks between the outside trim boards and the exterior siding.
Replace Glass in Broken Windows
Windows are broken for a number of reasons, mostly because of flying objects. When working with glass always wear gloves and safety glasses.
- Remove the putty or trim surrounding the broken glass. Take care not to damage the sill.
- If putty, remove the glazier points. These are triangular pieces of metal used to hold the glass in place.
- Carefully pull the broken pieces of glass straight out of the window frame. Have a container ready to put the broken glass into.
- Clean out the groves in the window frame.
- Mark the glass
- Set the marked sheet of glass on a clean flat surface such as a table and score the glass once with a glass cutter
- Slide the glass sheet to the edge of the cutting table with the scored edge directly over the table edge.
- Press down on the glass portion sticking over the table edge. This will cause the glass to break along the line made by the glass cutter. Continue until you have the right size of glass.
- Check the window frame for warping by putting the new glass sheet into the clean frame and pressing each corner gently. The glass should meet the frame evenly all around.
- Apply a thin layer of putty to the groove. If the frame is warped, add more putty to the low spots, than gently press the glass into place.
- Install the glazing points or trim into the frame on every side of the glass pane.
- Apply a bead or strip of putty around the edges of the glass pane to make it weather proof. Press the putty against the corner formed by the glass pane and the window frame, and make it smooth.
NOTE: PROCEDURES FOR DOUBLE GLAZE
Most often with Double Glazed units you will have these units done by a professional window glazier. The actual window unit can be removed and taken into the glass shop for repair, or they can measure them up and install them at your worksite.