42 Tools Knowledge: Hand Power Tools
Learning Objectives
Demonstrate the safe use of portable hand power tools.
The Circular Saw and Accessories
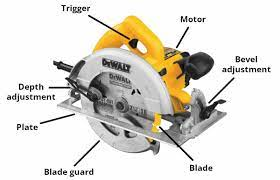
Parts of a Circular Saw
- This is a very popular tool for construction and general carpentry work.
- It is used for roughing out sheet material to be sized later, or for cutting rough lumber into shorter lengths prior to dressing (jointing & planing) it.
- In the hands of a skilled construction worker many important cuts can be made with a good deal of accuracy. By using the two built-in adjustments, (depth and bevel), proper guides and jigs, it is possible to cut accurately. It depends on how well you know your tool.
- Using jigs, extreme accuracy and clean cuts can be easy.
- A straight edge can also be clamped to the material to produce a straight cut.
- Bevel cuts are made by tilting the base with the mechanism located at the front of the saw. Remember that this procedure will change the depth of your cut.
Choosing a Circular Saw
There are many brands of circular saws that one will encounter when working in the construction field, but they all operate the same and require the same care and operating skills. The majority of work sites will have excellent quality tools.
When purchasing a circular saw, look for a well-designed, balanced machine. as it will be much more stable in operation and last longer than the lighter, cheaper machine.
The most common size will be the 7 ¼”, although there are from 4″ to 16″ saws available. The size of the saw is determined by the diameter of the saw blade.
Circular Blades
Because this saw has an exposed circular blade, it can be very dangerous if handled incorrectly. Be sure that the blade guard is not removed, that it is working properly, and that it opens and closes easily.
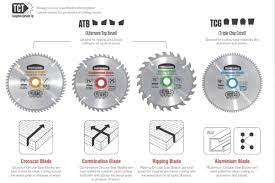
Circular blades are made to rotate in one direction only, teeth pointing forward. As well, different blades are required for different materials and cutting situations. Find out which type of blade is right for the work you are doing. Use only sharp blades, and have dull blades professionally sharpened.
The three main types of blades are the ripping blade, the crosscut blade and the combination blade. The combination blade combines the features of ripping, and crosscut blades. One variety consists of four cutting teeth and one raker tooth.
Although saw blades come in different metal varieties, the carbide tipped saw blades are the blades of choice because they hold an edge longer, and require less sharpening.
Types of Blades
Changing Circular Saw Blades
Always! Unplug the saw when changing blades or making adjustments. Follow manufacturer’s instructions closely. Some saws have a blade locking mechanism, which makes it quite easy to change blades. Or, you can always use a block of wood to hold the blade from turning while you loosen the arbor nut.
Remember to point the teeth forward when you install the blade
Be careful not to over tighten the locking nut after replacing the blade.
- Wear safety glasses and/or a face shield, as well as hearing protection. Breathing protection may also be required when cutting material, which produces harmful or excessive dust. Never wear gloves when operating a circular saw.
- Cutting between points of suspension will result in the saw kicking back. Always secure the work to a bench with the end to be removed hanging free over the edge. Never at tempt the fabled “knee saw-horse” displayed in fictionalized accounts of what carpenters do.
- Be aware of the location of the blade on the underside of the material to avoid cutting into benches and sawhorses. Do not reach under the material being cut, or put your hand near the rotating blade.
- Keep your stance and balance at all times.
- Most circular saws are designed for right-handed operators only, and are awkward for left-handed people to use.
- Before cutting, always check the material, making sure it is free of nails, screws, stones, concrete, etc.
- Set the blade depth at the minimum required to penetrate the material being cut by loosening the knob and setting the blade so that the gullets of the saw blade extend past the saw cut.
- To avoid kickback, start the machine before touching the material. Let the motor reach full speed before pushing the blade into the material. If there are any unusual sounds or vibrations, shut the machine off immediately and troubleshoot.
- As the rotating blade enters the material, the blade guard should raise to the upper surface of the material. The blade guard should never be removed or held open artificially.
- Be sure that the power cord stays out of the way during the cutting procedure and whenever the blade is turning.
- Keep both hands on the handles provided when the machine is running.
- Feed the saw at a rate that does not strain the motor or cause the blade to wander.
- Do not overreach in order to finish a long cut. Take the time to stop the machine, reposition yourself, and continue the cut.
- Do not lift the saw off the surface when cutting. Keep the base plate firmly in contact with the material at all times.
- When finished a cut, make sure that the blade guard repositions itself, covering the blade, before setting the saw down. Never carry a saw with your finger on the start trigger.
- Because the circular saw cuts on the up stroke, finished material should be cut with the good side down. You can also score the cut line with a knife.
Power Drills and Accessories
Objectives
- Identify and correctly name the main parts of the power drill
- Identify different types of electric and cordless power drills available
- Identify the different drill bits available
- Knowledge of drill accessories available to the skilled worker
- Become skilled at the useful operation and maintenance of the power drill
- Determine the different sizes of power drills
Electrical Hand Drills
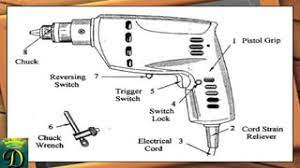
The electric hand drill consists of a small, powerful motor, housed in a body unit, which has a handgun-type molded handle and a trigger switch. The motor speed is slowed, and the power increased, by a gearing mechanism mounted to a chuck. The chuck mechanism is able to accept standard drill bits and accessories of varying shaft diameters. It is locked with a geared key to securely grip the bits. Newer models are available with keyless chucks, which are easier and faster to operate.
Drills are sized according to the maximum bit diameter that can be accepted by the chuck, which are usually available in sizes of 1/4 inch, 3/8 inch, 1/2 inch, and 3/4 inch. The resulting difference is recognized in that the drill gets more powerful and slower in speed as the size increases. Most electric drills on the market are multi-speed and reversible.
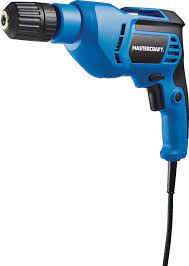
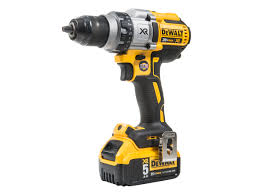
Cordless Hand Drills
Cordless drills are becoming increasingly popular as more powerful and compact batteries are developed and introduced. Their popularity stems from the versatility experienced by not having a cord, and quick charge batteries. Shown below are some examples with different batteries and different chucks.
Cordless impact driver
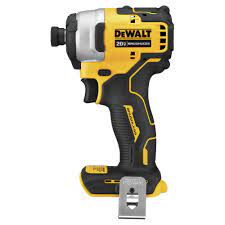
Impact drivers, like cordless drills are used to drive screws and lag screw or bolds, but are smaller and more compact than cordless drills. These only come in a ¼ inch drive so you are limited on what bit size you can use for these drivers.
Hammer Drills
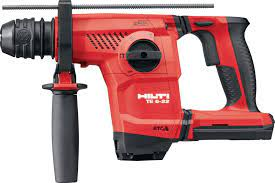
Hammer drills are also common to the commercial and industrial field. They combine the rotary action of the drill bit with the hammering action of a jackhammer. They are commonly used for drilling into concrete and masonry.
All drills produce torque, and are prone to twisting the wrist in the opposite direction of the bit rotation. This becomes a real problem when operating large, powerful drills, when using large-diameter cutters, or when driving screws. The torque can twist the wrist, causing injury. An auxiliary handle permits the use of both hands to stabilize the machine.
Large-capacity hand drills usually have the capability of accepting a side-mounted handle. This allows the machine to be gripped firmly with both hands, helping to stabilize the effects of torque.
To further reduce the negative effects of torque, take care to “square up” the bit to the surface being cut. Before you start your cut, brace yourself firmly in anticipation that the twisting motion will occur. Reduce the speed and downward pressure toward the end of a cut.
To change the bit in a hammer drill, follow these procedures: manufacturers directions as the different models/brands will have different procedures to change bits.
Drill Bits, Accessories, & Cutters
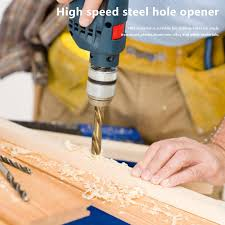
Drill bits are available in many shapes and sizes, depending on the job they are designed to perform. They are usually divided into wood, masonry and metal-cutting categories, although most metal cutters will also work with wood. Wood cutting bits, however, are not meant to handle metal cutting or masonry cutting. The most common is the straight shank twist bit used for wood and metal. A sharp bit is an absolute must if you desire a good job.
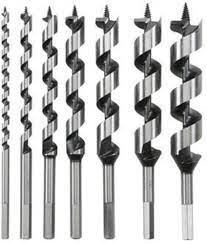
Auger bits are similar to the bits used in hand brace , except that it does not have a tang and doesn’t require a screw tip.. They are used for medium speed woodworking jobs. Another common bit is the spade bit, which is used for slower speed jobs. For concrete and masonry work, you must use a carbide tipped bit that is suitable for the job.
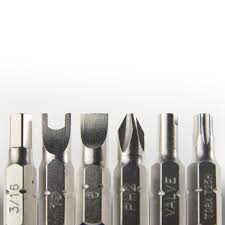
A variety of driving bits are available, but the most common are Robertson, Phillips, and Slotted driver bits.
They come in sizes and lengths that fit all screw sizes common to the construction industry. Also available are different styles of magnetized bit holders to speed up your work. The adjustable depth gauge can be very useful for drilling multiple, same depth holes. The old method of drilling through a dowel cut to the right length is still a method used by a skilled worker.
A suitable finish to a driven screw can be accomplished by using a special bit called a counter-sink/counter-bore combination bit. Countersink simply means flush, and counterbore means drilled below the surface, to be covered with a wood plug.
Changing the Bit
- Disconnect the power cord.
- Remove the bit by inserting the chuck key into one of the holes in the side of the chuck.
- Engage the gear teeth of the key into the corresponding teeth on the chuck.
- Twist the key counterclockwise to loosen the bit.
- When making adjustments to accommodate another bit, the chuck body can be easily rotated by hand.
- Insert the new bit and turn the chuck by hand until it engages the bit.
- Insert the chuck key and turn it clockwise to tighten it.
- Tighten the chuck firmly and remove the chuck key before reconnecting the power.
- Run the drill momentarily, to make sure that the bit is turning straight and true.
Cleaning Drill Bills
- Brushing or wiping off oil and loose debris can clean bits.
- To remove built-up glue and resins, etc., soak with a household oven cleaner.
- Oven cleaners are caustic and must be used sparingly and with respect.
- Read the product warning labels before proceeding.
- Let stand for a few minutes, then wash off the residue under running water.
- Dry thoroughly, and spray with penetrating oil to protect from rust
Other Cutters & Accessories
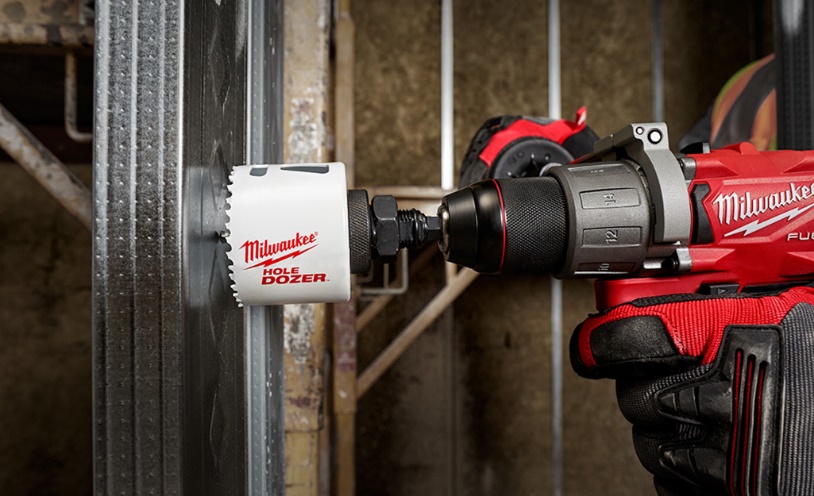
Keep the drill manufacturer’s capacity ratings in mind when purchasing cutting attachments. Large-diameter hole saws and spade bits are meant for use in drill presses and can cause hand drills to overheat. The hardness of the material being drilled will also be a factor.
Hole saws have a pilot drill bit in the center. Never use a hole saw without the pilot drill securely in place.
Other accessories are also available: sanding wheels and drums, buffing pads, and water pumps. Before using these accessories, read and follow the manufacturer recommendations concerning safety precautions and procedures.
Exercises
Safety and Procedures
- Eye protection should be worn whenever using an electric drill. Wear safety glasses and a face shield. Hearing protection and a dust mask should also be worn.
- Coveralls may be appropriate when using hammer-drills, especially when drilling into plaster or concrete.
- Be careful if using gloves, as they may get tangled in the chuck of the drill.
- Before drilling the hole, be sure that the work is mounted securely to prevent it from twisting or spinning. It is best to clamp work to a surface. Small pieces should be held in a vise.
- A starting point can be made with a scratch awl or a center punch (metal)
- Keep the air vents in the drill body clear to prevent overheating.
- Unless you have a cordless drill, you must be aware of the location of the cord, keeping it out of the way of the bit and chuck.
- Do not drill through steel without cooling and lubricating the cut. Use cutting oil to prevent overheating and ease the drilling process.
- When drilling large-diameter holes in metal, it is better to drill a smaller pilot hole first, and then enlarge it to the proper size. In order to prevent wandering and chattering, the
- pilot hole should be of smaller diameter than the centering tip of the larger cutter.
- Accurate hole depth can be achieved by using an adjustable depth gauge or drilling through a dowel cut to the desired length.
- Splintering can be reduced or eliminated by attaching a scrap piece of wood to the underside of the piece being drilled or drilling from both sides
- Do not reach around the material being drilled or drill with one hand while holding the material with the other. Keep good footing and balance.
The Jig Saw and Accessories
Objectives:
- Identify and correctly name the main parts of a jig saw.
- Know the basic cuts which can be performed with a jig saw.
- Practice the safe and practical use of a jig saw.
- Change the saw blades and maintain a jig saw.
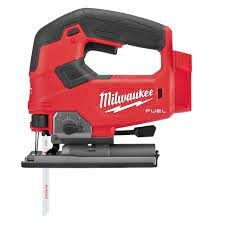
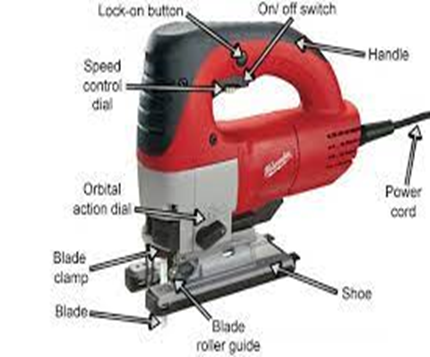
Description
This is a very popular tool because it is among the least expensive tools with which to make straight and curved cuts in woods and metals. type of. It is a versatile machine, relatively safe and easy to operate as long as certain precautions are taken. Some jigsaws operate with a reciprocating action similar to a sawsall.
When choosing a jigsaw, look for a machine with bearings on all moving parts. Bushings will wear quickly under the strain of even moderate use. A well-balanced machine should operate with minimum vibration.
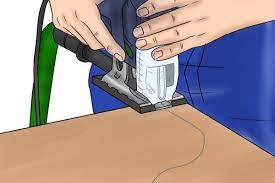
To Operate a Jigsaw
Position the front end of the base of the saw onto the material to be cut. Align the blade with the line of the cut to be made.
Pull the machine back a bit, so that the blade is not engaging the material.
Press downward lightly to hold the saw onto the material, and start the saw before addressing the blade to the material.
When the motor has reached maximum speed, push the saw slowly forward into the material with an even pressure. A sharp blade will cut with almost no effort on your part, other than to guide the saw. Do not attempt to force the blade through the material.
The saw blade cuts with an upward motion. This can tear the upper side of the material being cut. Cut with the good side down or score the cut line on the upper surface.
Starting a Cut on the Surface
Prior to starting a cut in the middle of a panel, drill a hole in the material through which the blade is inserted. “Plunge-starting” is the term given to a method of starting cuts without previously drilling a hole. Because the resulting vibrations are prone to breaking blades, causing operator injury, and/or damaging the machine, this method will not be discussed here. Plunge-starting a jigsaw cut is dangerous and should be discouraged. Always drill a starter hole.
Jigsaw Blades
Jigsaws use long, thin, tempered steel blades, which are held in the machine at the upper end, leaving the bottom protruding downward past the sole of the machine.
Blades become dull quickly due to the stress and heat that they are subjected to. They are short-lived and easily replaceable following the manufacturer’s directions. If it becomes difficult to push the machine through the material the blade is probably dull and in need of replacing. A dull blade will have rounded teeth, the “set” will be reduced, and resins may have accumulated on the teeth or shaft of the blade.
Different blades are made for different materials and cutting operations, and are available singly or in sets. Be sure that the blades you are buying are the right ones for the job and for the machine. Common types are Wood cutting, Metal cutting, and Knife blades which are used for cutting fabric, leather, rubber and other like materials
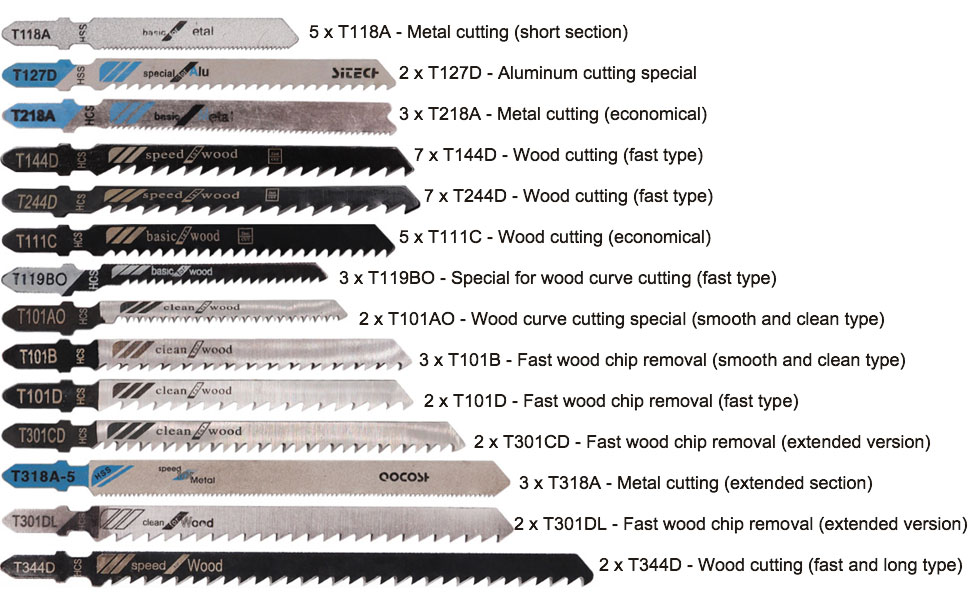
Shown above are illustrations of jig saw blades. Note the difference in teeth spacing.
Changing a Blade
A fairly simple operation that requires either a screwdriver or an allen wrench which is used to loosen and tighten the set screw located on the blade locking mechanism. Much simpler and safer if you UNPLUG the saw first.
1. Wear eye protection when using the jigsaw. These machines cut on the up stroke, so that the saw is drawn onto the work by the cutting action. This means that sawdust and filings are discharged upward, toward the operator.
2. Disconnect the power supply before changing blades or making adjustments.
3. Clamp material to a surface to prevent damaging vibrations. Clamp as close to the cut line as possible without interfering with the travel of the saw. Small pieces should be clamped to a suitable work area.
4. When cutting curves, care must be taken that the radius of the curve does not exceed the minimum cutting radius of the blade you are using. Attempting to cut a curve of too small a radius will result in the blade binding against the sides of the cut. Use relief cuts to ease the stress on the blade
5. When cutting metal, it is advisable to use cutting oil on the cut line to lubricate the blade.
6. Be aware of the location of the blade on the underside of the material to avoid cutting into benches and sawhorses.
7. After making a cut allow the blade to stop completely before removing the tool from the work. 8. Do not put the saw down until the motor has come to a stop. Lay the saw on its side so that no weight is placed on the blade.
9. Store the saw on a shelf with a hole drilled through it to accept the blade allowing the weight of the machine to rest on its sole rather than on the blade.
The Reciprocating Saw and Accessories
Reciprocating Saw (Sawsall)
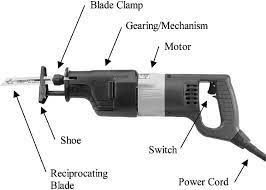
- Trigger
- Shoe
- D- Handle
- Blade Attachment Mechanism
- Armature
- Power cord
Reciprocating Saw Information
Most trades will have need for one at one time or other, some more than others. For the busy renovator the “sawsall” simply can’t be beat. They can go where few other saws can, and can cut through metal, wood, nails, wires and other building materials.
There are different blades available to cut these materials. Every reciprocating saw uses the same type of blades. The blades come in different lengths, and are usually made of a softer material than, say, a sabre saw blade. Other than that they are quite similar. They will bend quite easily if the blade is too long for the job so choose your blade wisely. A reciprocating saw varies from a sabre saw, in that it doesn’t perform in an orbital action and the blade runs vertical to the trigger. Also the blade is attached to the end in bayonet fashion in line with the body and works in a reciprocating manner (much like a handsaw).
The reciprocating saw is used primarily for rough work, such as cutting holes for pipes, ducts, roof, vents, etc. because a plunge cut can be made relatively easily with this saw. The most unique feature is the ability to cut a hole in the floor or wall flush to a wall plate in the framing stage. This is called a flush cut. The fact that it can cut through embedded metal makes it that much more valuable.
Most models have variable speeds from 0 to 2400 strokes per minute, and vary in amperage from seven to fourteen amps. As the amperage increases so does the cutting ability and performance. The trigger operates in a variable speed fashion making it possible to match the speed of cut to the material.
Plunge Cut
Although it is advisable to bore a starter hole when cutting around a curve, it is also possible to use what is commonly called a plunge cut. Position the tool so that the edge of the shoe rests on work surface with blade above material. Start the saw and slowly lower the blade onto work surface.
As the blade starts cutting, raise the handle of saw slowly until the shoe rests firmly on work surface. After completing the plunge cut the saw can be held at any convenient angle while cutting a straight line.

Changing Blades
Blades are held in the chuck with an Allan nut, or a quick release mechanism. Unplug the saw before changing blades.