41 Tools Knowledge: Layout, Measuring, and Leveling New
Learning Objectives
Identify, use and maintain the basic tools required for laying out, measuring and leveling construction projects:
- builders level
- hand levels
- plumb bobs
- steel tapes
- framing square
- string lines and batter boards
- chalk lines.
Testing Tools
Testing tools check the accuracy of the layout and the work completed. There are four different tests that are conducted to check for accuracy. They are:
- Test for “Level” and “Plumb”
- The term “level” refers to a horizontal line or plane that is parallel to the surface of a body of still water.
- The term “plumb” refers to a vertical line or plane that is at a right angle or perpendicular to a level surface.
- Test for straightness.
- Test for square and correct bevel.
- Test for correct dimensions.
Testing Level
Hand Levels
The hand level is made from wood, metal alloys, or composite materials (carbon fibre). They vary in length from 203 mm (8”) to 2438 mm (8’), but the most commonly used are from 610 mm (2’) to 1219 mm (4’). The number of levelling tubes mounted on the hand level may also vary. These are mounted individually or in pairs and may be fixed or adjustable. If you have to level a distance longer than the level itself, be sure to reverse the level each time you move along a line. This will remove any inaccuracies the level has.
Calibration: Check a hand level for accuracy
Hold the level in a plumb position against a wall. When the bubble reads level, draw a pencil line along the level. Reverse the direction of the level, and line up the level to the line. Is it level on this line? If not, draw another line. The distance between the widest distance between the two lines is twice the amount the level is out over the length of the level. Do the same measurement for plumb. Going to buy a level? Do the same test in the store on the shelf, using some pennies to adjust the level.
Water Hose
A transparent water hose is an accurate method of transfering levels. Fill the hose with water, make sure to remove all bubbles. You hold the hose against your first elevation and adjust the hose up or down until the level of the water is at the same level as your marked elevation. The level of the water at the other end of the hose will be the exact same level. Accurate levels can be established across hundreds of feet using intermediate elevation stations on stakes.
Line Level
A small spirit level that will clip onto a string. Because no string line is perfectly level, this is a method of leveling that is not very accurate. If you must use one, be sure to put the level at the center of the string.
Builder’s Level
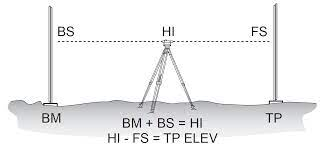
There are different types of level. We’ll look at the builder’s level, sometimes called the dumpy level or the optical level. This particular type swings horizontally only. The level is a very delicate instrument that is basically a telescope rigidly supported at the top of a tripod, with a fixed vial or vials filled with alcohol that has a small bubble for leveling purposes. We will look at the proper handling and care of this valuable instrument as a rod man assisting the instrument person.
Calibration: Check a Builders Level for accuracy
The builders level is set up, leveled and two different shots are taken. The machine is then moved, set up and leveled again, and two shots are again take at the first two locations. If the two elevations are parallel, then the machine is accurate.
The purpose of the builder’s level is to establish elevations and layout lines.
Traditionally an “instrument person” performs the operation, usually the carpenter, and an assistant called the “rod man”. They work together to determine and transfer elevations, and layout building lines. Today it is possible to perform this task alone with a laser level that emits a certain sound when elevation point is attained. A signal is sent from the instrument to a receiver attached to the rod. A mark is established when the sound dictates. Some types of rods are the Philadelphia Rod and the Chicago Rod. More common to a small site is the Stick Rod which is a 1 X 4 with a tape measure attached long enough to measure all elevations..
Using the builders level:
- Ensure bubble is exactly centered
- Set up tripod with level positioned at chin level
- When setting up in opposite temperatures (warm to cold etc….), allow the instrument to acclimatize for 20 – 30 minutes
- Give hand signals clearly and properly, i.e.; extend arms away from body when giving signals for better visibility
- Settlement of the level also causes problems i.e.; soft terrain, slopes…
- Improper focusing can be a problem
- Touching the instrument can cause inaccuracy
- Try to keep the back sight (known elevation) and the fore-sight (unknown elevation) distances equal
- Wind is also a common problem
- Shooting too far with one setup can cause problems
- Hold the rod steady and plumb
- Keep from moisture or wet conditions.
Rod Man Duties
The rod man has an important role in the leveling process, and he must carry these out quickly and correctly. Some of these duties are:
- Placing the rod on the proper location
- Ensuring the rod is clean and not obstructed at the point of contact with the desired elevation.\
- Make sure the rod is placed the right way up at all times
- Keeping the rod vertical
- Watching the instrument person closely
- Waving the rod properly
- Marking the stick rod properly with a sharp pencil
- Standing behind the rod properly facing the instrument person
- Ensure the rod is highly visible to the instrument person
- Knowing the right hand signals.
Common Hand Signals
To assist the instrument person hand signals relay pertinent messages over a long distance. They tell the rod man what he wants done etc.
Proper Handling
It is sometimes necessary to move the instrument from one position to the next. At times it can be moved without dismantling with these proper procedures, in order to move the instrument while it is still attached to the tripod, carefully fold up the legs and carry under your arm making sure not to bump into anything.
Laser Levels
Laser levels are now the most common levels on job sites. Easy to set up and self leveling, the rotating head laser level rotates at a variable preset speed, allowing elevations to be taken anywhere within 100 feet of the level.
Beware the inexpensive ($50 and up) laser levels now coming onto the market. All tested to an inaccuracy of about an inch in fifty feet. This isn’t accurate enough to lay out a building site. Set up and test the level in the store. (The clerks will want to know what you’re doing. Show them how it’s done.)
Calibration: Laser levels are calibrated the same way the builders level is.
Testing Plumb
Spirit Level
The spirit level can be used to measure plumb. The longer the level, the more accurate the level. Most carpenters use 4 foot levels.
Plumb Bob
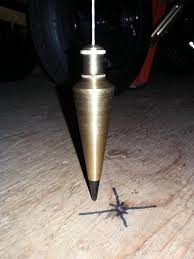
The plumb bob is used to check or determine plumb. It is a simple tool based on the fact that gravity will cause a mass (weight) to fall vertically (90) to a horizontal plane. A string is attached to it and suspends the plumb creating a vertical reference line. The greater the mass the less it is affected by the wind and the sooner it comes to “rest”. More expensive plumb bobs are hollow to allow them to be filled with mercury which has a high weight for its volume.
Measuring Length
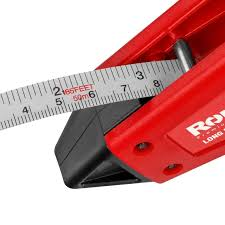
Steel Tapes
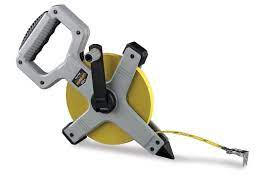
Steel tapes are available in both imperial and metric scales. Some have both scales, but differ from the pocket tape in that the scales appear on opposite faces of the tape.
Imperial Steel Tapes
Imperial steel tapes are available in lengths up to 200”. They have increments graduated in feet, inches, half inches, quarters, eighths, and sixteenths of an inch
Metric Steel Tapes
Metric (SI) steel tapes are available in 15 m, 20 m, and 30 m lengths. Most are graduated in millimetres with each 10 mm (1cm) increment marked on the tape.
When reading a measurement on a metric steel tape you must always determine the full “metre” lengths first. Then you add the remaining length in millimetres to it.
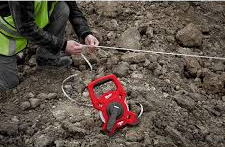
Measuring with Steel Tapes
Care must be taken not to damage the steel ribbon by crimping or bending it. It should be uncoiled from its case by pulling on the end ring. This is always done in the direction to be measured.
Steel tapes should be lightly oiled to protect them. This will prevent rust and will help eliminate sticking within the case. Because steel expands or lengthens in warm temperature and contracts or shortens in cold weather, the surrounding temperature must be taken into account for best accuracy.
Proper support and tensioning is also necessary to obtain accurate measurements. A tape should be supported along its entire measuring length.
Testing Square
Framing Square
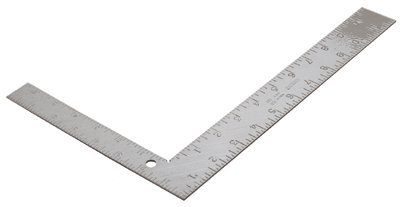
The square is a very useful tool for measuring and general layout work such as determining “square” and marking angle cuts for rafters, cross bridging, stairs, etc. The steel square is also invaluable as a calculator, saving time and increasing productivity.
There are two sides to a steel square. The face side is the side that displays the manufacturers label. (It is also that side facing you when you hold its “tongue” in your right hand and its “body” in your left hand.
Squares are typically divided into two specific types each based on the work they are used for. They are the framing square and the rafter square.
There is a wealth of information inscribed on steel squares. However, not all this information is present on all squares, so care should be taken when selecting a square that is suitable for the work to be done. Steel squares are available in either metric or imperial measure.
Check for square
Using the factory edge of a piece of plywood (because it will be straight) hook the body of the square along the straight edge and draw a sharp pencil line along the tongue. Reverse the square and line up the square along this line. If not, draw another line. The distance between the lines at the widest part is twice the amount the square is out of square.
Step off method for Stairs and Rafters
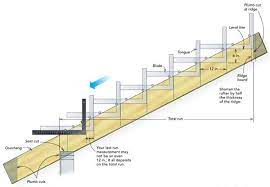
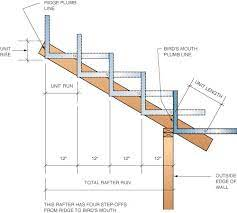
Framing squares can be used to step off your stair layout or to step off for laying out your different types of rafters. You will first need to start at the bottom or your material (where the rafter meets the wall or where the stairs meets the lower level) and work your way to the top. The body of your square should be your horizontal mark while the tongue is used for your vertical mark. (instructor to demonstrate step off method)
Stair Gauge Set
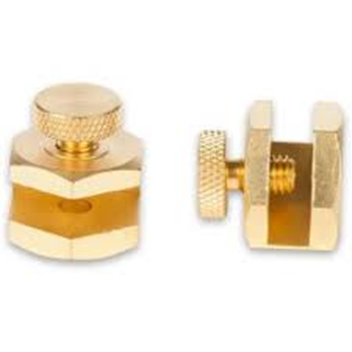
These small clamps are essential for laying out repetitive angles (i.e. stair and roof construction). They are used to mark the reference points on the tongue and body of the square.
String Lines and Batter Boards
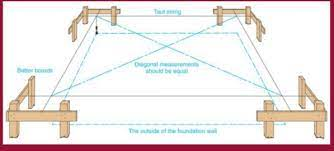
Projects are laid out by using string to define their outlines and elevations. The string used must be strong and resist stretching. The string is stretched tight on boards called Batter Boards.
A project is laid out using the plot plan to locate the property’s corners and the corners of the building. The string lines are located using tape measures, building levels or transits. The building’s corners are at the intersections of the strings.
The strings’ locations and elevations guide the carpenters crew in establishing footings and foundations.
Chalk Lines
Construction lines are temporarily laid out by using chalk lines. Different colours may be used but red and blue are the most commonly used. A chalk line is essentially a container with a spool of string and powdered chalk. The chalk adheres to the string until it is knocked off when the line is “snapped”.