51 Plumbing
Learning Objectives
Type your learning objectives here.
- Identify plumbing system components.
- Demonstrate installation of plumbing systems.
Basic Trade Hand Tools for Plumbing
This section shows the basic plumbing tools recommended for homeowners. The list of indispensable plumbing tools includes: plumbers pliers, crescent wrench, pipe wrench, basin wrench, tubing cutters, emery cloth, pipe cleaning tool, flux, solder, torch, striker, pipe dope (joint compound), Teflon tape, and assorted washers. These materials are available from plumbing supply stores and from most home centers.
Channel-lock Pliers
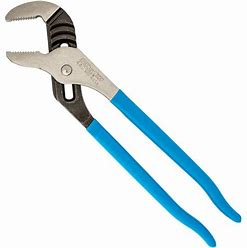
Perhaps the most basic plumber’s tool is a set of channel lock pliers also called plumber’s pliers or water-pump pliers. The jaws of these pliers have serrated teeth, and the jaws can expand to accommodate various sizes of pipe.
This type of pliers also features an offset head so that increased leverage and torque is possible even when expanded to fit larger pipes. The harder the user pushes on the upper handle, the more the jaws tighten. By contrast, using conventional adjustable pliers in this situation would be difficult, as they would be inclined to slip off the pipe.
Crescent Wrench
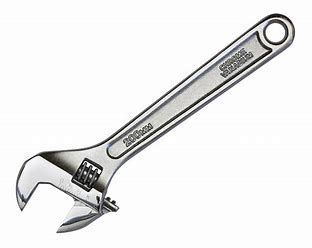
For applications where the serrated jaws might score a securing nut an adjustable open-end wrench a.k.a., a crescent wrench, is available. These are available in a variety of sizes.
Pipe Wrench
The large pipe wrench is another basic plumber’s tool. It is commonly used for larger jaws, to loosen threaded connections on large pipes. When using the pipe wrench, the back of the wrench’s jaws should come into contact with the pipe itself. In that way, adjusting and tightening the pipe will not damage or alter the shape of the pipe.
Basin Wrench
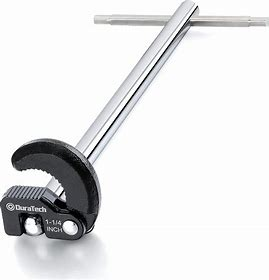
Loosening and tightening the connections that are underneath and behind sinks can be difficult and awkward. For this job, the specialized basin wrench is the perfect tool. The basin wrench’s adjustable spring-loaded jaw and long handle make it possible to remove and install nuts on connections in tight, difficult spaces.
Pipe Cutter

Soldering
If you intend to do serious do-it-yourself plumbing, at some point you’ll likely have to do some soldering — or “sweating” — of pipe connections. The first step in that process is usually to cut pipes to proper length using a pipe cutter. A pipe cutter, also called a tubing cutter, has a blade that cuts into the pipe as you make revolutions around the pipe, gradually tightening the cutter as you go. Being careful to keep the blade in the same groove, make steady, repetitive revolutions with this cutter to make a clean cut without damage to the pipe.
- Once the cut is done, use the reamer feature on the cutter to remove any metal burrs from the inside of the pipe.
- Use emery cloth to clean and surface the outside of the pipe before soldering.
- A specialized pipe-cleaning tool has wire-bristle brushes that can be used for cleaning both the inside and outside surfaces of pipe fittings.
- The final step before soldering is to apply flux compound to the connection. Lead-free solder, a torch and striker are then used to solder the joint.
- For threaded fittings, joint compound, also called pipe dope, is required to guard against leaks once the pipes are joined together.
- Another method of sealing threads is to use teflon tape to wrap the threads of the fitting.
Safety Alert:
Plastic Pipe
Most residential drain plumbing is ABS plastic pipe. Plastic pipe and the joint connectors, are glued with the appropriate glue. Plastic water supply lines are now being installed in many residential projects.
Each type of plastic used – black ABS and white underground grade, colour coded (hot and cold) water supply – uses its own glue or mechanical connector.
Keep in mind that plumbing installations must be done by a certified plumber and inspected by the building inspector.
Elements of a Plumbing System
The residential plumbing system consists of:
- Source of water
- Water supply lines
- Drain, waste and vent lines
- Appliances
- Fixtures
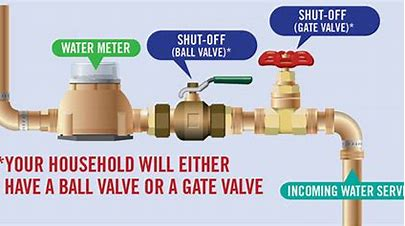
Source of water
Water comes into the house from either a city/town water system or from a stand-alone system like a well or reservoir. The water is brought under pressure through a 3/4 in. or 1 in. pipe which is connected to the main shut-off valve. This valve is located just before the water meter for a city/town system. For a stand-alone system, the valve would be located in the line from the pump used to bring water from the source. This allows pressure to be maintained in the pump when the water is turned off.
Water supply lines
Water is transported throughout the house in water lines or pipes. These pipes may be metal based, like copper or galvanized metal. It has been used most often in the past and continues to be used in new construction. Or, these may be plastic pipes like CPVC or PEX. Chlorinated polyvinyl chloride (CPVC) is an off-white rigid plastic pipe. Cross-linked polyethylene (PEX) is a high-temperature, flexible plastic pipe.
The main line is split into two lines just before the water heater. One cold line goes into the water heater and a hot water line comes out. At this point on, the other cold line and the hot water line travel together throughout the house. The lines are then connected to the various fixtures and appliances.
Drain, Waste and Vent Lines
The drain, waste and vent (DWV) lines form a system to remove water and waste from the house. When we use water in any appliance or fixture, it has to go somewhere. It goes out through the DWV system to either a city/town sewer system, or to an independent system such as a septic tank.
The drain/waste lines are directly connected to the appliances/fixtures and transport the water or waste out. The vent lines are connected to the drain lines, but go up where they connect with a main stack. The main stack usually goes out through the roof. This provides air pressure within the system so the water will drain properly.
The two main types of pipe used for DWV are Polyvinyl chloride (PVC) and Acrylonitrile-Butadiene-Styrene (ABS). Both are hard plastic pipe.
Appliances
Appliances are any machines that are directly connected to the water lines but are not attached to the house itself. This includes the hot water heater, washing machine, cold water line in fridge, etc. There may also be a water softener or water filtration system.
A shut off valve is installed at the inlet and outlet connections of the water heater so you can turn it off the system in case of emergencies or for maintenance purposes. Shut off valves are also installed for other appliances.
Fixtures
Fixtures include those things that require the use of water (toilets, showers, bath tubs, wash basins, sinks, outside taps, etc). They are fixed or attached to the house itself. They also have shut off valves installed in the water lines.
For each shut off in the house, the water inlet system may also have a 10” to 12” air chamber installed vertically over the feed pipe and closed by a plug cap. This prevents water hammering and pipes rattling caused by pressure changes when the taps are opened and closed.
Shutoff Valves
Before working on water supply lines, you need to shut off the water. You should shut off the water as close to the repair area as possible to keep water available to other areas. However, depending on available fixture shut off valves, you may need to shut the whole water supply off at the main valve.
Shutoff valves are used for turning off the main source of water or fuel lines into a building.
Individual shutoff valves are installed at fixtures and appliances to turn off that individual unit. Individual shutoffs are installed so that you don’t have to turn off the main source of water or fuel in order to service or repair a fixture or appliance. They are also useful in case of an emergency so that the whole house or building’s water or fuel source doesn’t need to be turned off.
It is a good idea to install shutoff valves under every sink on both hot and cold water supply lines and at every toilet. This will allow you to shut off water to only that fixture without disruption to the other supply lines in the building.
Main Water Shutoff Valve
The main cold water shutoff valve will be located close to where it enters the building inside the house and usually in the basement or crawlspace.
If you have a problem with shutting off the main building valve you might have to get the municipal shutoff valve at the street turned off which will require the services of the public works crew.
Fixture Shutoff Valve
The shutoff valve for a fixture is located directly under the toilet tank, sink, or tub/shower. In some cases where there are no shutoffs located directly at the fixture you may have to turn off the main water line valve.
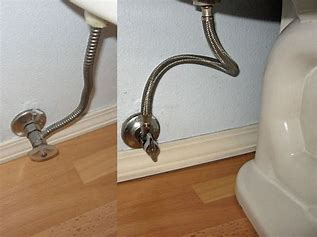
Toilet Shutoff
Look for this shutoff, typically with an oval handle and under the left side of the toilet tank.
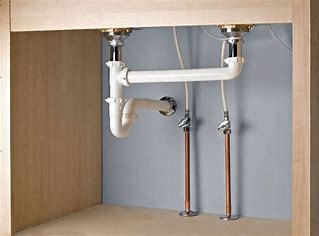
Sink Shutoff
These shutoffs usually sit just beneath the sink or within the cabinet or vanity under the sink.
Dishwasher Shutoff
Look first under the kitchen sink or if you have an unfinished basement, look between the floor joists just below the appliance.
Icemaker Shutoff
Look first under the kitchen sink. If you have an unfinished basement, look between the floor joists just below the appliance or possibly it is hooked up in the crawlspace.
Clothes Washer Shutoff
There should be valves where the house-supply lines meet the washer hoses.
Electric Hot Water Heater
Note that if you have an electric hot water heater you will need to shut off the electrical breaker for the hot water heater in the main electrical panel if you are draining the water from the tank or there is an emergency repair to be done where you need to shut off the main water supply. Also, once you are finished working on the tank, the tank must be refilled BEFORE you turn on the power to the tank otherwise you may ruin your tank.
Install Plumbing Fixtures
Identify Safety Procedures When Working with Plumbing
“Most of the time, you want to fix things that don’t work yourself. But, have you fully considered that fixing these things is perfectly safe? Here is some advice on how to make sure you are fully safe, when you cannot turn to professional help and try to do things yourself. If you follow some basic safety rules and resort to your common sense, you can deal with the home plumbing projects quite easily. Also, remember, when in doubt, call in a pro!
- Don’t get electrocuted. If you want to make a plumbing repair near an electrical source, you need to turn off the power near that source. Remember that water and electricity ‘mix’ themselves together very well so you can get into trouble quite easily.
- Have the emergency numbers at hand. It is highly advisable that you should have emergency numbers at hand. These numbers should include phone numbers for fire, medical emergency, police, utilities, etc.
- Calm down. Even if you face a bursting pipe and water is leaking everywhere, you need to keep your head on your shoulders and shut off the water as soon as possible in order reduce further damage. Remember, keeping calm will help you make the best decision and act quickly and wisely.
- Practice. In case of emergency, you should be ready. It shouldn’t be your first time using a plunger or an auger. You shouldn’t use these tools for the first time when you are under pressure.
- Protect your eyes. Wear eye protection! Safety glasses are an absolute necessity when you are cutting, soldering or working over your head. Safety goggles particularly will provide the adequate protection for your eyes for most jobs.
- Protect your ears. Just because you’re doing a cut or two with the power saw does not mean that you are not going to need hearing protection. Protecting your ears is even more important when you are doing more noisy stuff like hammering or heavy-duty pounding. Continuous loud noise can damage your ears more than you think.
- Protect your hands. The types of gloves that you may need depends on the type of job that you are doing; if you are working with chemicals, some rough rubber gloves will be needed. If you are doing some soldering, some heavy-duty leather gloves will protect you from accidental drip of hot water. Wearing long pants and long sleeves for waste water protection containing chemicals and bacteria will also protect you from any unwanted accidents. Remember, doing the laundry afterwards is important as well.
- Protect your Lungs. When working around chemical fumes, wearing a respirator ‘might’ be a good idea.
- Use the right tools. One of the first lessons that you have to learn in do it yourself (DIY) projects is using the rights tools for the jobs that you are doing. A screwdriver is not a chisel, while the wrench is not a hammer. Using wrong tools for the wrong job not only will make jobs more difficult, but they will also do more damage to what you are working on. Also, not only the repair is going to take longer, but you also risk of losing money in the long run.
Safety should always be your top priority. A work area that is clear of materials and tools that you do not use. Hazards can be prevented this way. In spite of being willing to repair things, you should note that your health and your life should be your priority.
Plumbers and PVC Pipe Glue (from Saskatchewan Occupational Health and Safety)
“The glues and primers used by plumbers to join PVC (polyvinyl chloride) pipes contain a solvent called tetra-hydro-furan (THF). When plumbers work in poorly ventilated areas, the solvent concentrations may be high enough to cause dizziness, nausea or headaches. There have been some cases of liver and kidney damage. The glues and primers used on PVC pipes contain 20 to 90 percent THF.
Understanding the Health Risks
Plumbers often work on PVC pipe in cramped and badly ventilated spaces. Bathroom vanities, crawl spaces, trenches and attics are examples. Because of cramped conditions, plumbers are working and breathing where THF vapours are most concentrated. Hands, which are covered with adhesive, can also absorb THF. Other solvents in the adhesives may increase the effects of THF. Alcohol consumption may also increase the health risks.
Protecting Plumbers’ Health
Employers must obtain a material safety data sheet (MSDS) for every adhesive used at a workplace. It will tell you which materials contain THF. MSDS’s are available from suppliers of the product. Employers must make all adhesive MSDS’s accessible to their employees at the worksite.
Exposure to THF must be reduced if you are experiencing headaches, dizziness or irritation of the eyes, nose and throat. Take the following precautions when THF is present.
- Reduce the exposure
- Avoid working at higher temperatures. There will be less vapour at lower temperatures.
- Use small containers of adhesives. Keep the containers closed when not in use.
- Use the applicators provided to put on the adhesives.
- Avoid skin contact when handling the materials. Use gloves made of butyl rubber when using primers.
- Wash adhesives from the skin often with mild cleansers. Do not use abrasive cleansers or solvents.
- Clean up small spills at once. In case of a large spill, leave the area until it is free of vapour or use a charcoal respirator and gloves for cleanup.
- Remove the rags filled with THF from confined work areas.
- Ventilate the work area
- Use natural ventilation where possible (e.g. open windows or doors).
- Use a fan to blow the vapour away from the face.
A charcoal respirator can be used where ventilation is poor (e.g. to clean up a large spill in a confined area). It must have National Institute for Occupational Safety and Health approval #TC-23C and protect against organic vapours. Choose the size of respirator that fits well to your face.
The THF solvent is flammable. Be careful when using it near sources of ignition such as pilot lights, welders and electric fans.”
(© 2007, Government of Saskatchewan; from: http://www.labour.gov.sk.ca/Default.aspx?DN=ed415fa3-7432-499c-b207-e9510e4ae19b )