48 Drywall
Learning Objectives
- Demonstrate hanging and finishing techniques.
- Demonstrate repair techniques.
This unit will introduce the drywall trade. It will also cover some basic construction and finishing techniques for wall covering
At one time walls of homes were strapped with lath and then layers of plaster were applied. Drywall, or walls covered with panels of plasterboard (gypsum wallboard) has taken their place because it is easier, faster, and more economical.
The topic of steel stud construction will deal mainly with the basic description and uses of steel studs, and the tools required to work with them.
Drywall & Steel Stud Tools
Objectives:
- Identify, use and maintain the basics tools required by a drywall/steel stud mechanic:
- apron
- hammer
- tape measure
- circle cutter
- utility knife
- surform
- T square
- hawk and tray
- trowels or knives
- snips
- key hole saw
Drywaller’s Tool Kit
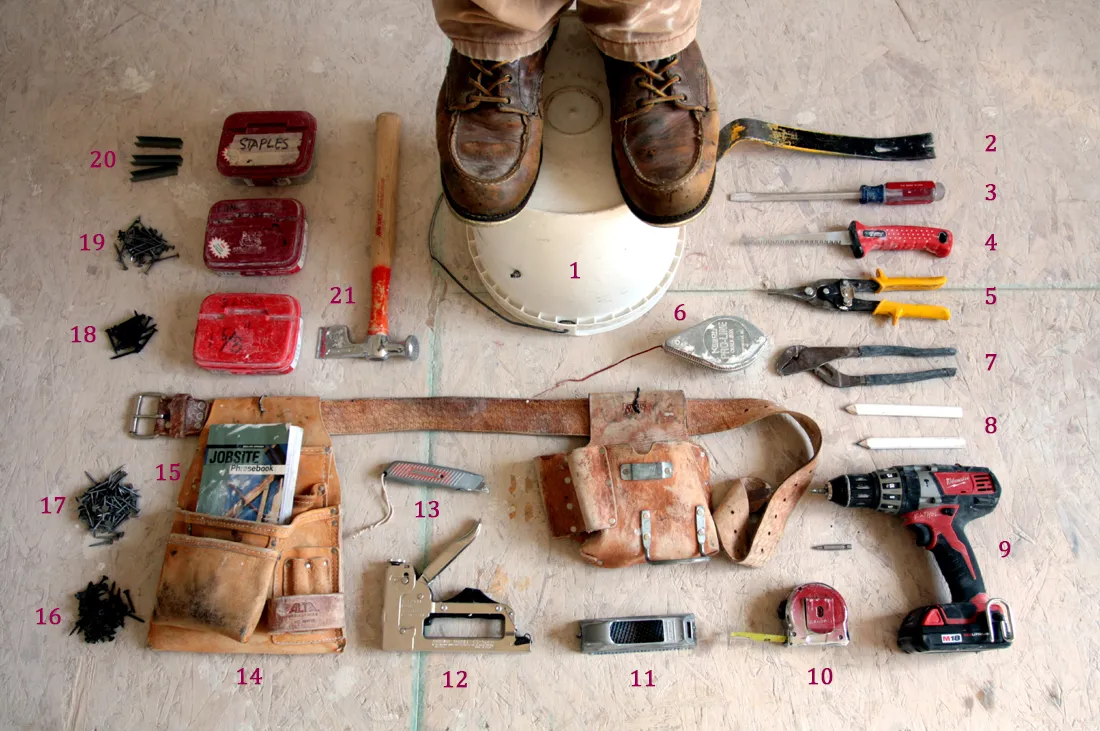
Apron
Above is a basic drywall pouch. It should have enough pouches to hold the basic hand tools, such as keyhole saw, hammer, tape, surform, drill knife, and sufficient fasteners.
Drywall Hammer
For nailing up sheets of drywall, a drywall hammer is a must. It has a convex head that creates a little dimple around the nail head without breaking the paper on the surface of the drywall. This will allow you to cover the nail head with drywall mud and get a perfectly smooth surface.
Tape Measure
The tape measure used is the same as the carpenter’s. Using the tape is also the same procedure, although skilled workers use the tape as a rule guide for cutting gyproc sheets. This involves placing the knife at the desired cut line, and using the proper length of tape. Secure the knife and tape at the desired width, scribe cut to the selected line.
Utility Knife
The utility knife described in the carpenter’s tool unit is used for drywall as well. A point to consider is a knife accepting a fairly stiff replacement blade without the break off tips. Also a fixed open position blade is recommended because of the variety of cutting procedures in hanging gyproc sheets.
Drywall Screw Gun
Using drywall screws can go a lot faster if you have the right tool. Use a special electric drywall screw gun that adjusts to sink the screws a little below the surface so you don’t break the paper. With a regular screw gun you don’t have this control.
Drywall Router
Professionals use a tool that is designed specifically for cutting out holes for electrical boxes and fixtures. It is used to cut the holes after the sheets of drywall are up. This is a lot faster than cutting them all by hand. Be careful you don’t strip the electrical wiring inside the electrical box you are working on.
T- Square
Used like any T-square, certain features make this tool a must for drywall work. One arm measures 16″ for aid in locating studs. The blade measures 47-7/8″ and the head is notched which enables cutting a 48″ board in one pass while standing on the floor. The 2″ wide blade lets you guide cuts for both sides of an outlet box without moving the square.
For making square cuts, use a drywall T-square. Set your sheets of drywall upright with the smooth side out. Set the T-square on the top edge and line it up with your measurement. Run a utility knife along the side of the “T” to score your cut. Snap the sheet back to break the sheet along the cut. Then cut the paper back with a utility knife.
Keyhole Saw
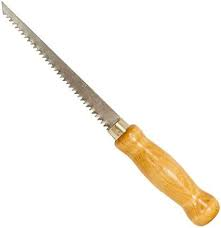
Use a keyhole saw for cutting around electrical boxes. Just punch the tip through the drywall and cut along each side. You can also use a power jig saw for these cuts.
Circle Cutter
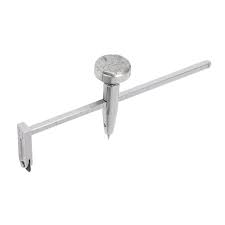
For round cuts, like around light fixture boxes, use a circle cutter. Find the center of your circle and punch in the center marker. Adjust the arm to the radius of your circle and use it to score the perimeter of the circle. Do the same on the other side of the sheet. Tap out the cut out with a hammer. You can also use a compass to draw the circles, and a keyhole saw to cut them.
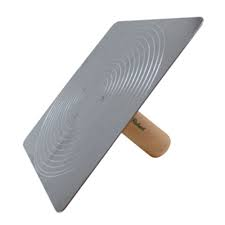
Plastering Trowels
[insert image of curved duraform and straight wood handle]
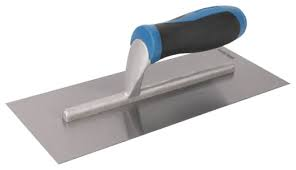
Available with a high carbon, blue, stainless, or golden stainless steel blade. A plastering trowel carries the plaster from the hawk to the wall or ceiling.
Its flexible, slightly convex blade is riveted to the mounting with ten rivets. The smallest and most common size is 11″ x 4-1/2″. Plastering trowels with wood handles are available in two kinds of handle shapes, straight or curved.
Drywall Corner Trowel
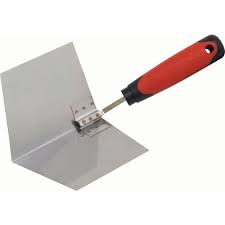
Drywall corner trowels are used to apply mud to taped corners. They may also be used to apply mud to the metal beading. A very flexible one-piece blade constructed of stainless steel eliminates tape snagging and rusting. The blade angle of inside corner trowels is set at a 103 degree angle, thus forming perfect 90 degree corners when flexed during use. Outside corner trowels have an 80 degree angle that flexes to 90 degrees to form a clean, square corner on the outside.
Drywall Taping Knives
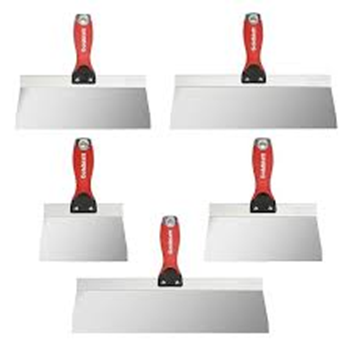
The “art” of taping involves using different sized taping knives for a smooth, tapered joint.
For the first “tape coat” you’ll need a taping knife that’s 5″ or 6″ wide. With each of the next two coats you’ll want to cover an inch or two farther in each direction so you’ll probably need an 8″ to 10″ knife and a 12″ to 14″ knife. Use a mud pan to hold the mud as you tape the joints. The tempered blue steel or stainless steel blades flex just right for feathering but will not take a set. Taping knives range in size from 6″ to 14″ with the most popular being 8″ and 10″. They can be used in covering over nail spots and other indentations in the board with drywall mud. Taping knives are available with wood, plastic, and DuraSoft ® handles. Many knives have an ergonomically designed handle to better fit the contour of the hand for greater user comfort.
Hawks
Hawks are used for holding plaster before application. They must be lightweight and are usually made of aluminum, magnesium or structural foam. Most popular sizes are 13″ x 13″ and 13-1/2″ x 13-1/2″, although smaller sizes are available.
Drywall Sanders
Drywall hand and pole sanders are used for sanding drywall joints. The pole sander is especially useful when working on ceilings and side walls from the floor. The swivel type head permits sanding at any angle, and the positive locking clamps hold the paper firmly in place. Sanders use pre-cut sheets or 1/2 sheet of regular sandpaper. The four foot hardwood pole sander handle has a hammer head tip for use in resetting nails.
For sanding the joints, use either a pole sander for dry sanding, or a wet sanding pad.
Board Lifter
Virtually an indispensable tool, the lifter is used to lift a length of gyproc to a desired position.
Mud Mixer Blade
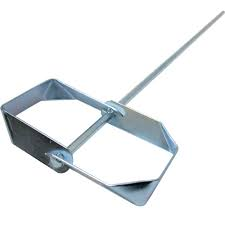
The above tool is used to get a consistent mix of drywall mud. It is operated with the aid of a ½ inch electric drill. This tool must be cleaned promptly after daily use.
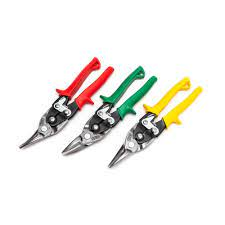
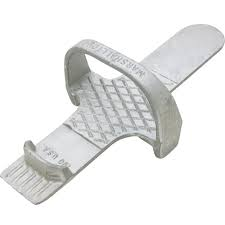
Aviation Snips
- Center Cut (Yellow)
- Left hand Cut (Red)
- Right hand Cut (Green)
Metal snips are used in steel stud construction as a means of cutting lengths of stud or track. The material is measured, marked with an appropriate marker and cut in a normal fashion.
The snips illustrated come in colors that indicate their specific cutting ability.
Tools and Fasteners for Steel
Cutting and fastening steel requires different tools than does lumber and other materials. In order to reduce frustrations on the jobsite, you should become familiar with these tools and learn the correct application for each.
Cutting
Aviation snips – cuts up to 33-mil material and makes cuts for coping track flanges.
14-gauge swivel head electric shear – cuts up to 68-mil material.
14-inch chop saw – for cutting multiple sections simultaneously, especially partition studs.
[Insert image pg 29}
Steel drill bit, 1 inch – for drilling holes in studs and track.
Hole punch, 1 inch – for field punching holes for the installation of electrical and plumbing systems.
Fastening
Adjustable clutch screw gun – with industrial motor (5.4 amps), 0-2500 rpm variable speed, reversible, bit tip holder release, adjustable torque control for framing. |
Magnetic bit tip holder and #2 Phillips bit tips. 5/16-inch magnetic hex driver for hex-head screws. |
Miscellaneous
Felt markers – for layout and cuts (black and red).
Other miscellaneous tools include: tape measure, speed square, utility knife, wallboard axe, and 50′ grounded extension cords.
Materials
Types of Wallboard
On our pages, we use the generic term “drywall” when talking about gypsum board. You will also hear it called “wallboard”, or referred to by the by the name “gyproc”.
Most plasterboard has a smooth side of white or cream-colored paper, a backing of kraft paper, and a central core of gypsum. The core is incombustible, and the paper facings are insignificant as a fire hazard. Some wallbord is made with decorative surfaces of various designs, including simulated wood grain.
Plasterboard is sold with half a dozen kinds of edges: straight, tapered, squared, beveled, rounded, and tongue-and-groove.
Sheet Sizes
Standard thickness of wallboard is 3/8” in., to ¾” in. Widths vary from 4 ft. to 6 ft. Lengths are 8 to 16 ft. Dry wall is usually ordered to fit walls – a wall that’s 11 ft. 6’’ would have no horizontal seams if 12 ft. sheets are used.
For walls with 16″ on-center framing use standard 1/2″ drywall. For ceilings (fire-resistant), use 5/8″ drywall. And for 24″ on-center framing, 5/8 standard is recommended.
A ¼” bending grade of wallboard is used for curved walls. It is dampened and carefully pressed into or onto the curve.
Moisture-Resistant Drywall or “Aqua-Board”
Usually green in color, this has the same gypsum core as drywall, but it has a water-resistant facing. It’s not waterproof, however, and will deteriorate from water penetration.
Concrete Backer Board
Often called by the brand names “Durock” and “Wonder Board”, this particular product is used as backing for ceramic tile. It has a solid concrete core and is faced on both sides with fiberglass. It’s ideal for wet areas like shower walls and bathtub surrounds.
Framing and Drywall Application
Ensure that all your studs and joists are straight, secure, and spaced properly. The nailing faces should all be flush and aligned in a level plane. Excessively bowed or crooked studs or joists should not be used, or straightened if the bow is within reason.
Furring can be used to correct surface unevenness in the existing framing.
There should be backing nailed in at every corner; on both sides of vertical corners and headers. No edge of drywall should go unsupported for more than two feet.
Screws as short as what’s allowed, are preferable to nails to minimize “popping”. Using dry material as well as gluing instead of nailing works to combat nail popping.
An alternative to using conventional wood studs is the use of prefabricated metal studs for non-bearing applications. This is widely used in commercial construction. Metal studs have many advantages.
Planning
Working from the plans or site measurement, measure the rooms and make a sheet detailing room sizes and count the sheet sizes and amounts. Sheets are commonly installed horizontally, with the least number of joints. Drywall cannot be joined at the corner of a door or window; it must join on the next stud. Walls are ½”, ceilings are 5/8”.
Climate conditions can be a factor in your dry-walling job. Temperature and humidity can affect how long it takes mud to dry. Job site temperature should be maintained at a minimum 55 degrees for 48 hours before and 48 hours after the completion of the driwalling. Ventilation should be provided even in warm climates because the mud evaporates quite a bit of water.
Handling
Handling and storing of plasterboard requires skill and care. The gypsum core, faced on both sides with paper, is dense, soft, and crumbly. A full-sized panel is both heavy and brittle; it should be carried horizontally, by one or two persons. Be careful, sheetrock can break easily. Plasterboard should be stored in stacks on dry, flat surfaces to prevent cracking. Spread the drywall around the house to evenly distribute the weight on the floor structure.
The delivery of drywall panels should coincide with the installation schedule. In new construction, drywall is not applied until after the Insulation and air vapour barrier is completed and inspected.
Application of Dry Wall
If both the ceilings and walls are to be covered, the ceiling should be done first. When the room is completed the panels on the walls will act as pilasters to help support panels on the ceiling. Wall panels butt snugly against the ceiling; any gap at the bottom will be covered by the baseboard. The panels can be attached either vertically or horizontally to the wall frame.
You may have walls taller than eight feet. In this case you can use wider sheets, or cut an narrow strip called a ripper.
Where you put the ripper depends on a variety of factors. You may want to put the ripper on top instead of on the bottom so you don’t have to bend over when taping. Put it on the bottom if you have several things breaking up the wall, like doors or a fireplace, so you don’t have as many joints. And if your ripper is only a few inches wide, you may want to put it in the middle of the wall. That way you end up with two joints close together and you can combine them into one wider joint.
<video>
Double Layers
In certain parts of the house, double layers of plasterboard may be advisable, as in a bathroom, kitchen, or busy hallway. The extra layer will result in a wall that is more acoustically efficient, stronger, and more fire-resistant.
In a double installation, the first layer is usually nailed over the wall frame. The second layer is then attached to the first with adhesive, mastic, or adhesive strips. In some cases you may need to fasten the edges with a metal fastener.
By doubling the layers of drywall you double the mass. An added technique to gain greater value, would be to use “resonant sound bar”. These are screwed horizontally to the studs at two foot intervals. The first layer is then attached vertically to the “resonant sound bar”. The next layer is attached as described in the first paragraph. This method’s effectiveness is two-fold in that it creates a separation (de-coupling) between the wall members besides increasing the mass.
De-coupling how your construction walls fit together creates a break in sound trainsmission as well as providing an air space. There are other methods of acoustically efficient techniques which will be covered in the framing module.
Safety Precautions
Safety in working with drywall covers a wide variety of precautions that must be exercised at all times. Because of the pyisically demanding nature of this work it helps to be in excellent physical condition as well. The possibility of heavy lifting in unusual positions requires extra caution in lifting techniques. The amount of “dust” associated with drywall work is also an important note to consider.
- Gypsum dust can cause eye and respiratory irritation. Protect your eyes and lungs. Wear safety glasses and particle masks when appropriate and provide proper ventilation for the work site.
- Know your tools and use them only on jobs they were specifically designed to handle.
- Dull tools are unsafe and can harm the work. Always work with sharp cutting blades. Maintain your tools and always disconnect the power when working on a tool.
- Use caution when working from saw horses, scaffolding or ladders. Make sure the ladders’ feet are secure on the ground. Never attempt to stretch while on a ladder.
- Keep children away from the work area and power tools as well as harmful materials, adhesives and solvents.
- Keep a clean work site and don’t let debris accumulate.
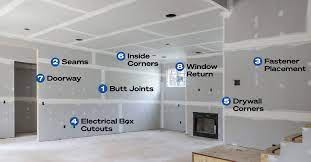
Basic Techniques for Cutting, Installing, Nailing and Taping Drywall
<include video and images>
Cutting a plasterboard panel to a smaller size is relatively easy once you understand the unique nature of this hefty but crumbly material.
- The first step is to measure accurately for a piece that is to fill a particular area. For secure fastening, the vertical edges of any panel should cover at least half the thickness of a stud; its top or bottom edge—where applicable—should lap far enough over the frames top plate or sole plate to provide nailing space.
- Use full sheets of drywall whenever possible.
- Cut the length of the sheet so that the end falls in the center of a joist or stud.
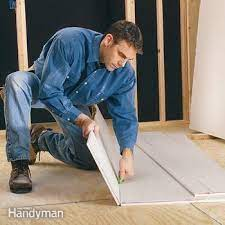
- To cut a sheet for length, first set it upright with the finish side out. Measure out the length with a tape measure. Then using a drywall T-square on that mark as a guide, score the front side with a utility knife. Snap the drywall back. It should break apart right at the cut. That doesn’t cut the paper on back, though, so to finish the cut run the knife blade down the back side to cut the waste free.
- Making cuts along the length of a sheet is a little trickier. One way is to snap a chalk-line along the sheet and then score the line by hand. If you have an 8′ straight edge that would work, too.
- Another way to make this kind of cut is with a tape measure. Hold the tape measure in your left hand with your thumb and fore finger at the dimension you want. Hold the blade of your utility knife under the end of the tape, holding it against the hook. Now run your left hand across the top of the board and score the drywall with the knife. This is not a super-accurate method, but it’s good enough for hanging drywall.
- When cutting out openings, first install the piece, then cut it with a drywall saw along the vertical framing. Score the third line with a knife, and snap normally. Cut back of paper with your knife.
- For round cuts, like a round light fixture boxes, use a circle cutter. Cutting holes in drywall for lights, switches and outlets requires careful measuring and marking. Measure from the edge of where the drywall sheet will go to the center of the circle. Do this from both the side and top. Then transfer these measurements to the sheet of drywall. Find the center of your circle and punch in the center marker. Adjust the arm to the radius of your circle and use it to score the perimeter of the circle. Do the same on the other side of the sheet. Tap out the cut out with a hammer. You can also use a compass to draw the circles, and a keyhole saw to cut them.
- When cutting an opening, first drill or punch (carefully!) a hole or two inside the marked shape, then insert a keyhole saw to cut.
- For switch and outlet boxes, measure from the side edge of where the sheet will go to the right and left side of the box. And measure from the top edge to the top and bottom of the box. Transfer these to the sheet of drywall and cut it with a keyhole saw.
- There’s also a power tool professionals use that’s designed specifically for cutting out holes for electrical boxes and fixtures. The drywall router and it’s used to cut the holes after the sheets of drywall are up. This is a lot faster then cutting them all by hand.
- If you use a power router be careful you don’t strip the wiring inside the electrical box when you make your cut.
Nailing Procedures and Requirements
Building codes have very strict regulations about how many fasteners need to be used to attach drywall. THE GYPROC CAN BE NAILED SCREWED OR GLUED providing you abide by proper nailing techniques.
Use a drywall hammer to set the nails. It has a rounded head that sets the nails just a little below the surface and leaves an acceptable dimple, which is slight depression without breaking the paper on the drywall surface. This dimple then gets filled in with joint compound later.
With nails you usually need one every 7 inches on ceilings and every 8 inches along walls. This may not be enough, depending on the thickness of the drywall and the spacing of the joists or studs. When nailing drywall into wood framing use ring shank nails. These hold into wood better, and will prevent “popping” later on. Standard length is 1-1/4″ for 1/2″ drywall, and 1-3/8″ for 5/8″ drywall.
Using drywall screws can go a lot faster, if you have the right tool. You want to use a special electric drywall screw gun that lets you adjust it to sink the screws a little below the surface, again, so you don’t break the paper. With a regular screw gun you can buy an attachment that will do this.
Screws are stronger than nails. You usually only need to use one screw every 12 inches along the ceilings and every 16 inches on walls. When using a screw gun, use drywall screws. 1-1/4″ screws are needed for 1/2″ drywall, and 1-5/8″ screws are needed for 5/8″ drywall.
Drywall Applications
When hanging drywall always work from the top to the bottom. And always run the drywall sheets perpendicular to the framing.
Mark joist locations on top plates of the walls so the joists are easier to find when fastening ceiling sheets.
Mark the stud locations of walls on the ceiling sheets and on the floors so they’re easier to find when fastening the wall sheets.
Once you get a sheet in place, just nail or screw around the edges of the sheet. Then you can take the lift or jacks away (or give your head a rest if you’re using that).
Stagger the joints between sheets from row to row, this will make your walls stronger.
Key Takeaways
Always cut sheetrock slightly small, never cut a panel even slightly larger than the space allotted to it: edges or corners will crumble when the panel is forced into place. Any small gap can be filled and made invisible with tape and joint compound.
Hanging Drywall on Walls
You can apply plasterboard either parallel or perpendicular to the joists or studs depending on the wall’s dimensions. However, we normally put wall board on horizontally because it is stronger at the 90 degree angle to the wall frame or studs.
The best plan is the one that results in the fewest cuts, and the least number and shortest lengths of joints. Planning and some simple calculations can make your task considerably easier. It works best to have two people to lift sheets up to the top row.
Start nails across the top of a sheet before lifting it. This leaves both of your hands free to lift the sheet and nail it in place.
Conventional wall framing leaves 8 feet 1-1/8″ between the subfloor and the bottom of the trusses or joists. With two rows of drywall, you have about a 1/2″ gap left. Normally you should leave this at the bottom of the wall where it’ll be covered up by the baseboard.
To help hold the bottom sheet up snug to the top one use a foot wallboard lifter. You just step on one side of it and it lifts the sheet up. You can also use a pry bar for this.
Around window and door openings, you want to avoid creating joints at the corners. This will weaken the wall and will be more likely to crack at those joints. Place the joint away from the opening.
Start the ceiling using full sheets, and cut them so the edge is centered on a joist.
Getting sheets of drywall up to the ceiling can be tricky. And once you get them up, holding them in place while you screw or nail them is another challenge.
Two persons are required to place a 4 X 8 foot panel on the ceiling. One person raising the panel overhead and ascending the ladder and the other to raise and keep the panel level at all times. With a T-brace firmly wedging the panel, one person can begin the nailing while still partly supporting one end of the panel.
You can also rent a rig called a drywall lift. You load a sheet on it, then crank it up to the ceiling. It holds the sheet in place while you nail or screw it to the joists.
An important thing to remember when hanging any drywall is to line up the joints right.
Cut edges should be butted together. Tapered joints should not be butted up to a butt joint. Joints should also be staggered, and arranged so that the butt joints are on different studs on opposite sides of the partition. Before taping butt-joints, some people will “vee” them out with a utility knife to make a recess. This helps eliminate having a “hump” where the joint is.
The “factory edge” of a drywall sheet is the finished smooth edge made at the factory. The edges are also beveled, so when they butt together you get a nice recess for filling in the joints. This way the joints end up flush with the sheet, rather than having a build-up. So ideally, you always want a factory edge next to a factory edge.
When you have soffits to drywall, hang the bottoms of the soffits with the ceiling and the sides of the soffits with the walls.
When dry walling a bathroom you might need to install aqua board or concrete backer board. These install in much the same way as drywall.
Outside corners can get damaged easily so you want to protect them with a metal corner bead. Do this before starting the tape coat.
Wrap the corner bead around the corner and check to be sure it’s plumb. Nail it in about every 200 mm (8 inches) apart, and opposite each other, making sure you hit the wood framing. The corner bead will get covered up in the finishing process.
Before starting the taping process, make sure corner bead is installed on all outside corners. Ensure that all the fastener heads are sunk below the surface of the drywall. You can check them by running a taping knife over the drywall. If you hear a “click” you’ve got a nail or screw that needs to be sunk deeper. Just give the nails an extra tap, or give the screws a twist with a Phillips-head screwdriver.
Repairing Drywall
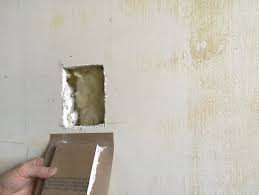
Hole Repair and Patching Work
Large holes in drywall are difficult to patch because there’s no backing material behind them. Also cracks can appear due to the racking of the building, but are often the result of not enough drying time between coats of filler.
To repair a hole in a covered wall need not be as major a project as one might think. All it takes is careful thought and a few proper tools and techniques.
For a hole between studs, a possible solution would be to cut a circular hole larger than the one to be repaired.
The next step would be to install a wood backer piece by screwing a piece of wood stock behind the Gyproc. Next fix a piece cut to fit in the hole that you just made.
Tape and finish in the normal procedures described in this lesson.
Small nail holes or shallow dents can be repaired pretty easily with a little bit of patching compound and a putty or taping knife. Then let the compound dry, sand over it, then prime and paint.
Nails will sometimes pop through the surface if they are not holding properly. To fix this, first re-sink the nail into the drywall. Then drive a new screw in next to the nail to hold the drywall into the framing. Apply compound over both fastener heads. When they dry, you can sand and prime over them.
The California Patch
Here is another way to patch a hole easily and with no framing required. First, these are the tools you’ll need for the easiest way to fix a small hole.
<image of tools>
Drywall compound, drywall knife, sanding block or hand sander, pencil & utility knife.
Procedure
1. Measure the hole, making sure you allow for damage inside the wall.
<image>
2. Cut a piece of matching thickness drywall 2” bigger than the hole.
3. Cut the back paper 1” in from the edge on all four sides, as below.
<image>
4. Break the edges away and peel the edge back toward you. Avoid breaking paper away from the face of the patch.
<image>
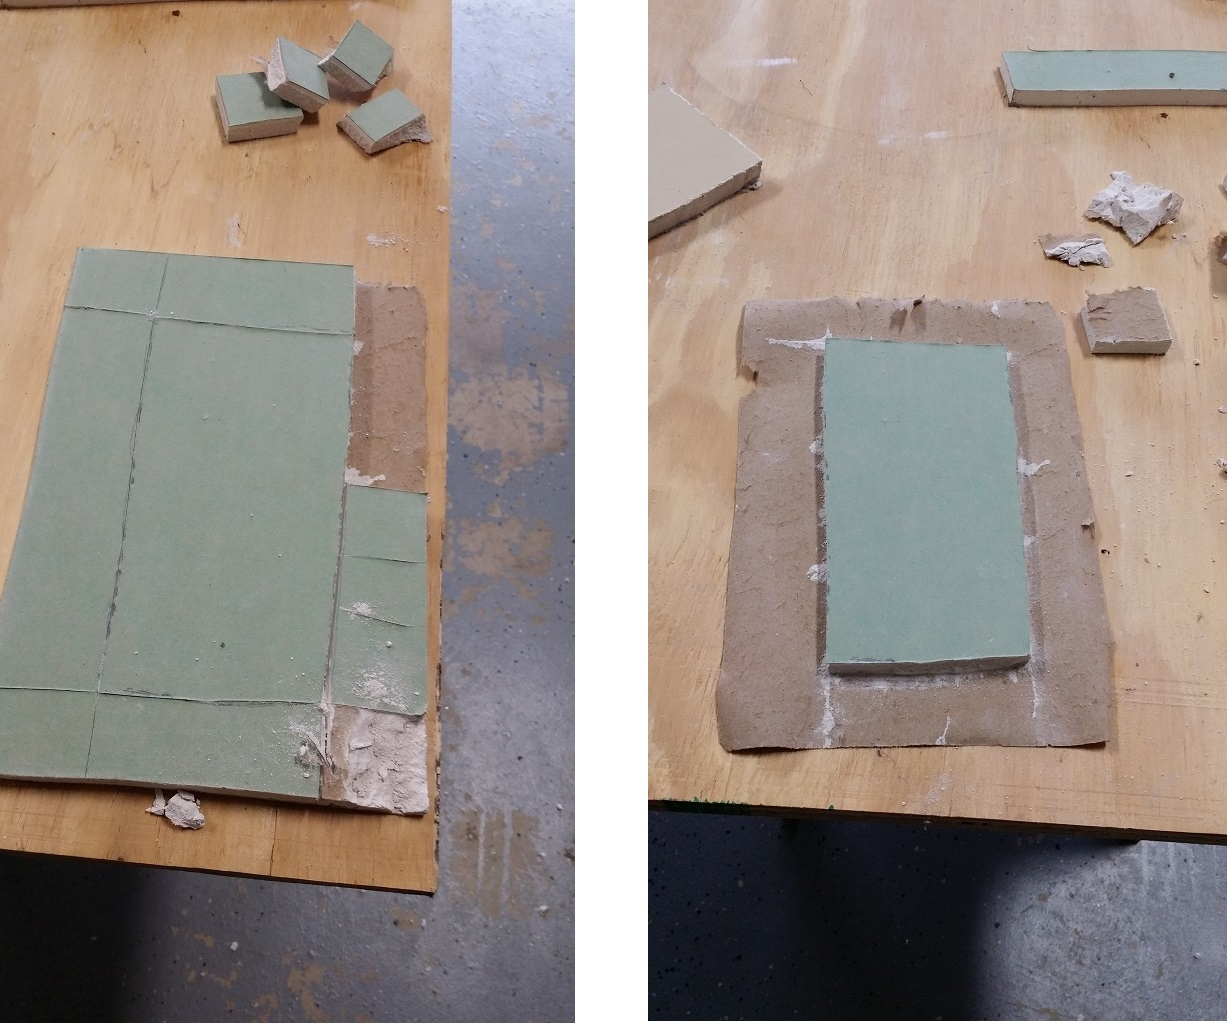
5. Do this to all four sides and your patch should look like this.
<image>
6. Place the patch over the damage and scribe around it with pencil.
<image>
7. Now, cut out the hole at the scribed mark and see if the patch fits.
<image>
8. Smear the drywall compound into the opening and onto the face of the wall to past where the paper edges will reach.
<image>
9. Use the drywall knife to install the patch making sure that the drywall compound is spread evenly to the wall.
The California patch is now complete except for the next coat of compound and final sanding, ready for priming and then painting.
Jointing Compound
The “art” of taping comes from using different sized taping knives to get a smooth, tapered joint. In the hands of the professional “Taper”, the flawless application of joint compound to fill the joints and dimpling associated with drywall finishes, is the ultimate goal.
Joint compounds are available powdered or pre-mixed. Powdered joint compounds come in different textures. Tape is perforated for better adhesion of the joint.
Taping compound is used for the tape coat. It is stronger and coarser than the compounds used for the finishing process.
Topping compound is thinner and finer. It’s used for the fill and finish coats, and for texturing.
All purpose joint compound is halfway between a taping and a topping compound. It comes pre-mixed and is a good choice for do-it-yourself jobs.
Chemically setting compounds come in powdered form only. They are generally very strong and therefore difficult to sand. A do-it-your person might use this to patch and fill gaps created when remodeling plaster for walls.
Taping and Finishing
The entire finishing process is about a 4-step, 4-day process. The first step is called the “tape coat.” This is when you apply joint compound to the seams and embed paper joint tape in it.
Mix up your joint compound. If you’re working with pre-mixed compound, don’t mix it too much, this can work air into the mixture and then you can get little bubbles and craters on the surface of the wall.
Starting on the ceiling, first spread out a layer of “mud”, as the professionals call it, over the joints. For this first coat use a 5″ or 6″ taping knife. Be generous with the mud at this point. Spread out more than you need to fill the seam.
For the first “tape coat” you’ll need a taping knife that’s 5″ or 6″ wide. With each of the next two coats you’ll want to cover an inch or two farther in each direction so you’ll probably need an 8″ to 10″ knife and a 12″ to 14″ knife.
Use a mud pan to hold the mud as you tape the joints.
Key Takeaways
- The trick to spreading out mud is to hold the knife almost vertical to the drywall when it’s full of mud, and press it flatter as you move along the joint. This spreads the mud evenly over the whole stroke of the knife.
- As you tape, keep your knife clean. Constantly scrape it off the side of the pan. Mud that stays on your knife will dry out faster.
For the second pass, lay a piece of joint tape over the center of the joint. Press it lightly with your hand–just to make it stick for now.
The last step for the tape coat is to spread a very thin layer of mud out on top of the tape. This requires a gentle touch. The layer should be thin enough that the tape is still visible through the mud.
Don’t worry too much about a few grooves and streaks on the surface for now. There’ll be more coats to smooth it out later.
Then go back and flatten the tape into the mud, working from the center of the joint out to the sides. You can use pretty firm pressure with this stroke. You’ll end up scraping off some of the excess mud, just leave some mud under the tape.
At the inside corners the tape is creased lengthwise to fit into the cemented joint.
Successive Coats:
The first coat of compound is applied slightlywider than the tape, and under the tape. Successive coats are applied over the tape and to a much greater width.
After the first coat has dried for 24 hours, depending on temperature, air humidity, ventilation, and thickness of filler, apply a second coat over the tape and feather it to a width of about 6 inches.
As you work, also apply the compound to any nail holes and accidental dents in the surface. Fill these areas flush. Smooth the compound with the knife, and with a wet paint brush or sponge.
Some Tapers tape only the left side of the corners, and the ceiling side of the wall ceiling corner. Next coat do the other sides. This allows your knife to slide along dry, flat plaster.
Recap Steps in Taping:
- Cut off full length of tape and work it into the compound. Feather the edges as well.
- Alternate method of taping involves unrolling the tape along the joint as the compound is applied. Spread the tape well into the wet cement.
- The second coat is applied over press it evenly over the joint. Work 24 hours after the second. The compound about 6 to 8 inches wide. Smooth surface and feather edges.
- The third coat is applied over, press it evenly over the joint. Work 24 hours after the second. The compound about 10 to 12 inches wide. Smooth surface and feather edges.
- Butt joints should have at least, a finished mud spread of 600 mm.
- Any rough spots remaining on the wall are sanded out after the mud dries.
- Inside corners are mudded by working the tape in with the corner taping tool while the mud is wet.
- Outside corners are protected with perforated metal corner beads. They are nailed in place and have 3 coats of mud.
Paint
We paint to protect our buildings and to make them more aesthetically pleasing.
Exterior surfaces such as siding and railings that are not painted on a regular basis will soon deteriorate and need to be replaced.
Paints and stains are available in thousands of colours. An otherwise plain home can be made into something special with a carefully chosen colour scheme.
There are two main types of paint: latex (water-based) and oil-based (alkyd). Both types of paint have a range of sheen or reflectivity from flat or dull to very glossy or shiny.
Latex Paint
A water based paint that is practically odour free. One of the major advantages is that it is easy to clean up and it dries very quickly. It can be used over most surfaces where the water base will not affect the surface. It should not be used over metal as it promotes rust. Any type of paint can be used over latex paint.
Latex does not adhere well over shiny surfaces.
Where a flat latex paint is used, the walls will be more difficult to keep clean.
Latex paints normally can be recoated within 12 hours. Check the label on the paint can for drying time.
In exterior applications, latex paints are suitable for stucco (concrete), masonry, siding and fences.
Do not apply latex paints directly over surfaces previously painted with alkyd paints. Consult your paint dealer for proper preparation techniques.
Latex paints, tools and equipment clean up with soap and warm water.
Latex Primer
A primer is used to seal the surface to be painted, especially new drywall. A latex primer can be used under all finishing paints; it has less odour than oil paint and is quick drying. It is not recommended on new wood as it will raise the grain. Primers can be tinted with the colour to be used as the finish coat to help with coverage.
Flat paint
Latex flat paint is suitable for low traffic areas such as master bedrooms and ceilings. Flat paints are warm and hide drywall defects well. This paint is not readily washable.
Egg shell finish
Latex eggshell paint is a low gloss paint that is suitable for moderate traffic areas such as living rooms, hallways etc. These paints are washable and resist marking.
Semi gloss
Latex semi gloss paint is suitable for medium traffic areas such as kitchens, children’s rooms and woodwork. This paint withstands scuffing and has a moderate shine.
High gloss paint
Latex high gloss paint is suitable for high traffic areas and for painting trim and furniture. This paint has a wet look and is tough and durable. This paint does not hide drywall defects.
Oil based (alkyd) paints
Oil based paints (alkyd) are smooth, tough and durable. You should wait overnight before applying a second coat.
Alkyd paints are suitable for high moisture area such as bathrooms, kitchens and laundry rooms. They wash well.
Exterior oil based paints are suitable for siding, trim, doors and windows.
Alkyd paint does not adhere well over masonry, and should not be used over fresh wallboard as it will raise the nap of the paper and leave a rough surface.
Most paints can be used over alkyd paint except for latex paints which will not adhere well.
Fumes are flammable and toxic, so the area must be well ventilated.
Alkyd paints clean up with mineral spirits.
Alkyd paints will fade or yellow over time.
Alkyd primer
An alkyd primer can be used under all finish paints, it is recommended for new wood as it does not raise the grain. It is not recommended for wallboard as it tends to raise the nap on the paper coating.
Alkyd flat paint
Alkyd flat paint is suitable for low traffic areas such as master bedrooms and ceilings. Flat paints are warm and hide drywall defects well. Alkyd paints are more durable than latex paints.
Alkyd semi gloss paint
Alkyd semi gloss paint is suitable for medium traffic areas such as kitchens, children’s rooms and woodwork. This paint withstands scuffing and has a moderate shine. Alkyd paints are more durable than latex paints.
Alkyd high gloss paint
Alkyd high gloss paint is suitable for high traffic areas and for painting trim, metal and furniture. This paint has a wet look and is tough and durable. This paint does not hide drywall defects
Latex or Oil
Latex is the most popular paint for residential interior painting.
Some of the reasons to choose latex paints are:
- easy to apply
- virtually no odour
- dries quickly
- clean up tools with soap and water
Low sheen matte finishes are hard to clean.
Walls previously painted with an oil paint cannot be repainted with latex paint without proper surface preparation.
Some of the reasons to choose alkyd paints are:
- durable finish
- walls painted with water based paints can be repainted with oil paints
- easily washed
Oil paints can have a strong odour and they do not dry quickly. Thinners are required for the cleanup of tools.
Choosing the sheen of the paint for the room that you are painting:
Flat paint may be suitable for a ceiling but not for a bathroom. Semi gloss paint may be suitable for a living room but not as a trim paint. High gloss paint is suitable for trim but probably not a good choice for a hallway wall (shows defects in the wall).
Always consult your painting supplier when choosing a paint product for your project.
Identify and Describe the Use of Solvents and Thinners
Paint thinners
Most household oil based paints specify mineral spirits for cleanup of paint rollers, brushes, spray guns and trays.
Although the terms solvents and thinners are often used interchangeably they have different properties.
Solvents can dissolve a cured surface. Thinners are used to change the viscosity of a liquid finish.
Mineral spirits can be used to thin most household oil paints. Thinners will evaporate after application.
Mineral spirits are colourless and flammable; use them in a well ventilated area.
Regular mineral spirit paint thinners have a strong odour but reduced odour solvents are available.
Wear appropriate safety equipment when working with paint thinners and solvents. Be careful not to ingest or inhale any thinner and avoid any extended exposure to the skin.
Some other solvents and thinners are:
- Naphtha
- Turpentine
- Denatured-alcohol
- Lacquer thinner
- Xylene (xylol)
- Water is used as a thinner for latex paints only.
Identify and Describe the Use of Special Paints
Floor paint
There are occasions when floors are painted; typically the only floors that are
painted (with the exception of faux finishes) are concrete floors.
Garage floors and basement slabs are floors that may be painted.
There are different products used to paint concrete floors:
- latex floor paints
- alkyd floor paints
- epoxy floor paints
Latex floor paints are inexpensive paints that are designed to withstand foot traffic. These paints feature good resistance to abrasion, oils and washings. These paints clean up with soap and water. These paints are suitable for basement floors. These paints are not a good choice for garage floors.
Alkyd floor paints are often sold as floor and porch paints. These paints resist dirt, oil, grease and stains.
Epoxy floor paints are generally available as a two part painting system. Low end relatively inexpensive water based paints are available but for better results consider a higher end (and priced) painting system. Epoxy finishes are easy to maintain and keep clean. They are a better choice for garage floors.
Sealers and Primer Sealers
Transparent wood sealers sink into the pores to binding the fibres together, making them easier to sand. Stain, oil, or alkyd paint can be used directly over the wood sealer.
Primer sealers or shellac are used over wood knots to prevent the wood resins from bleeding through.
Masonry sealers are used on concrete and are effective in slowing water seepage through basement walls.
Metal Primer
This is a rust proofing coating to protect the metal from rusting. It is used under oil based metal paints. In many paints the paint and the primer are combined so that only one coat is needed. Marine enamels are also suitable for painting metal surfaces.
Acrylic (Water-borne paint)
Acrylic (water-borne) paints are a relatively new type of paint that perform like solvent based paints but primarily use water as solvent to disperse resin. These paints reduce the toxicity and odours associated with solvent based paints and are much safer to work with.
Water-borne paints also clean up with soap and water.
Identify and Describe the use of Wood Finishes
Varnish
Varnish is a clear tough finish used over bare wood to protect the surface. Varnish comes in a matte, semi-gloss and high-gloss finish. Varnish is moisture resistant and durable.
Clean up requires solvents.
Lacquer
Lacquers are rapid drying finishing materials that have a very strong odour.
Lacquers dry by the evaporation of the solvent or thinner and form a protective film from its nonvolatile contents. Modern day lacquers may have as many as twenty or more ingredients but the main constituent is nitrocellulose. Acrylic lacquers are used in automotive painting.
Shellac
Shellac gives a smooth coating over bare, bleached or stained wood. It cannot be used over painted surfaces as the alcohol base will damage the paint. Shellac dries quickly, but it is easily damaged by alcohol or water which will leave white marks on the surface.
An alcohol based solvent is needed for clean up.
Urethane Paints
Urethane paints are excellent for areas to be protected from moisture and chemical spills. They are a durable plastic coating, and dry very quickly.
This coating can be used over almost any surface.
Clean up requires special solvents.
Stains
Stains are designed to bring out the colour in the wood, the stain can be semi-transparent, which leaves much of the wood grain showing, or solid, which covers the wood grain more deeply to leave an even colour along the surface.
Water based stains will penetrate the wood more deeply for longer lasting protection. Oil based stains are often used because they will give a smoother finish, since they do not raise the grain of the wood.
Preparing the Walls and Ceilings for Painting
The preparation of the wall surface is perhaps the most important part of the painting job.
Sometimes you may need to wash the walls before painting. You can use a mild detergent if the walls are not too bad. If the walls are quite dirty or greasy like in a kitchen cooking area, you can wash the walls with TSP (Trisodium phosphate). TSP is used as a cleaner and for paint preparation (washing surfaces before painting helps insure a good clean “bite” for the finish coats of paint). This product will remove grease as well as any dirt. If there is mildew to be removed, use a mixture of 1 part bleach to 3 parts water to bleach.
Consult the manufacturer’s recommendations for mixing; be aware that TSP in a concentrated form can strip paint. Handle with care. Wear eye protection and rubber gloves. Avoid any skin exposure. Rinse off the TSP or bleach mixture as well with clean water.
Carefully remove all loose and peeling paint with a scraper. Fill all the holes with a suitable wall patch. Drywall compound (mud) works best. It comes pre-mixed or you can mix your own small batch. Do not use spackle or re-surfo on drywall as they are hard to sand when dry. Apply the wall patch in layers. Allow the patching compound to dry before applying subsequent layers. Make each coating of compound a little bigger than the last one and feather all the edges. Two or three applications may be necessary.
Carefully sand the patches with a fine grit sand paper. Feather the edges when you sand but do not over sand or you will be applying more patching compound. Make sure that you do the best job that you can; satisfactorily fixing defects in a painted wall is difficult to achieve.
Before painting the wall, it is important to sand the whole surface of the wall lightly to promote adhesion of the paint. You would use a fine sand paper (150 grade) and a pole sander to reach the top of the wall. It is also recommended that you sand very lightly between coats of paint. Again, this helps with better adhesion of the paint to the surface.
Vacuum the wall and the floor before starting any painting. Dust can ruin a paint job.
Cover the floors and any equipment, to protect them from paint splatters.
Apply primer to unpainted areas including the patches or the patches will “flash” through.
Make sure that you have sufficient paint on hand for the job, as matching the paint afterwards may prove to be difficult. If you do not have sufficient paint to cover the entire room, stop painting in a corner, if there is a slight difference in colour, it will show up in the middle of a wall but will not be noticed if it is on different walls.
Clean up any spatters of paint right away, it is much easier to clean up if the paint is still wet.
Clean up all tools and equipment as soon as you finish painting.
Select the right paint for the job. If in doubt, talk to the people in the paint store. They have access to information that you don’t have.
Make certain that the areas that you are going to paint are primed or the paint may fail.
In most cases two coats of finish paints are recommended for a long lasting paint job.
Preparation of a Wood Surface
If you have to repaint a previously painted wood surface you will have to prepare the surface so that the new paint will have a clean and structurally sound surface to bond to.
If you paint over a piece of painted wood that has not been prepared properly the paint job is almost guaranteed to fail. You could use the best paint available but it would still fail if you did not take measures to ensure that the substrate was clean and sound.
Remove the old finish
Peeling, pitted chipped or crazed paint will need to be removed before new paint is applied. How you accomplish this depends a great deal on how large the job is.
There are three ways of stripping paint from wood:
- mechanical
- chemical
- heat
Large jobs such as preparing the siding on a house to be repainted will probably involve paint scrapers, sanders and lots of elbow grease.
Paint scrapers are a very effective method of removing loose and peeling paint. Although this may seem like a very labour intensive process (and it is), it is probably the most effective way of making sure that you have achieved the results that you are aiming for.
Sanders are only effective on small areas (with the exception of wood floors). Sanders are of limited use on large vertical surfaces.
Power sanders can be effective when removing paint on smaller projects that have flat surfaces (like doors).
Blow torches and electric heat guns are only useful when stripping small projects. Be careful when working with an open flame.
Heat the item and use scrapers to remove the loosened paint. Some sanding will be required before you paint the object.
Chemical strippers are available for removing paint. Many of these strippers contain methylene chloride which is considered by Health Canada to be “toxic” to human health.
!! When using paint strippers with methylene chloride, wear gloves, goggles and use a good quality breathing mask designed for use with organic chemicals.
When patching wood there are different products designed for different applications.
If you are going to paint the surface you could use any appropriate wood filler that will accept paint.
Tinted wood fillers are available for stained surfaces. Again, wood fillers should be applied sparingly as they are hard to sand down later.
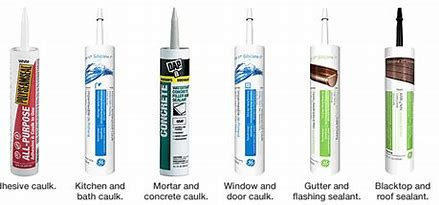
Calking and Sealants
To apply caulking to counter tops in bathrooms and kitchens, make sure that the paint is completely dry before applying any caulking. Make sure that the area is clean, clear of dirt and water.
Use a good sink and bathtub caulking for this project. Cut the end on an angle. Make this cut very small, you can always cut a little more of if needed. Holding the caulking gun on the correct angle, you will be able to lay in a proper bead of caulking that does not require any further work. If you have to remove a little caulking somewhere, a wet finger is ideal for that purpose as the caulking will not stick to water.
To caulk around the exterior of doors and windows, use a good caulking that will stand up to your weather conditions. Make sure that all painting is completed in the area where you will be applying caulking. Be sure that the area is clean and apply a fairly wide band of caulking, making sure that the material penetrates deeply into the crack; you want to be sure that it is sealed completely.
Caulking for both the interior and the exterior come in a variety of types and colours, be sure to use the correct type of caulking for your purpose and that the colour blends in with the surrounding colours.
Use a silicone based caulking in kitchens and bathrooms. They will not accept paint, but are easier to keep clean. When using silicone caulk, you need to have solvent based cleaner and rag on hand to clean up any mess.
Use a latex based caulking on the exterior, you can paint over them.
(This section of this Information Sheet was adapted from Module Q2 Prepare surfaces for paint and stain 2 – 7, Residential Building Maintenance Worker program with permission from the BC Residential Construction Industrial Training Organization, copyright 2010.)
There is a caulking compound for every purpose. They come in two sizes of tubes and are used with a caulking gun. Caulking compounds can also be purchased in bulk form and loaded into the chamber of special guns.
Acrylic Base
Acrylic-base caulking cures by evaporation of the solvent, and it must be applied in air temperatures between 4˚C. It is used to seal wood, glass, concrete, ceramic tile and aluminum. It can be applied over a damp surface, but it is not suitable for continuous immersion in water. The finished caulking can be painted.
This is a low-odor, nonflammable compound, which can be cleaned up with water while the caulking is wet or cleaned with solvents after it has cured.
Polysulfide Base (Rubber Base)
Polysulfide caulking is used to seal pre-cast tilt-up panels, pre-cast facings and curtain walls. It is considered to be a general building caulking.
Polysulfide is a rubber-based sealant that comes as a one or two-part, chemically curing caulking.
All surfaces must be thoroughly clean and dust-free. A special primer is used to prepare the surfaces for the caulking. The caulking should not be applied to wet or frosty surfaces.
Safety Precautions for using Polysulfide caulking:
- Avoid prolonged or repeated contact with the skin, breathing the vapors or ingestion. Use adequate ventilation or air-supplied respirators during applications, and wear gastight goggles and gloves.
- Obtain immediate medical attention if the material is ingested. If the primer or caulking comes in contact with the eyes or skin, wash it off immediately with plenty of water.
- Wash hands and face before eating.
- Keep this sealant away from heat, sparks, and open flames; it contains flammable and volatile solvents.
- Keep out of the reach of children.
Butyl Base
Formulated from a blend of butyl rubbers, this caulking provides a soft flexible seal with minimum shrinkage. It is used for sealing the gap between the exterior finish and window and door frames.
This caulking is available in many colours and can be painted. Mineral spirits are used to clean tools and caulking gun smears.
Polyurethane Base
This one-component joint sealant with a polyurethane base is designed to resist moisture and withstand movement, shear and deflection. A high-performance, moisture-curing sealant, it is used where considerable movement is expected. It is not recommended for horizontal joints in floors and decks, or for joints that will be submerged in water for prolonged periods of time. It should not be used with polystyrene, or with glass or plastics.
Immediately remove all excess sealant and smears adjacent to the joints as work progresses. Use solvents, recommended by the manufacture, for clean-up.
Safety Precautions for the use of polyurethane caulking:
- Do not use in confined areas without proper ventilation. Avoid inhaling vapors. Contains ignitable solvents. Keep away from an open flame or high heat.
- If inhaled over a prolonged period, move to fresh air and avoid further overexposure. No special treatment is required.
- Wash hands and face before eating.
- Guard against ingestion and contact with skin and eyes.
- If this sealant comes in contact with your skin, wash with a hand cleaner, then with soap and water. If it gets in your eyes, flush them immediately with running water for 15 minutes and get medical attention. If ingested, call a physician immediately.
Silicone Base
Silicone-base caulking is a one-part, silicone-rubber sealant. It works well with non-porous materials such as glass, aluminum and ceramic tile. Silicone base caulking cannot be painted. Surfaces should be clean and dry before applying the caulking. It needs atmospheric moisture for curing.
Prior to applying caulking, clean surfaces with vinegar. Masking the sides of the bead before applying will simplify clean up. Remove the tape immediately after tooling.
Safety precautions for the use of silicone caulking:
- Avoid repeated or prolonged contact with the skin.
- If uncured sealant comes in contact with the eyes, immediately flush them with plenty of water.
- Use goggles when working overhead.
Backer Rod
A backer rod is used between joints to provide a backing for caulking. The rod should be installed so that it is tight fitting and set back from the surface the distance recommended by the caulking manufacturer.
A backer rod must be compatible with the caulking applied to it. Check the manufacturer’s specifications for the correct type of rod to use.
A backer rod may be plastic foam, expanded rubber, or neoprene. Caulking sealants are tooled to form an hourglass cross section that will allow expansion and compression as the members on either side of the joint move.
(This section of this Information Sheet was adapted from Module Q3 Prime, Paint and Stain Surfaces, p. 9 – 12, Residential Building Maintenance Worker program with permission from the BC Residential Construction Industrial Training Organization, copyright 2010.)