55 Boiler Operation Maintenance
Learning Objectives
- Describe startup steps and possible abnormal conditions
- Describe daily check operating conditions
- Explain emergency conditions and accidents that can occur during boiler operations
Essential Question
What are signs that a boiler is operating normally? Or abnormally?
Introduction
This chapter focuses on general guidelines on boiler operation and maintenance. Always check the manufacturer instructions for guidelines specific to the equipment in order to have safe and effective usage of the equipment.
Always keep a written record of all inspection and maintenance completed for all equipment.
Startup Procedure
This section describes in detail a general startup procedure for boilers.
The information in this section is taken from PanGlobal (2017) under the fair use policy.
Preparation for Startup
The following are some preliminary steps that should be taken:
- Make sure that the boiler has a valid inspection certificate. Without the certificate, the boiler may not be legally started up. The certificate should be conspicuously placed adjacent to the boiler or retained and safeguarded in a manner approved by the inspector. Be aware that if there is no certificate, it may take some time to get one.
- Inspect the fireside and waterside of the boiler to make sure that no foreign matter, such as tools or tags, is left behind.
- If the waterside of the boiler is dirty or coated with grease or oil, clean the boiler chemically first.
- Before filling the boiler with water, make sure that the firing equipment is ready for startup. This is necessary because the boiler should be fired up as soon as it is filled with water, to heat the water sufficiently to drive off the dissolved gases in order to prevent corrosion.
In order to prepare for the startup, the following procedure should be completed.
Note: the water system should already be filled, the boiler stop valves in the supply and return lines should be closed, and the steam unit should be a single unit.
- Review the manufacturer’s recommendations for start of the boiler.
- Before closing manhole and hand hole openings, make sure that the seating surfaces are clean. Traces of old gaskets left behind may cause leakage. Use new gaskets coated with powdered graphite or a gasket compound. This makes removal easier the next time the boiler is opened up.
- Before filling the boiler, ensure that manhole and hand hole covers, and/or washout plugs, are in place and properly tightened. Check that the blowoff valves on the boiler and the drain valves on fittings and controls are closed.
- Open the boiler vent and fill the boiler with water to the desired level. Add chemicals if and as required.
- Water: fill the boiler completely until water exits the vent, then close the vent valve.
- Steam: ensure the gauge glass is in full service. Fill boiler to desired level (slightly below normal working level to allow for expansion) and leave vent valve open.
- Check all points for leakage such as manholes, hand holes and drains.
-
Water - When the boiler is filled, open the stop valves in the supply and return lines to the boiler and check that all other stop valves in the system are in the open position.
- Check the altitude gauge on the boiler to see that the system is under the minimum static pressure required to maintain a positive pressure at the highest point in the system during operation. If the boiler is equipped with a combination altitude-pressure gauge, the pressure will be indicated by the movable hand. Align the stationary hand with the movable hand, so that when the boiler and system are heated up and in operation, it can be seen at a glance that this minimum pressure is maintained.
- Check the level in the expansion tank. It should be in the lower part of the gauge glass.
- Start the circulator and vent the air at high points in the system.
Steam - If the heating system is going to be warmed up with the boiler, open the suction and discharge valves on the vacuum or condensate pumps, and set the pump switches to the ON position. Open the water supply to the feeder valve, if there is one.
- Check that fuel is available up to the stop valves in the pilot and main burner supply lined. If fuel oil is used, also open the stop in the return line and make sure that the lines, filter, and fuel pump are properly primed and free of water.
- Check that the fresh air supply to the boiler room is obstructed.
- Check the settings of the operating and limiting controls.
- On boilers with a high-low fire control, set the control switch on the panel to low unless advised otherwise in the manufacturer’s manual.
- On boilers with a modulating control, set the manual-automatic switch on manual and the flame control switch in the lowest position.
- Reset all limit switches, such as low water, which could have been tripped or opened during shutdown.
- Check that the boiler control switch on the panel is in the OFF position.
The boiler is now ready for startup.
Startup
- On gas-fired boilers with a standing pilot, open the pilot valve and light the pilot. Follow the lighting instructions given on the instruction plate attached to the burner manifold or automatic valve. When the pilot is lit and burning satisfactorily, open the stop valve in the fuel line to the main burner.
- On the boilers with an intermittent, or interrupted pilot, open the stop valves in the fuel line to the pilot and to the main burner.
- Close the main switch to supply power to the boiler.
- Turn the boiler control switch to the ON or START position. The programming relay or control will take over and start up the boiler in the proper sequence.
- Warm the boiler up slowly to prevent excessive stresses in the boiler metal due to uneven expansion and thermal shock.
- Inspect the boiler frequently during the warm-up period. Observe the operation of the burner. Check for leakage at hand holes, washout plugs, valves, and pipe connections.
-
Water - Do not leave the boiler until the operating control reaches its cut-out temperature. Make sure that the control shuts off the burner.
- When the burner shuts down, check the water pressure on the altitude gauge and the water level in the expansion tank.
- Check the safety relief valve for evidence of leaking. Perform the try lever and pop tests.
Steam - Close the vent valve when the boiler pressure reaches 15-20 kPa (2-3 psi). All the air should have been driven out of the boiler.
- When the boiler is thoroughly warmed up, steam is being produced and good water circulation has been established, the firing rate may be increased slowly.
- While the boiler is building up pressure, blow down the water column and gauge glass to ensure the connections are clear and the level is correct. Also, test the low-water cut-offs by opening the drains on their housings.
- Stay with the boiler until the operating control reaches its cutout point. Make sure it shuts off the burner at the right pressure.
- Check the safety valve for evidence of simmering. Perform the try level and pop tests.
- Enter the following in the log book:
- Date and time of startup.
- Any irregularities observed and corrective action taken.
- Time when control shut off the burner at established temperature/pressure, tests performed, etc.
- Signature of operator.
Routine Operation and Maintenance
It is really important to regularly and carefully inspect boilers to ensure they are working safely and effectively. There are some checks that should be held on a daily basis.
Pressure and Temperature Checks
| Water Units |
|
| Steam Units |
|
Water Levels
| Water Units |
|
| Steam Units |
|
Burner Operation
Inspect the burner flame. Check for :
- Burning brightly and evenly
- Signs of smoking
- If there is smoking, check the air intake in the boiler room for any obstructions (snow, ice, bags, etc.).
- Other possible reasons, check if the burner nozzle is dirty: dirty burner nozzle, low fuel temperature, incorrect fuel-air ratio.
- Adjust the above to stop the smoking.
Stack Temperature
Flue gases’ temperature can be checked using a stack temperature. It shows if the heat exchange between the flue gases and water in the boiler is working. If the heating surfaces on the fireside and waterside are both clean, the maximum amount of heat can be exchanged, and in this case, the stack temperature will at its lowest for each specific firing rate. Heat transfer can be negatively impacted by the following:
- Soot deposits on the fireside due to improper combustion.
- Scale and sludge deposits on the waterside due to incorrect water treatment or a lack of water treatment.
The gases leave the boiler at a higher temperature which has a negative impact on the boiler efficiency. The stack temperature should be observed and recorded so that any changes can be analyzed, and any problems can be fixed (for example, cleaning). A slight change is not harmful towards the equipment, but a large difference will cause issues, such as furnace explosions, damaged tubes, etc.
Water Treatment & Make-up
| Water Units |
|
| Steam Units |
|
Blowing Down
| Water Units |
|
| Steam Units |
|
Intermittent Blow Down Valve
Continuous Blow Down Valve:

Example:
Inspection
It is important to regularly and properly completing inspections in the boilers. Generally, the following should be inspected:
- Leakage
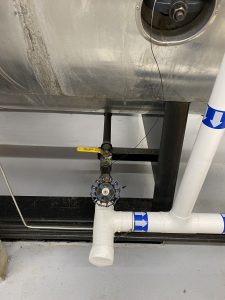
- safety relief valves
- manholes
- hand holes
- clean-out plugs
- valves
- pipe connections
- Unusual noises or conditions
- Equipment
- circulating pumps
- chemical feeders
- air compressors and feedwater
- condensate
- vacuum pumps
- fuel pump (if oil-fired)
- fuel level (if oil-fired)
- Cleanliness/Housekeeping
- oil spills
- storage of rags
- no boxes or flammable materials need the boiler
| Safety Relief Valve |  |
| Pipe Connection Union | 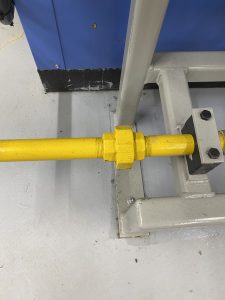 |
| Connection Elbow | 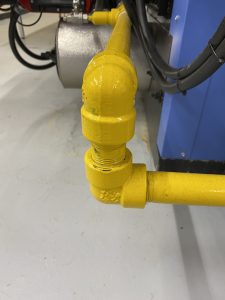 |
| Connection T | 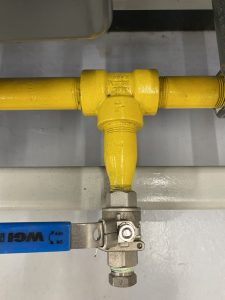 |
NOTE: ensure to keep a record of all inspections, checks, testing, etc.
Emergency Conditions
Emergency situations and unforeseeable conditions can occur while operating steam boilers. Read the different situations below to better understand these situations and the causes that lead to such situations.
Abnormal Water Loss
This can occur when make-up water is consistently needed or when water treatment chemicals are required to be adjusted to maintain the correct concentration levels in the boiler. Increasing or continuing water treatments is NOT the solution. The boiler and all its parts should be inspected to find the cause of this issue in order to repair the issue as soon as possible.
To do so, tightly close the blowdown valve and close all drain valves. Check and inspect all parts, including but not limited to, pumps, valves, pipping, terminals, etc. If there is no issue found, it may be necessary to shut down the boiler and conduct a hydrostatic test to ensure that there are no leaks or issues with the pressure.
Low Water Level
If the water level continues to drop, this may be caused by one of the following:
- feedwater level controller not working properly.
- feedwater or condensate pump failure.
- water supply to the pump is being interrupted.
- ruptured firetubes or open blow-off valves that lead to leakage from the boiler.
The boiler should shut off automatically if the water level drop below the cut-off point. If this does not happen automatically, the operator should check the glass gauge to see the water level (open it if you need to confirm). If the water level is low, immediately shut down the boiler. Once the boiler is cooled off, drain it. Check for any damage due to overheating. If there is damage, contact the Boiler Inspector. If there is no damage, fill up the boiler, but do NOT start operating it until the issue is determined and resolved.
High Water Level
The information in this section is taken from PanGlobal (2017) under the fair use policy.
Should the water in the gauge glass of a steam boiler show a higher than normal level or even climb out of sight, the level should be brought back to normal to prevent carryover of the water with the steam.
If the cause of the high water level is a malfunction of the boiler water level control devices, it is imperative that the feedwater system be shut down immediately. Any attempt to lower the water level before stopping the feedwater input will result in the control system trying to maintain the level, which is not what is wanted. Further, opening the blowdown valves can result in a pressure drop and this can result in boiler water “swell”, a condition in which the water volume tries to increase. Remember, feedwater temperature is much lower than the boiler water temperature; stopping its flow should result in a slight boiler pressure increase. This in turn will cause “shrink” of the boiler waiter, a positive factor in the situation we are trying to resolve.
It is in this condition of boiler water swell that results in no boiler having a high water level fuel cut-off device. Any drop in pressure will cause this, therefore it is important to maintain pressure.
Should there be “priming” and resulting water hammer, the operator should stop the feedwater input then close the steam outlet valve. The boiler will then trip on high steam pressure. Whenever there is evidence of water hammer, it is imperative to always isolate the system at the source and not open drains or any other valve that would cause glow to happen or the pressure to drop. Should water hammer result, the boiler must be removed from service immediately and thoroughly inspected by a jurisdictional boiler inspector, an insurance company inspector, and an inspector from the plant operations group before the unit can be returned to service.
The cause of trouble, a defective feedwater control, should be repaired as soon as possible.
Blower Failure
If the blower or fan fails, the combustion air supply will stop. In this situation, the fuel supply has to be shut off immediately to avoid a furnace explosion. Most boilers will have a low-air cur-off switch that will automatically cut off the power to the fuel valve immediately after the level drops below the minimum safe value.
Flame Failure
Following are the possible causes that could lead to flame failure:
- insufficient fuel oil supply because of a plugged filter.
- presence of water in the fuel.
- an excess of air supply.
- insufficient gas pressure.
When this happens, the fuel flow to the burner has to be stopped immediately so the furnace does not fill with unburned fuel which can lead to an explosion. A lot of boilers now have flame detection devices that will stop the fuel supply right away. It is therefore really important to regularly test these devices to ensure these safety precautions fall into place when they are needed!
Maintenance Procedures
Regular and thorough maintenance can increase the safety, the lifetime and the efficiency of boilers. There are also legal requirements for specificized inspection intervals for boilers and pressure vessels. Follow the instructions specific to the boilers used at the facility. This section discusses general instructions for maintenance. Always refer to the manufacturer’s instructions. It is very important to take all precautions and steps to ensure the safe operation of all equipment.
| General Maintenance |
|
| Lubrication |
|
| Washing out the Boiler | After the initial three month of use, new boilers should follow this procedure:
During this, the tubes and tube sheets can be inspected for scale or pitting to see the efficacy of the water treatment. This entire should be repeated as often as needed. |
| Cleaning the Firetubes | Follow this procedure:
|
| Refractory Maintenance |
|
| Burner Maintenance | Regularly observe the burner flame during operation to ensure that the flame is symmetrical. That would mean that the burner is clean. Gas burners don’t usually need much maintenance, simply inspect once per year. Oil burners need to be cleaned regularly by following the procedure given by the manufacturer. Here is a general procedure:
|
Refractory:
How to clean out a Burnham oil boiler?
Additional Resources
Copyright © 2017 PanGlobal. All rights reserved. Under Fair Use Policy.
PanGlobal. (2017). In Boiler Operation Maintenance. Low Pressure Boiler Components & Operation (2nd ed.). PanGlobal Training Systems Ltd.